Table of Contents >> Show >> Hide
- Why DIY Air Dry Clay Bowls Are So Popular
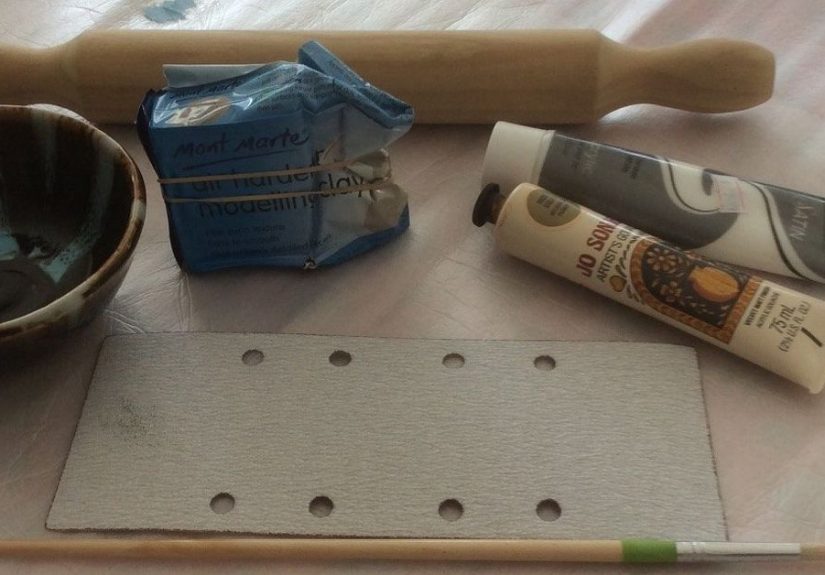
- What You Need to Make Air Dry Clay Bowls
- How to Make DIY Air Dry Clay Bowls Step by Step
- How to Paint and Finish Your Air Dry Clay Bowl
- Common Mistakes to Avoid
- Creative DIY Air Dry Clay Bowl Ideas
- How to Use Air Dry Clay Bowls Around the House
- Experience Section: What Making DIY Air Dry Clay Bowls Really Feels Like
- Final Thoughts
- SEO Tags
If you have ever looked at a cute little catchall dish in a boutique and thought, “That is adorable, but why does it cost the same as my lunch?”, welcome home. DIY air dry clay bowls are one of those rare crafts that feel fancy, look expensive, and still let you work at your kitchen table in pajama pants. No kiln, no pottery wheel, no art degree, and no mysterious “artisan dust” required.
These handmade bowls are simple enough for beginners, but customizable enough to keep crafty overachievers happily occupied for hours. You can make a smooth minimalist ring dish, a textured key bowl for the entryway, a marbled trinket tray for your dresser, or a leaf-impressed catchall that makes guests ask, “Wait, you made that?” The correct answer is always yes, followed by a humble nod and dramatic sip of coffee.
In this guide, you will learn how to make DIY air dry clay bowls from start to finish, including what tools you need, how to shape the clay, how to avoid the usual cracking drama, and how to paint and seal your finished piece. You will also find design ideas, beginner mistakes to avoid, and a longer reflection section at the end full of real-life crafting experiences that make this project even more fun.
Why DIY Air Dry Clay Bowls Are So Popular
There is a reason air dry clay bowl crafts keep showing up on home decor blogs, craft pages, and gift guides. They hit the sweet spot between easy and impressive. Air dry clay is approachable because it does not need to be baked in a kiln, and most brands can be painted once dry. That makes it ideal for quick home decor projects, handmade gifts, and weekend crafts that do not require a full studio setup.
Another reason these bowls are so loved is that they are genuinely useful. A small clay bowl can hold rings, earrings, hair ties, paper clips, loose change, keys, tea bags, or the random little objects that somehow multiply on every flat surface in your home. In other words, it is both a craft project and a tiny act of organization. We love a multitasker.
Air dry clay bowls are also incredibly flexible in style. If your taste is modern, keep the shape shallow and simple in matte white, beige, or terracotta. If you want something playful, go with scalloped edges, painted stripes, polka dots, or bright color blocking. If you lean rustic, use textured leaves, lace, or stamped patterns. The project changes personality fast, which is excellent news for creative people and terrible news for anyone trying to stop at just one bowl.
What You Need to Make Air Dry Clay Bowls
Basic Materials
- Air dry clay
- Rolling pin or smooth bottle
- A small bowl to use as a mold
- Parchment paper, wax paper, or plastic wrap
- Craft knife or clay tool
- Small cup of water
- Sandpaper or sanding block
- Acrylic paint, if you want color
- Clear acrylic varnish or sealer
- Optional texture tools such as lace, leaves, stamps, or a comb
You do not need expensive tools to make a good-looking clay bowl. A rolling pin can be swapped for a smooth drinking glass, and texture can come from things already around the house, like a doily, a fork, or even a patterned kitchen towel. One of the best things about this project is how low-maintenance it is. The clay is doing the heavy lifting. You are mostly there to guide it and occasionally stop it from becoming a lopsided pancake.
Choosing the Right Air Dry Clay
Not all air dry clay feels exactly the same. Some are soft and lightweight, while others dry denser and feel more like traditional clay. For bowls, a smoother air dry clay is usually easier to roll and shape neatly. White clay is popular because it creates a clean base for paint, but terracotta-colored clay also looks beautiful if you want an earthy, pottery-inspired finish.
If you are a beginner, start with a basic white air dry clay and keep the design simple. A round shallow bowl is much easier than an extra-deep bowl with dramatic wavy edges. You can absolutely become the Michelangelo of trinket dishes later. Today, we aim for “cute and structurally sound.”
How to Make DIY Air Dry Clay Bowls Step by Step
1. Prep Your Workspace
Lay down parchment paper or wax paper so the clay does not stick to your table. Have your tools nearby, and choose the bowl you want to use as a mold. A shallow bowl usually works best because deep forms can make removal trickier and increase the chance of cracking or distortion while drying.
2. Knead the Clay
Take a portion of clay and knead it with your hands until it feels soft and workable. This step matters more than people think. Clay that has not been kneaded well can crack more easily or develop uneven texture. If it feels a little dry, dampen your fingers lightly with water and keep working it. Think of it like waking the clay up before asking it to become home decor.
3. Roll It Out Evenly
Roll the clay into a slab about 1/8 to 1/4 inch thick. Try to keep the thickness even all the way across. Uneven slabs are one of the easiest ways to end up with bowls that dry unevenly, warp, or crack. Thicker clay can feel sturdy, but it also takes longer to dry. Too thin, and the bowl may become fragile. Aim for the Goldilocks zone: not too thick, not too thin, and not suspiciously shaped like a map of Florida.
4. Cut the Shape
Use a knife, clay cutter, or even the rim of a larger bowl to cut out your basic shape. Round is the easiest, but oval, leaf, freeform, and scalloped shapes also work well. If you want a modern organic look, resist the urge to make everything perfectly symmetrical. A slightly irregular edge can feel charming and handmade instead of stiff.
5. Add Texture or Decorative Details
This is the fun part. Press a lace pattern into the surface, roll over a leaf to transfer veining, stamp initials, carve lines with a skewer, or gently score a geometric pattern. If you want a marbled effect, twist two or more clay colors together before rolling them out. If you love clean lines, skip the texture and let paint do the talking later.
6. Shape the Bowl
Line your mold bowl with a bit of plastic wrap or parchment paper if needed, then gently place the clay shape inside it. Smooth it lightly so it follows the curve without stretching too much. You can also drape the clay over the outside of an upside-down bowl if you prefer that form. Both methods work, but the key is gentle handling. Air dry clay likes confidence, not wrestling.
7. Smooth the Edges
Dip a fingertip in water and run it lightly around the edges and surface to smooth cracks, fingerprints, or rough spots. Do not soak the clay. A little water helps refine the shape; too much turns your elegant bowl into a soggy emotional event. Take your time here because clean edges make a big difference in the final look.
8. Let It Dry Completely
Set the bowl aside and let it dry according to the clay instructions. Many air dry clays harden over one to three days, depending on thickness and humidity. Resist the urge to rush. Yes, waiting is boring. Yes, poking it every thirty minutes is tempting. No, that does not help. Let the bowl dry thoroughly before painting or sealing it.
How to Paint and Finish Your Air Dry Clay Bowl
Sand First for a Cleaner Look
Once the bowl is completely dry, use fine-grit sandpaper to smooth rough edges and tidy the surface. This is the step that makes a beginner project look much more polished. Sanding can soften an awkward rim, remove tiny bumps, and give your bowl a more finished feel. Wipe away dust before moving on to paint.
Painting Ideas
Acrylic paint is usually the easiest choice for air dry clay bowls. It dries quickly, comes in about eleven billion shades, and lets you create almost any style. Here are a few easy design directions:
- Minimalist: Leave most of the bowl unpainted and add a single stripe or painted rim.
- Boho: Use warm earthy colors like rust, mustard, blush, and cream.
- Modern: Try black-and-white patterns, abstract brushstrokes, or color blocking.
- Nature-inspired: Paint leaf details, flowers, mushrooms, or soft stone-like speckles.
- Gift-worthy: Add initials, a short word, or tiny gold accents.
If you are painting a bowl for a bedroom or vanity, soft neutral tones can look especially elegant. For a craft room or entryway, brighter colors make it easier to spot keys, clips, or jewelry. In other words, this craft can be practical and pretty, which is the craft equivalent of having excellent hair and being able to assemble furniture.
Do You Need to Seal It?
Sealing helps protect the painted finish and can add either a matte or glossy effect, depending on the product you choose. A clear acrylic varnish is a common option. That said, sealing does not magically turn standard air dry clay into fully waterproof dinnerware. These bowls are best used as decorative pieces or dry-item catchalls, not as everyday food bowls for soups, cereal, or anything wet and messy. If you want a bowl for actual food use, you need materials specifically rated for that purpose.
Common Mistakes to Avoid
Making the Clay Too Thin
Thin clay looks refined while wet, but it can dry fragile. If your bowl feels delicate before drying, it will not suddenly become heroic later.
Using Too Much Water
Water is helpful for smoothing, but overdoing it weakens detail and can lead to soft spots, sticking, or more cracks later.
Skipping Dry Time
Painting or sealing before the bowl is fully dry can trap moisture and ruin the finish. Patience is part of the project, even if patience is rude.
Ignoring Uneven Thickness
Bowls dry better when the clay thickness is consistent. Thick bottoms and thin rims often lead to uneven drying and warping.
Expecting Waterproof Results
Air dry clay bowls are charming, not invincible. Treat them gently and keep them away from standing water.
Creative DIY Air Dry Clay Bowl Ideas
If you want to go beyond the basic round bowl, here are a few stylish variations:
- Marbled jewelry dish: Twist white and terracotta clay together for a swirled look.
- Leaf bowl: Press the clay over a large real or faux leaf for natural texture.
- Scalloped trinket bowl: Cut the edges with a repeating curve for a romantic finish.
- Stamped quote bowl: Add one word like “keys,” “rings,” or “hello.”
- Paint-dipped bowl: Leave half the clay natural and paint the lower half.
- Textured entry bowl: Use lace, woven placemats, or carved lines for visual depth.
These also make thoughtful handmade gifts. A small custom bowl for a teacher, best friend, sibling, or parent feels personal without being overly complicated. Add a tiny pair of earrings, wrapped candy, or a handwritten note inside, and suddenly you look like the sort of person who has their life together.
How to Use Air Dry Clay Bowls Around the House
One of the best parts of this craft is how easy it is to put to use. A bowl on your bedside table can hold rings and lip balm. A bowl on the coffee table can collect matches, coasters, or tiny odds and ends. One in the bathroom can hold hair clips and bobby pins. A larger one by the front door can catch keys and pocket clutter before it migrates into every room like it pays rent.
You can also style several bowls together in a set. Make three in different sizes and stack them visually on a shelf or tray. Keep the colors coordinated for a calm, intentional look, or make each one different for a playful handmade collection. This is especially effective in dorm rooms, apartments, and smaller spaces where decorative storage needs to work hard without looking boring.
Experience Section: What Making DIY Air Dry Clay Bowls Really Feels Like
There is something wonderfully human about making air dry clay bowls by hand. The first time you try it, the project seems almost suspiciously simple. You knead the clay, roll it out, press it into shape, and think, “That cannot possibly turn into something cute.” Then it dries, you sand the edges, add paint, and suddenly you are holding a piece that looks surprisingly polished. It is one of those crafts that gives beginner crafters a quick win, and that is a big part of its charm.
Many people discover that the process itself is as enjoyable as the finished result. Working with clay is tactile and calming. You are using your hands, focusing on shape and texture, and paying attention to small details instead of staring at a screen. Even when the bowl comes out slightly crooked, it still feels satisfying because the imperfections make it feel personal. In fact, the tiny quirks are often what people love most. A handmade clay bowl with a slightly wavy rim has more warmth than something factory-perfect.
There is also a funny little emotional journey that happens during the project. At first, you are optimistic. Then you worry the bowl is too thick. Then you think the edge looks weird. Then you become deeply invested in a tiny dish that will eventually hold hair pins. By the time you are choosing paint colors, you are acting like you are curating a museum object. This is normal. Clay does that to people.
Another common experience is learning that air dry clay rewards patience. The makers who enjoy the best results are usually the ones who do not rush the drying step, who smooth the edges carefully, and who accept that a second coat of paint is often worth it. The craft teaches you to slow down just enough to enjoy the process. It is not difficult, but it does ask for a little attention, and that makes the final bowl feel more earned.
People also love how customizable the project becomes over time. Your first bowl might be a plain ring dish. The second might have stamped letters. The third becomes a gift for a friend. Then suddenly you are making seasonal bowls, experimenting with marbling, trying speckled paint, and wondering whether your entryway needs a matching set. Spoiler: according to every crafter ever, yes, it absolutely does.
Perhaps the nicest part is that these bowls often become small everyday favorites. You reach for one without thinking. You drop your earrings into it at night. You set your keys in it after school or work. You smile a little because you made it yourself. That is the secret power of a good DIY project. It is not just decorative. It quietly becomes part of your routine. And for a humble lump of air dry clay, that is a pretty impressive career path.
Final Thoughts
DIY air dry clay bowls are proof that a simple craft can still feel stylish, practical, and genuinely fun. They are beginner-friendly, affordable, and easy to personalize, which makes them perfect for home decor, gifts, and creative afternoons when you want to make something useful with your hands. With the right thickness, enough drying time, a little sanding, and a thoughtful finish, even a first attempt can turn out beautifully.
So gather your clay, choose a bowl mold, and let yourself experiment. Keep one for your jewelry, gift one to a friend, and maybe make an extra just because it is hard to stop at one. Air dry clay bowls have a sneaky habit of turning a quick craft session into a full-blown “I should make a matching set” situation. Honestly, there are worse hobbies.





