Table of Contents >> Show >> Hide
- Why Build a DIY Outdoor Sectional Sofa?
- Before You Build: Make These Decisions First
- Tools and Materials
- Example Building Plan: A Simple L-Shaped Sectional
- Step-by-Step DIY Outdoor Sectional Sofa Tutorial
- Best Finishes and Maintenance Tips
- Common DIY Mistakes to Avoid
- Real DIY Experiences and Lessons Learned From Building Outdoor Sectionals
- Conclusion
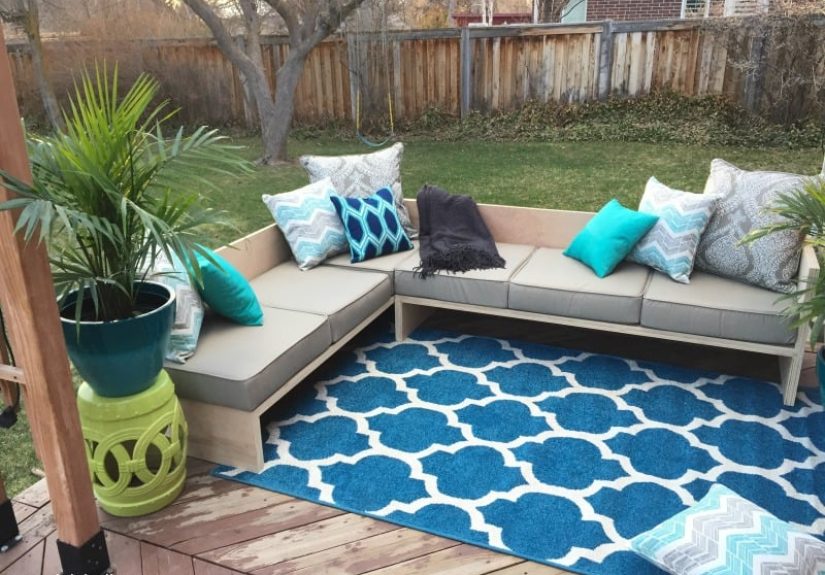
If your patio is currently giving “forgotten folding chair convention,” it may be time for an upgrade. A DIY outdoor sectional sofa is one of the smartest backyard projects you can tackle because it combines comfort, style, and bragging rights in one gloriously useful build. Instead of spending a small fortune on a store-bought patio set that may or may not survive one dramatic thunderstorm, you can build a custom sectional that fits your space, your cushions, and your budget.
The best part is that this project is easier to customize than most people think. You can keep it simple with straight cuts and a boxy modern frame, or dress it up with angled legs, wider arms, and a cleaner designer look. Either way, the secret is not starting with wood. It is starting with a plan. Better yet, start with cushions, because building a beautiful frame that does not fit your cushions is a classic DIY plot twist nobody enjoys.
This tutorial walks through a practical approach to building a durable outdoor sectional, with a beginner-friendly mindset and a realistic building plan you can adapt. It also covers wood choices, outdoor finishes, maintenance, and the real-life lessons that make the second build easier than the first.
Why Build a DIY Outdoor Sectional Sofa?
A sectional is the MVP of outdoor seating. It uses corner space efficiently, gives you more seating than a couple of chairs, and makes a patio feel like a real outdoor living room instead of a place where lonely planters go to reflect.
Building your own version has several advantages. First, you control the size. Small patio? Build a compact L-shape. Big deck? Stretch the long side and add a return. Second, you control the materials. Third, you get to choose whether your sofa looks modern, farmhouse, coastal, or “I own a drill and suddenly have strong opinions about slat spacing.”
Most successful DIY outdoor sectional builds follow the same logic: use weather-tolerant lumber, choose outdoor-safe screws, build around standard cushions, leave slight gaps between slats so water does not linger, then seal the finished piece so it lasts longer and looks better.
Before You Build: Make These Decisions First
1. Buy or Measure the Cushions First
This is the golden rule. Do not guess cushion dimensions. Buy them first or measure the ones you already own. Many popular DIY outdoor sofa plans are built around standard 24-by-24-inch cushions, which makes design much easier. If your cushions are deep-seat style, measure width, depth, and back height before you cut anything. A one-inch comfort allowance can help prevent an overly snug fit.
2. Choose the Right Lumber
For an outdoor sectional sofa, cedar is a favorite because it naturally resists moisture and rot, is easy to cut, and looks great even with a simple finish. Redwood is beautiful and dimensionally stable, though often pricier. Pressure-treated pine is budget-friendly and durable, especially for a painted build, but it may need time to dry before staining or sealing properly. If you want the sweet spot for many DIYers, cedar usually wins. If you want value, pressure-treated lumber is hard to ignore.
3. Use Exterior-Grade Fasteners
This is not the moment to get thrifty with random indoor screws hiding in a coffee can in the garage. Outdoor furniture needs coated deck screws, stainless-steel fasteners, or other exterior-rated hardware. Cedar and pressure-treated lumber can react badly with some metals, and rusty fasteners can turn a good-looking project into a sad science experiment.
4. Pick Your Style of Build
There are two common ways to approach a sectional. The first is a modular box build with straight cuts and simple legs. The second is a more refined design with angled legs, pocket holes, and decorative back slats. Both work. If you are a beginner, a box-style frame is more forgiving and faster to build. If you want the high-end patio showroom look without the showroom invoice, go a bit more modern with clean lines and wider arms.
Tools and Materials
Here is a practical material list for a simple two-piece outdoor sectional built around 24-by-24-inch cushions:
- 2×4 lumber for the structural frame
- 1×4 boards for seat and back slats
- 2 1/2-inch exterior deck screws for the frame
- 1 1/4-inch exterior screws for slats
- Exterior wood glue rated for outdoor use
- Clamps
- Miter saw or circular saw
- Drill/driver
- Sander and sandpaper
- Measuring tape, square, pencil, and spacers
- Outdoor stain or sealer
- Outdoor cushions and pillows
Safety gear matters too: eye protection, hearing protection, and a dust mask are not glamorous, but neither is explaining to your family why you got sawdust in places sawdust should never visit.
Example Building Plan: A Simple L-Shaped Sectional
This sample plan is designed to be realistic, adaptable, and beginner-friendly.
Finished Layout
- Long sofa section: about 72 inches wide
- Return section: about 48 inches wide
- Seat depth: sized to match your cushion depth, commonly around 24 inches
- Back height: based on your back cushions and desired look
- Configuration: one long side plus one shorter side joined at a right angle
This gives you a comfortable L-shape without becoming so large that it swallows your entire patio like a wooden sea creature.
Suggested Cut Strategy
Rather than obsessing over a hyper-specific cut list that only works for one exact layout, build in modules:
- Create one long seat box sized for three seat cushions or a continuous bench cushion.
- Create one shorter seat box sized for two cushions or one chaise-style cushion arrangement.
- Add back posts and horizontal slats.
- Add an outer arm where needed.
- Join the two units into an L-shape with hidden connector boards or exterior-rated brackets.
This modular approach makes transport easier, allows future rearranging, and saves you from wrestling one giant finished piece through a gate that is mysteriously narrower than you remembered.
Step-by-Step DIY Outdoor Sectional Sofa Tutorial
Step 1: Build the Seat Boxes
Start with two rectangular frames made from 2x4s. One frame becomes the long sofa, the other becomes the short return. Add front and back rails, then side rails, then at least one center support on each module. If your long side is wide, add two center supports so the seat does not sag later when everyone decides your new sectional is the place to be.
Check for square before driving all screws. Measure corner to corner in both directions. If the numbers match, you are in business. If they do not, adjust before moving on. A crooked frame now becomes a very creative problem later.
Step 2: Add Legs and Base Support
Attach legs at the corners and reinforce the long runs. You can keep the legs flush and simple, or angle them slightly for a more polished look. What matters most is strength and stability. Outdoor furniture takes weather, movement, and the occasional dramatic flop from someone carrying a plate of burgers.
If the sofa will sit directly on a patio, deck, or pavers, avoid letting end grain stay wet for long periods. Seal the bottoms of the feet and all exposed end grain well. That step sounds boring because it is boring, but it is the kind of boring that adds years to a build.
Step 3: Install Seat Slats
Use 1×4 slats or similar boards across the top of the seat frame. Leave small, consistent gaps between the slats so rainwater can drain and air can circulate. A spacer block helps keep the gaps even. Uneven spacing is one of those details only you notice at first, but once you see it, you will see it forever.
Work from front to back, keeping the first and last slats aligned cleanly with the frame. If you want a more refined look, lightly ease the sharp edges before installation.
Step 4: Build the Backrests
Attach vertical back posts at the ends and, for longer sections, add middle supports. Then screw horizontal back slats across the rear. Again, keep spacing consistent. If you prefer a slightly reclined back, angle the posts during layout. If you want a straight modern frame, keep them vertical and let the cushions provide the softness.
Some builders also add a top cap board across the back for a more finished look. It is a nice touch and gives the sectional a cleaner silhouette.
Step 5: Add the Arms
Install arms on the outside ends only. The inside joining edges of the sectional should stay open so the two modules can meet neatly. Wide arms are especially practical because they double as mini side tables for drinks, books, or that one lemon sparkling water everyone pretends is a cocktail.
Step 6: Join the Modules
Push the long and short sections together at a 90-degree angle. Make sure the back edges align cleanly and the seat heights match. Secure them from the inside with connector boards, exterior brackets, or bolts. The goal is a tight joint that keeps the sectional from drifting apart every time someone stands up.
If you ever want the flexibility to separate the pieces, use removable connectors rather than permanent glue at this stage.
Step 7: Sand, Prep, and Finish
Sand all visible surfaces, especially arms, front rails, and any edges people will touch often. Fill noticeable screw holes if you want a cleaner painted finish. Before applying stain or sealer, make sure the wood is ready. If you used new pressure-treated lumber, test whether it absorbs water. If water beads up, the wood is not ready for finish yet. If it soaks in, you can move forward.
Apply thin, even coats of exterior stain or sealer and allow proper drying time. A stain-and-sealer-in-one product is often the simplest choice for DIY builds. Do not rush this stage. Rushed finish work has a special talent for looking rushed.
Step 8: Add Cushions and Style It
Once the finish has cured, add your cushions and pillows. Deep-seat cushions create the most lounge-worthy look. Stick with outdoor fabrics rated for sun and moisture, and store them or cover them during harsh weather. The wood frame may be rugged, but soaking wet cushions are basically mildew’s favorite vacation home.
Best Finishes and Maintenance Tips
Outdoor furniture does not stay pretty by sheer force of optimism. A little maintenance goes a long way.
- Clean the frame at least seasonally and inspect for loose screws.
- Reapply protective finish when water stops beading and starts soaking in.
- Keep furniture off bare soil and out of standing water.
- Use breathable covers instead of trapping everything in airtight plastic.
- Store cushions indoors or in a dry storage box during severe weather.
- Rotate and flip cushions so they wear evenly.
- Let cushions dry fully after cleaning to prevent mold and mildew.
If you love the weathered gray look of natural cedar, you can let it age gracefully. If you want richer color retention, seal it and maintain it regularly. Either option can look great. Neglect, however, has a very specific design style and it is called “yard regret.”
Common DIY Mistakes to Avoid
Building Before Buying Cushions
This is the patio version of buying shoes and hoping your feet cooperate. Measure first.
Using the Wrong Screws
Indoor screws outdoors are a short-term relationship. Use exterior-rated fasteners from day one.
Forgetting About Water
Outdoor furniture must drain, dry, and breathe. Gaps between slats and breathable covers matter more than people think.
Skipping End-Grain Protection
The cut ends of boards absorb moisture faster than face grain. Seal them thoroughly.
Rushing the Finish
Even a beautifully built sectional can look rough if stain is applied too heavily, too quickly, or before the wood is ready.
Real DIY Experiences and Lessons Learned From Building Outdoor Sectionals
One of the most common experiences people have with a DIY outdoor sectional sofa is realizing that the project is less about fancy woodworking and more about smart planning. On paper, the build looks straightforward: cut wood, screw it together, add cushions, become patio royalty. In reality, the little decisions determine whether the finished piece feels custom or just homemade in the wrong way.
A lot of first-time builders discover the cushion issue the hard way. They build a beautiful frame, proudly set it in place, then shop for cushions and find out the seat is an inch too narrow, too deep, or too low. That one-inch difference is the kind of thing that can turn a relaxing outdoor sofa into something that feels oddly awkward every time you sit down. The lesson is simple and unforgettable: cushions are not accessories in this project. They are the project’s co-stars.
Another frequent experience is underestimating how much better a sectional looks when the spacing is consistent. Builders who use spacer blocks between slats almost always end up happier with the finished piece. Without spacers, the eye catches every tiny inconsistency. With spacers, the whole sofa looks more intentional, more polished, and more expensive. It is one of those low-effort, high-impact habits that separates “weekend project” from “why does this look weird?”
Many DIYers also mention that sanding took longer than expected. Not the dramatic structural cuts. Not the assembly. Sanding. That is because outdoor furniture gets touched constantly. People grab the arms, drag their hands along the front rail, and sit in shorts. Suddenly, that tiny splinter you thought was “probably fine” becomes unforgettable. The builders who take time to soften edges and smooth the contact points almost always say it was worth it.
Weather teaches its own lessons too. Some people learn that a gorgeous finish means very little if the end grain and feet are left vulnerable. Others realize that airtight plastic covers create a damp little greenhouse effect that invites mold instead of stopping it. Builders in rainy or humid climates often become strong believers in breathable covers, seasonal cleaning, and bringing cushions inside before storms. Experience has a funny way of turning maintenance from an optional chore into a deeply held personal philosophy.
Then there is the surprisingly emotional part: the first time the sectional gets used. A lot of DIY outdoor furniture projects feel satisfying, but a sectional feels different because it changes how a space functions. Suddenly people gather there. Coffee tastes better there. Even your phone somehow feels less annoying there. The build becomes more than lumber and screws; it becomes the place where the patio actually starts to feel like a room. That is why so many people who build one outdoor sofa end up making a matching table, chair, planter, or side bench later. The sectional is rarely the end of the project. It is usually the beginning of a very specific condition known as “I can totally build that too.”
Conclusion
A DIY outdoor sectional sofa is one of the best projects for adding comfort and character to a patio, porch, or deck. It can be simple or polished, budget-friendly or upgraded, but the winning formula stays the same: measure cushions first, choose outdoor-friendly materials, use the right fasteners, leave room for drainage, and protect the finished piece from weather. Do that, and your sectional will not just look good on day one. It will keep showing up for many seasons of backyard lounging, family hangouts, and suspiciously long coffee breaks.