Table of Contents >> Show >> Hide
- Before You Start: A 5-Minute Bell-Building Checklist
- 1) Ribbon Jingle-Bell Cluster (The “Instant Cheer” Door Hanger)
- 2) Accordion Paper Bell Ornament (Lightweight, Fancy-Looking, and Surprisingly Easy)
- 3) Felt Bell Ornament (Soft, Cozy, and Basically Impossible to Break)
- 4) Salt Dough Bell Ornaments (Old-School, Budget-Friendly, and Full of Memories)
- 5) Terracotta Pot Bells (The Rustic “Ceramic Trend” LookWithout the Price Tag)
- 6) Vintage Baking Mold Bells (Statement-Maker Door Décor)
- How to Style Your DIY Bells So They Look “Intentional,” Not “Accidentally Seasonal”
- from the Craft Table: What People Learn After Making Holiday Bells
- Conclusion
Christmas bells are the holiday equivalent of popcorn: once you start, you’ll “accidentally” add more and suddenly your home sounds like Santa’s sleigh got a part-time job as a wind chime.
The best part? You don’t need fancy tools or an advanced degree in Festive Engineering to make bell décor that looks store-bought and feels personal.
In this guide, you’ll find six bell craftsranging from “I have 15 minutes and optimism” to “I’m making heirloom vibes on purpose.”
Each one includes practical steps, smart material swaps, and styling ideas so your bells don’t just jinglethey serve.
Before You Start: A 5-Minute Bell-Building Checklist
- Decide what the bell is doing: tree ornament, gift topper, door hanger, garland accent, or table décor.
- Pick your jingle level: “cute and subtle” or “my cat thinks it’s a toy.” (Door bells usually land in the middle.)
- Mind the weight: lightweight for trees and gifts; heavier is fine for doors, mantels, and wreaths.
- Choose your adhesive wisely: hot glue is fast; craft glue is tidy; epoxy is strong (and best with adult supervision + ventilation).
- Plan the hanger: ribbon for sweet, twine for rustic, wire for sturdy, and cord for a clean modern look.
1) Ribbon Jingle-Bell Cluster (The “Instant Cheer” Door Hanger)
This is the bell craft you make when you want maximum holiday impact with minimum effort.
A clustered bunch of bells looks elegant, sounds festive, and instantly upgrades a doorknob, hook, or stair banister.
Materials
- Assorted jingle bells (mixed sizes look best)
- Craft wire (or strong floral wire)
- Ribbon for a big bow (wired ribbon makes life easier)
- Optional: greenery sprigs, faux berries, or a cinnamon stick bundle
How to Make It
- Build two wire loops: Make two circles of wire (about palm-size), twisting the ends to secure.
- String the bells: Slide bells onto both loops so they sit in a clustered “bundle,” not a flat ring.
- Twist to lock: Twist the loop ends together at the top to form a sturdy hanging point.
- Add the bow: Tie a generous ribbon bow over the twisted wire top to hide mechanics and add drama.
- Hang and fluff: Add greenery or berries if desired, then hang from a doorknob, hook, or stocking holder.
Pro Tips + Variations
- Quiet mode: Want the look without the noise? Use hollow decorative bells (or tuck a tiny piece of felt inside each bell to soften the jingle).
- Color story: Go classic (gold + red), snowy (silver + white), or modern (matte black + cream ribbon).
- Gift-topper upgrade: Make a mini version with 3–5 bells and tie it onto wrapped gifts for instant “wow.”
2) Accordion Paper Bell Ornament (Lightweight, Fancy-Looking, and Surprisingly Easy)
Paper bells are ideal if you want something lightweight for the tree (or you’re crafting with kids and don’t want anyone “testing” the jingle volume).
The secret is layering folded bell shapes so the ornament looks dimensionallike it belongs on a boutique tree in a magazine.
Materials
- Cardstock (metallic, glitter, or pearl finishes look especially festive)
- Scissors
- Hot glue or tacky glue
- Hole punch
- String or metallic cord
- Optional: bead for the hanger, tiny jingle bell for the bottom
How to Make It
- Cut bell shapes: Cut 6–10 identical bell silhouettes from cardstock (use a printable template or trace a simple shape).
- Crease each bell: Fold each bell in half lengthwise and press the crease sharply.
- Glue into a sphere: Glue the folded bells togetherflat side to flat sideuntil you form a 3D ornament.
- Add a hanger: Punch a small hole at the top (or glue a loop of cord inside the top seam).
- Finish the “clapper” look: Tie on a bead and/or a tiny jingle bell at the bottom for a polished finish.
Pro Tips + Variations
- Two-tone effect: Alternate colors (red + white, gold + cream) for a candy-shop vibe.
- Personalize: Add a name or year with a paint pen for keepsake ornaments.
- Extra fancy trick: Lightly ink the edges with gold ink or chalk for a “vintage greeting card” feel.
3) Felt Bell Ornament (Soft, Cozy, and Basically Impossible to Break)
If your household includes kids, pets, or that one relative who hugs the Christmas tree like it’s a long-lost friend,
felt bells are the safest, sturdiest option. They look handmade in the best waywarm, charming, and slightly nostalgic.
Materials
- Craft felt (two coordinating colors)
- Scissors
- Needle and thread (or fabric glue for a no-sew version)
- Polyfill stuffing (or cotton balls)
- Ribbon or twine for hanging
- Optional: a small jingle bell inside for sound
How to Make It
- Cut two bell shapes: Cut two identical bell silhouettes from felt. (Add a small rectangle strip if you want a “top band.”)
- Decorate first: Add simple embroidery lines, tiny felt stars, or a contrasting band before assembly.
- Attach the hanger: Pin or glue a ribbon loop between the two bell pieces at the top.
- Assemble: Sew (blanket stitch looks adorable) or glue around the edge, leaving a small opening.
- Stuff and close: Add stuffing (and a tiny bell inside if you want sound), then close the opening.
- Add the “clapper” detail: Stitch on a small felt circle or bead at the bottom center to mimic a bell clapper.
Pro Tips + Variations
- No-sew hack: Use fabric glue and clamp the edges with clothespins until dry.
- Make a set: Create matching bells for stocking tags or place cards (tiny felt bells tied onto name tags = instant charm).
- Texture upgrade: Mix in velvet ribbon, pom-pom trim, or metallic thread for a boutique look.
4) Salt Dough Bell Ornaments (Old-School, Budget-Friendly, and Full of Memories)
Salt dough ornaments are classic for a reason: they’re inexpensive, family-friendly, and easy to personalize.
Bell shapes look especially good in salt dough because you can stamp patterns, write names, and paint them to match any theme.
Materials
- Flour, salt, and water
- Rolling pin
- Bell-shaped cookie cutter (or cut by hand with a paper template)
- Straw (to punch a hanging hole)
- Baking sheet + parchment paper
- Acrylic paint + sealer (Mod Podge or clear spray sealer)
Simple Salt Dough Ratio
A common, reliable approach is a flour-and-salt base with water added gradually until the dough is firm and workable (not sticky).
If it feels too wet, dust in flour; if it crumbles, add water a teaspoon at a time.
How to Make It
- Mix and knead: Combine flour and salt, then add water slowly. Knead until smooth.
- Roll evenly: Roll to about 1/4 inch thick so ornaments don’t snap easily.
- Cut bell shapes: Cut with a cookie cutter (or trace and cut with a craft knife for cleaner edges).
- Punch the hanger hole: Use a straw near the top center.
- Add texture: Stamp with lace, a rubber stamp, a fork, or even a patterned rolling pin.
- Dry thoroughly: Bake low and slow (or air-dry longer) until fully hardened.
- Paint + seal: Paint details, let dry, then seal to help protect from moisture.
Pro Tips + Variations
- Elegant look: Paint matte white, then add gold edges and a small satin bow.
- Rustic look: Leave natural, then brush with watered-down brown paint for a “gingerbread house” patina.
- Memory-maker: Add names, dates, or tiny thumbprint “holly berries.”
5) Terracotta Pot Bells (The Rustic “Ceramic Trend” LookWithout the Price Tag)
Terracotta bells are having a moment because they feel earthy, handmade, and a little Scandinavian.
The DIY version is wonderfully simple: small terracotta pots already look like bell formsso you’re basically halfway done before you start.
Materials
- Mini terracotta pots (2–3 inches is ideal)
- Jute twine, cotton cord, or thin ribbon
- Wooden bead(s) for a “clapper”
- Acrylic paint (optional)
- Optional: metallic wax rub or gold paint for edges
How to Make It
- Paint first (optional): Paint pots outside and inside lip. Let dry completely.
- Create the hanging cord: Thread cord through the drainage hole from the outside in, tie a knot inside to stop it from slipping.
- Add the clapper bead: Thread a wooden bead onto the cord inside the pot so it hangs and taps lightly.
- Finish the top: Make a loop or add a bow at the top for hanging.
- Style it: Hang solo as an ornament, or cluster 3–5 for a mantel swag or wall hook moment.
Pro Tips + Variations
- Modern neutral: Paint warm white and edge with gold for a chic, minimalist bell.
- Farmhouse: Wrap twine around the top rim and add a tiny sprig of faux pine.
- Outdoor-friendly: Seal with a weatherproof clear coat if using on a covered porch.
6) Vintage Baking Mold Bells (Statement-Maker Door Décor)
This one looks like it came from an antique market (the good one, not the “why is everything sticky?” one).
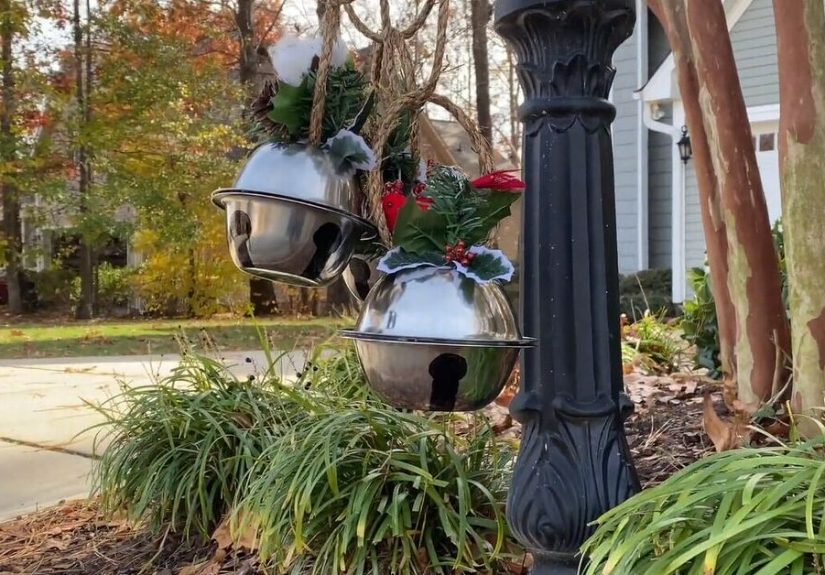
By stacking mini Bundt pans or vintage baking molds, you get dramatic bell shapes with serious curb appeal.
These are best for doors, large wreaths, or porch hooksanywhere they can be appreciated without weighing down your Christmas tree.
Materials
- Mini fluted baking molds or small Bundt-style pans (thrifted works great)
- Strong adhesive (epoxy is strongest; heavy-duty mounting adhesive can work; adult supervision recommended)
- Small ornament or bead for the “clapper” look
- Ribbon loop + bow
- Optional: greenery swag, faux berries, or eucalyptus
How to Make It
- Test your stack: Arrange molds/pans until you like the bell silhouette.
- Secure the shape: Bond pieces together with a strong adhesive (follow product directions carefully).
- Add the clapper detail: Hot-glue a small ornament or bead to the bottom center so it reads as a bell clapper.
- Create the hanger: Glue or wire a ribbon loop to the top and add a large bow to finish.
- Dress it up: Add greenery and berries around the hanger area for a “front porch ready” look.
Pro Tips + Variations
- Want it lighter? Use plastic molds or lightweight aluminum instead of heavier bakeware.
- Vintage finish: Dry-brush with a little antique gold paint, then wipe back for patina.
- Door-safety note: Hang from a sturdy hook (not flimsy adhesive strips) to avoid door drama.
How to Style Your DIY Bells So They Look “Intentional,” Not “Accidentally Seasonal”
- Repeat materials: If your bells use gold ribbon, echo gold elsewhere (tree picks, candle holders, or napkin rings).
- Cluster for impact: Three bells together almost always looks more designed than one lonely bell.
- Mix textures: Pair shiny bells with soft elements (felt, velvet ribbon, greenery) for balance.
- Use bells as punctuation: Add a bell cluster at the end of a garland or at the bottom of a stocking to “finish” the look.
from the Craft Table: What People Learn After Making Holiday Bells
There’s a predictable moment in every DIY bell session: the first bell looks adorable, the second bell looks even better,
and the third bell is when confidence skyrockets and someone says, “Wait… should we make twelve?” This is how it begins.
Not with a grand plan, but with a tiny jingle bell rolling off the table like it has places to be.
One of the biggest “aha” lessons is that bells are more about the hanger than the bell.
A plain bell instantly looks upgraded when it’s paired with the right ribbon, cord, or bow.
Switch from thin satin ribbon to velvet, and suddenly your bell looks expensive.
Swap ribbon for jute twine and add a sprig of faux pine, and it’s rustic-cabin chic.
People often spend time perfecting the bell body, then rush the finishing detailswhen the finishing details are what make it look intentional.
Another thing crafters discover quickly: hot glue has a personality.
It works fast, but it also loves to leave little glue strings like it’s decorating on its own.
A simple trick is keeping a scrap of cardboard nearby to “wipe” the glue tip, and using a toothpick to place tiny dots precisely.
And if you’re crafting with kids, the best approach is dividing tasks: kids can paint and choose ribbons; an adult can handle the glue gun.
Everyone stays happy, and nobody ends up wearing a jingle bell as an accidental accessory.
Sound is another surprise variable. People assume “more bells = better,” but there’s a sweet spot.
A huge cluster can be joyful on a door, but on a tree it can feel noisy (especially in a busy living room).
Many seasoned crafters build two versions: a louder door hanger for arrivals and departures, and quieter tree ornaments for close-up beauty.
For the “quiet” set, paper and felt bells become favorites because they bring the bell shape without the constant soundtrack.
When it comes to paint, the most common regret is rushing the dry time. Bells get handled a lothung, adjusted, admired, rehung
so tacky paint will pick up fingerprints or stick to tissue paper in storage.
The fix is simple: thin coats, proper drying, and a sealant if the ornament will be stored long-term.
A quick label on the storage box (“handmadefragile-ish”) also helps protect your future self from finding cracked salt dough in December.
Finally, people learn that bells are a sneaky way to create tradition.
A set of salt dough bell ornaments labeled by year becomes a timeline on the tree.
A felt bell made in a favorite color becomes “the one that always goes front-and-center.”
And a cluster of door bells becomes the sound cue that the season has officially started.
So yes, you’re “just crafting bells”… but you’re also building tiny, jingling memory anchorsone bow at a time.
Conclusion
DIY Christmas bells hit the perfect holiday sweet spot: they’re festive, flexible, and surprisingly doablewhether you’re crafting with kids,
upgrading your front door, or making keepsake ornaments you’ll want to unbox every year.
Pick one project for a quick win (hello, jingle-bell cluster), then graduate to a statement piece (those vintage mold bells are worth the hype).
And remember: the only real rule is that if it makes you smileand jingles appropriatelyit’s working.