Table of Contents >> Show >> Hide
- Before You Start: What You Need
- Way 1: Transfer Photos to an SD Card Using the Android Files App
- Way 2: Move Photos with Samsung Gallery or My Files
- Way 3: Transfer iPhone Photos to an SD Card with an Adapter
- Way 4: Use a Computer to Move Photos from Phone to SD Card
- Move vs. Copy: Which Is Better?
- How to Organize Photos on an SD Card
- Common Problems and Quick Fixes
- Safety Tips Before Deleting Photos from Your Phone
- Personal Experience: What Actually Works Best in Real Life
- Conclusion
Your phone camera is innocent until proven guilty, but let’s be honest: it has probably eaten most of your storage. One minute you are taking a photo of your lunch, your dog, or a sunset that looks suspiciously like every other sunset in your gallery. The next minute, your phone says, “Storage almost full,” as if it did not personally encourage this behavior with portrait mode, burst shots, screenshots, memes, and 4K video.
Learning how to transfer photos from a phone to an SD card is one of the easiest ways to free up internal storage, organize your memories, and keep important images backed up somewhere other than your device. Whether you use an Android phone with a microSD slot, a Samsung Galaxy device, an iPhone with an external card reader, or a computer as the middleman, there is a practical method for almost everyone.
This guide explains four reliable ways to move photos to an SD card, with clear steps, real-world tips, and a few “please do not accidentally delete Grandma’s birthday photos” warnings along the way.
Before You Start: What You Need
Before moving thousands of photos, take a minute to prepare. A little setup now can save you from the digital equivalent of dumping a box of printed photos onto the floor and hoping for the best.
Check whether your phone supports an SD card
Many Android phones, especially budget and midrange models, still support microSD cards. Some flagship phones do not. Samsung, Motorola, Nokia, TCL, and other Android brands have released models with expandable storage, but support varies by device. If your phone tray has only a SIM slot and no microSD slot, you will need an external card reader or a computer-based method.
iPhones do not have built-in SD card slots. However, newer iPhones can connect to external storage devices, memory cards, and card readers using USB-C or Lightning adapters, depending on the model. That means iPhone users are not left out of the SD-card party; they simply need to bring the right adapter to the party.
Use the right card format
For phones and cameras, microSD cards are commonly formatted as FAT32 or exFAT. Larger cards often use exFAT because it handles bigger files better, including long videos and high-resolution photo libraries. If your phone asks to format the card, back up anything already on it first. Formatting usually erases existing data, and your SD card will not send a sympathy card afterward.
Choose “copy” if you are nervous
Most file managers give you two choices: Move or Copy. Move transfers the photo and removes it from the original location. Copy duplicates the photo and leaves the original on your phone. If the pictures are important, copy them first, check that they open correctly on the SD card, and only then delete the originals from internal storage.
Way 1: Transfer Photos to an SD Card Using the Android Files App
The simplest way to transfer photos from an Android phone to an SD card is to use the built-in file manager. On many Android phones, this may be called Files, Files by Google, My Files, or File Manager. The names differ, but the basic idea is the same: find your photos, select them, and send them to the SD card.
Best for
This method is best for Android users who already have a microSD card inserted in the phone and want to move existing photos from internal storage to the card.
Step-by-step instructions
- Insert the microSD card into your phone and make sure the phone recognizes it.
- Open your file manager app, such as Files by Google or My Files.
- Tap Internal storage or Phone storage.
- Open the DCIM folder, then open Camera. This is where most camera photos are stored.
- Press and hold one photo to start selection mode.
- Select the photos or folders you want to transfer.
- Tap Move to or Copy to.
- Choose SD card as the destination.
- Create a folder such as Camera Backup, Vacation Photos, or Phone Photos 2026.
- Tap Move, Copy, or Paste to finish.
Example
Let’s say your Android phone has 2,400 photos in the DCIM folder. You could create a folder on your SD card called Phone Camera Backup, copy all DCIM photos there, and then check the folder to confirm the images open correctly. Once confirmed, you can delete the originals from internal storage to free up space.
Helpful tips
Move photos in batches if you have a huge library. Transferring 20,000 pictures at once may work, but it can also make your phone act like it has been asked to solve tax law while standing in the rain. Smaller batches are safer and easier to verify.
Also, keep your phone charged during the transfer. If the device shuts down halfway through, the copied files may be incomplete. A 60% battery level or higher is a good comfort zone.
Way 2: Move Photos with Samsung Gallery or My Files
Samsung Galaxy phones with microSD support make the process especially friendly. You can use either the Gallery app or the My Files app. Gallery is convenient if you think visually and want to move albums. My Files is better if you want folder-level control.
Best for
This method is best for Samsung Galaxy users who want to move photos, videos, albums, screenshots, or downloads to a microSD card.
Option A: Use Samsung Gallery
- Open the Gallery app.
- Go to Albums.
- Tap and hold the photos or album you want to move.
- Tap More or the three-dot menu.
- Choose Move to album.
- Create or select an album stored on the SD card.
- Confirm the move.
This is a clean method for people who organize photos by album: family, pets, receipts, travel, screenshots, or “random things I photographed because I might need them someday.” No judgment. We all have that folder.
Option B: Use Samsung My Files
- Open the Samsung folder on your app screen.
- Tap My Files.
- Go to Internal storage.
- Open DCIM, Pictures, Screenshots, or another photo folder.
- Select the images or folders you want to transfer.
- Tap Move or Copy.
- Go back and select SD card.
- Choose a destination folder and tap Move here or Copy here.
Set the camera to save future photos to the SD card
On many Samsung phones that support microSD cards, you can also set the camera to save new photos directly to the card. Open the Camera app, tap the Settings gear, look for Storage location, and select SD card. The exact wording may vary by model and software version.
This does not move your old photos automatically, but it helps prevent your internal storage from filling up again. Think of it as teaching your camera better manners.
Way 3: Transfer iPhone Photos to an SD Card with an Adapter
Because iPhones do not have microSD card slots, transferring photos from an iPhone to an SD card requires an external accessory. Depending on your iPhone model, you may need a USB-C card reader, a Lightning to SD Card Camera Reader, or another compatible adapter. Once connected, iOS can access supported external storage through the Photos app and Files app.
Best for
This method is best for iPhone users who want to export photos directly to a memory card without first uploading everything to cloud storage or moving files through a computer.
What you need
- An iPhone with USB-C or Lightning connection
- A compatible SD or microSD card reader
- An SD card or microSD card with adapter
- Enough free space on the card
- A card format the iPhone can read, commonly exFAT or FAT32
Step-by-step instructions
- Insert the SD card into the card reader.
- Connect the card reader to your iPhone.
- Open the Photos app.
- Select the photos or videos you want to export.
- Tap the Share button.
- Choose Save to Files or an export option shown on your device.
- Select the connected SD card or external storage location.
- Choose or create a folder.
- Tap Save.
Important iPhone notes
If the SD card does not appear in Files, check the adapter, card format, and power requirements. Some external drives and readers need more power than the iPhone can provide. In that case, a powered hub or official-style adapter with charging support may help.
Also, edited photos may export differently depending on the option you choose. If you want original files, look for an option such as exporting the unmodified original when available. For casual backups, the standard Save to Files method is usually enough. For professional photography, wedding shoots, RAW images, or client work, verify the file type and quality before deleting anything from the iPhone.
Way 4: Use a Computer to Move Photos from Phone to SD Card
If direct phone-to-card transfer is not convenient, use a computer. This method works well for Android and iPhone, especially when you need to move a large photo library. A computer gives you a bigger screen, easier folder management, and fewer tiny taps that make your thumb question its career choices.
Best for
This method is best for large transfers, mixed phone types, older devices, phones without microSD slots, and people who want a safer backup workflow.
What you need
- Your phone
- A USB cable that supports data transfer
- A Windows PC or Mac
- An SD card reader or built-in SD card slot
- Your SD or microSD card
For Android to SD card using Windows
- Insert the SD card into your computer’s card reader.
- Connect your Android phone to the computer with a USB cable.
- Unlock the phone.
- On the phone, choose File Transfer or USB for file transfer if prompted.
- Open File Explorer on Windows.
- Select your phone from the device list.
- Open Internal storage, then DCIM, then Camera.
- Select the photos you want.
- Copy them to a folder on the SD card.
- Wait for the transfer to complete before unplugging anything.
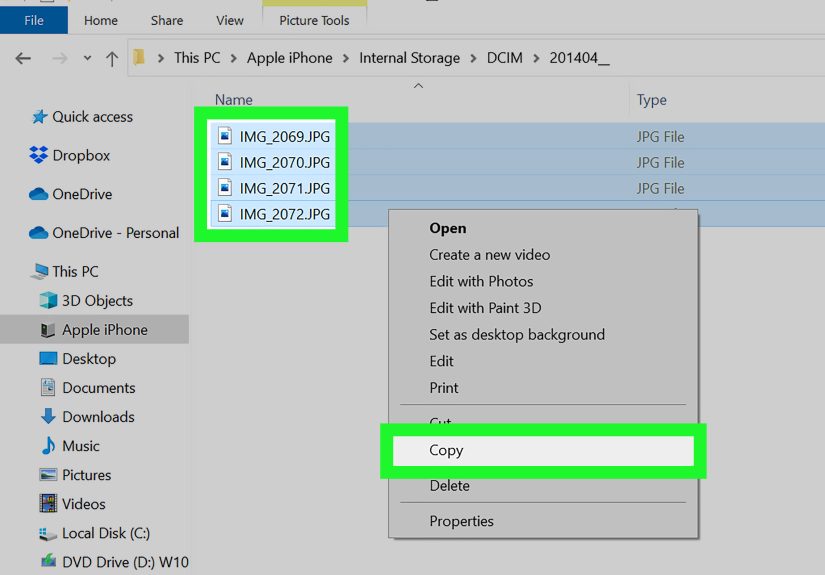
For iPhone to SD card using Windows
- Insert the SD card into your computer.
- Connect your iPhone with a USB cable.
- Unlock the iPhone and tap Trust This Computer if prompted.
- Open the Windows Photos app or File Explorer.
- Import or copy the photos from the iPhone.
- Save or move the imported photos to the SD card.
For Mac users
Mac users can use the Photos app, Image Capture, or Finder, depending on the phone and macOS version. Import the photos to the Mac first, then copy them to the SD card. If your Mac does not have an SD slot, a USB-C card reader will do the job.
Move vs. Copy: Which Is Better?
When transferring photos from a phone to an SD card, copy is safer and move is faster for freeing storage. If your goal is immediate space savings, moving works. If your goal is backup and peace of mind, copying is better.
A smart workflow looks like this: copy photos to the SD card, open several images from different folders to verify them, check that the file count looks right, and then delete the originals from the phone if you need the space. This adds a few minutes, but it protects you from accidental loss.
How to Organize Photos on an SD Card
Dumping every picture into one folder may feel easy today, but future you will not be impressed. Use folders that make sense. Here are a few simple structures:
- By year: Photos > 2024, 2025, 2026
- By event: Photos > Hawaii Trip, Graduation, New Puppy
- By device: Photos > Samsung Backup, iPhone Backup, Old Phone
- By type: Photos > Camera, Screenshots, Downloads, Edited
For most people, organizing by year and event is the easiest. For example, 2026 > Family Vacation is much easier to understand than a folder named IMG_20260503_174455_FINAL_FINAL2. Your SD card deserves a little dignity.
Common Problems and Quick Fixes
The SD card does not appear
Remove and reinsert the card. Restart the phone. Try the card in another device. If the card appears on a computer but not on the phone, the file system may be unsupported or the card may need formatting. Back up the data before formatting.
The transfer is slow
Large photo libraries, 4K videos, older cards, and slow adapters can make transfers drag. Use a higher-quality card, avoid transferring everything at once, and keep the phone awake during the process.
Photos disappeared from the Gallery app
If you moved photos to the SD card and they do not show in Gallery, open the file manager and check whether they are actually on the card. Sometimes the media library needs time to refresh. Restarting the phone may help.
The phone says the card is corrupted
Do not immediately format the card unless you have a backup. Try reading it on a computer first. If the computer can see the files, copy them somewhere safe. After that, you can format the card and move the files back if needed.
Safety Tips Before Deleting Photos from Your Phone
An SD card is useful, but it should not be your only backup. Cards are small, removable, and occasionally easy to lose. If the photos matter, keep at least two copies. One can be on the SD card, and another can be on a computer, external drive, or cloud service.
Before deleting photos from your phone, check three things: the files exist on the SD card, they open correctly, and the number of files looks reasonable. If you copied 1,200 photos but only 147 appear on the card, something went wrong. Do not delete the originals yet.
For extra safety, avoid cheap no-name cards when storing important photos. A reliable microSD card from a known brand is worth it. Saving a few dollars is not very satisfying if the card fails during the one family vacation where everyone looked at the camera at the same time.
Personal Experience: What Actually Works Best in Real Life
In real-world use, the best method depends less on the phone and more on the size of the photo library. For a small batch of pictures, moving photos directly inside the phone is usually fastest. If someone only needs to move 50 screenshots, 200 camera photos, or one vacation album, the Android Files app or Samsung Gallery method is simple and efficient. It feels natural because everything happens on the device where the photos already live.
For large transfers, however, a computer is often the least stressful option. Moving 10,000 photos on a phone screen can feel like trying to organize a closet through a mail slot. A laptop or desktop gives you a larger view, easier drag-and-drop control, and better folder naming. You can sort by date, file size, or folder. You can also quickly compare the phone folder and SD card folder to make sure the transfer worked.
One practical habit is to create a folder on the SD card before starting. For example, name it Android Camera Backup May 2026 or iPhone Photos Export 2026. This avoids the classic “Where did my photos go?” panic. It also makes future backups easier because you can see exactly when each transfer happened.
Another useful habit is to transfer in groups. Instead of selecting every photo from the last five years, move one year or one album at a time. Start with the oldest photos first if your goal is to free up phone storage. Old photos are usually less needed day to day, so moving them to an SD card gives you space without making your recent pictures harder to find.
For Android users, setting the camera storage location to the SD card can be a game changer, but only if the phone supports it. Once enabled, new photos save directly to the card. That said, it is still smart to check the card occasionally. If the SD card is removed, full, or damaged, the camera may switch back to internal storage or fail to save properly.
For iPhone users, the adapter method is convenient, especially with USB-C iPhones and compatible card readers. The main lesson is to test the setup before relying on it. Connect the card reader, export a few photos, open them from the SD card, and confirm everything works. Once the test succeeds, larger transfers feel much safer.
The biggest mistake people make is deleting originals too quickly. A transfer is not truly finished when the progress bar disappears. It is finished when you have opened the copied files, checked the folders, and confirmed the photos are readable. The second biggest mistake is treating an SD card as a permanent archive. SD cards are great for storage and transfer, but priceless photos deserve another backup too.
In short, the easiest daily method is the phone’s built-in file manager. The best Samsung method is My Files or Gallery. The best iPhone method is a compatible external card reader. The best big-library method is a computer. Use the method that fits the job, stay organized, and your phone storage will finally stop yelling at you.
Conclusion
Transferring photos from a phone to an SD card is not complicated once you know which method fits your device. Android users can usually move photos with Files by Google, My Files, or another built-in file manager. Samsung users get extra convenience through Gallery and My Files. iPhone users need a compatible SD card reader or external storage adapter. And for big photo libraries, a computer remains one of the most reliable tools.
The golden rule is simple: copy first, verify second, delete last. Your photos are not just files; they are birthdays, trips, pets, receipts, projects, memories, and occasionally blurry pictures of your pocket. Treat them with care, keep a backup, and use your SD card as a smart storage helper instead of a mystery box.





