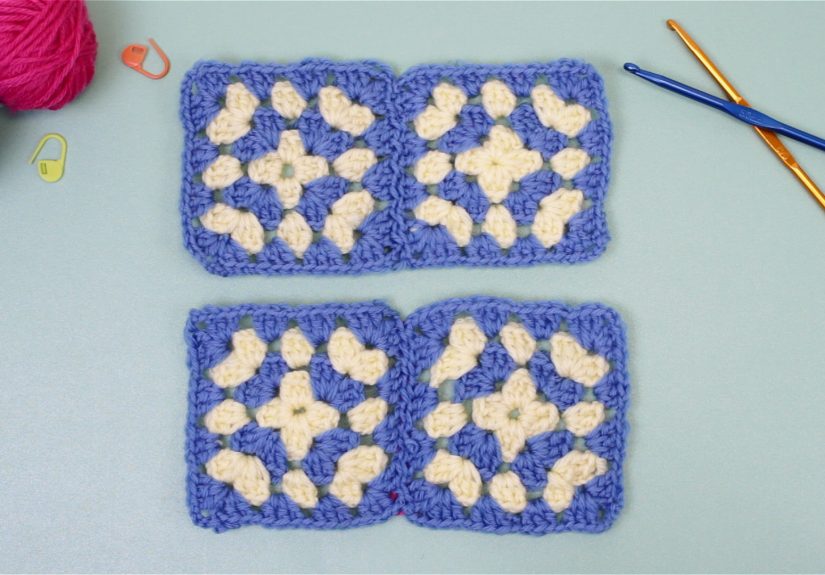
Table of Contents >> Show >> Hide
- Before You Join: The 10-Minute Setup That Saves 10 Hours
- Quick Picker: Which Method Should You Use?
- Method 1: Whip Stitch Join (Needle + Yarn)
- Method 2: Mattress Stitch (Invisible Seam)
- Method 3: Slip Stitch Join (Crochet Hook Seam)
- Method 4: Single Crochet Join (Strong + Decorative Ridge)
- Troubleshooting: When Your Joined Squares Misbehave
- FAQ: Smart Questions People Ask After They’ve Joined Exactly 12 Squares
- Conclusion: Pick a Join, Finish the Thing
- Extra: of Joining Experiences (What Crocheters Learn the Hard Way)
- SEO Tags
You did it. You crocheted a mountain of granny squares. They’re colorful, they’re cozy, they’re multiplying when you’re not lookingand now they’re all staring at you like, “So… are we becoming a blanket or what?”
Attaching granny squares is the moment your project goes from “craft chaos” to “I made a real thing!” The trick is choosing a join that matches your goal: invisible and polished, flat and flexible, or bold and proudly textured.
Below are four reliable, widely used ways to attach granny squarestwo sewn and two crochetedwith clear steps, pros/cons, and real-world tips so your finished piece looks intentional (even if you made half your squares while binge-watching TV).
Before You Join: The 10-Minute Setup That Saves 10 Hours
1) Block your squares (yes, even the “pretty close” ones)
Blocking sounds like the broccoli of crocheteveryone knows it’s good for you, but we’d rather eat snacks and keep stitching. Still, blocking is the fastest way to make squares the same size and reduce that “wavy quilt” look after joining.
- Natural fibers (wool, cotton blends): wet block or spray block, pin to shape, let dry fully.
- Acrylic: steam blocking can help relax stitchesjust use gentle steam and avoid pressing the iron directly onto the yarn.
2) Count stitches (your future self will thank you)
Granny squares can look identical but still hide a sneaky extra stitch on one side. If the stitch counts don’t match, you’ll get puckers or stretching when you attach granny squares. Quick fix: use stitch markers at corners and midpoint to line things up.
3) Plan your layout before you commit
Lay everything out on the floor/bed/table/available cat-free surface. Shuffle colors until it looks balanced. Take a photo. That photo becomes your map when your squares inevitably get “helpfully rearranged” by gravity, pets, or humans.
4) Choose joining yarn on purpose
The yarn you use to join granny squares can disappear… or become a design feature.
- Blend in: match the outer round color for a subtle seam.
- Stand out: use a contrast color for a graphic, patchwork look.
- Match weight and fiber: similar weight/fiber makes tension and wear more consistent.
Quick Picker: Which Method Should You Use?
If you’re torn between methods, use this “choose-your-own-seam-adventure” cheat sheet:
| Method | Look & Feel | Best For | Why You’ll Like It | Watch Outs |
|---|---|---|---|---|
| Whip Stitch (sewn) | Simple line of stitches; can be subtle or visible | Blankets, bags, fast assembly | Beginner-friendly, quick, tidy | Can show on the front if you use contrast yarn |
| Mattress Stitch (sewn) | Nearly invisible seam; polished finish | Garments, refined blankets, “store-bought” look | Clean join, minimal bulk | Slower; needs careful stitch alignment |
| Slip Stitch Join (crocheted) | Low-profile ridge; flexible | Afghans, shawls, projects needing a softer seam | Fast, no needle required | Too-tight slip stitches can pucker your work |
| Single Crochet Join (crocheted) | Bold ridge; sturdy and textured | Durable blankets, pillows, kid-proof projects | Strong seam, decorative by default | Bulkier; uses more yarn |
Method 1: Whip Stitch Join (Needle + Yarn)
Whip stitch is one of the easiest ways to attach granny squares. It’s basically the “classic handshake” of joining: simple, dependable, and hard to mess up. You’ll use a yarn needle (aka tapestry needle) and stitch through loops along the edges.
What it looks like
Whip stitch can look subtle if you match the joining yarn to the edges. If you use a contrasting yarn, it becomes a visible dashed line along the seam.
Step-by-step
- Align two squares with wrong sides together for a flatter seam (or right sides together if you want the seam hidden inside).
- Thread your needle with a long strand of yarn. A good rule: about 3x the seam length so you don’t run out mid-join.
- Start at a corner and insert the needle through matching loops/spaces on both squares. Pull snugnot tight.
- Continue along the edge, stitching through the same “type” of loop each time (many crocheters prefer using the outer loops so the seam is less bulky).
- Secure at the next corner with a small knot or by weaving through a few stitches, then weave in ends on the wrong side.
Pro tips for a cleaner whip stitch seam
- Use consistent loops: pick “both loops” or “outer loops” and stick to it so the seam looks even.
- Don’t strangle the yarn: if the seam puckers, you’re pulling too tight. Your squares should lie flat.
- Match corners first: put a stitch marker in both corner spaces before sewing so nothing shifts.
Best uses
Whip stitch is excellent for blankets, scarves, totes, and anything where you want a straightforward join that doesn’t add much bulk.
Method 2: Mattress Stitch (Invisible Seam)
If you want your granny squares to look like they magically fused together in a crochet lab, mattress stitch is your move. It’s often called an invisible seam because, when done well, you can barely see the join from the right side.
What it looks like
A tidy, nearly invisible join that brings edges together smoothlygreat for garments and “polished” blankets where you don’t want a ridge between squares.
Step-by-step
- Lay squares side by side with right sides facing up.
- Thread a yarn needle with matching yarn (or the yarn tail from one square if it’s long enough).
- Identify the “ladder” loops along the edgesoften the horizontal bars or the inside loops one stitch in from the edge. The key is to consistently pick the same structure on both squares.
- Weave back and forth: go under a loop on Square A, then under the matching loop on Square B, repeating like you’re lacing shoes (but calmer).
- Every few inches, gently pull the yarn to “zip” the seam closed. You should see the edges snug together without puckering.
- Finish at the corner, secure, and weave in ends on the wrong side.
Why mattress stitch is worth the extra minute
- It looks professional: great for cardigans, vests, and refined throws.
- It reduces bulk: fewer ridges means a smoother drape.
- It plays nicely with color changes: especially when squares have different edge colors.
Best uses
Use mattress stitch when you care most about appearance and comfort: wearables, baby blankets, lap blankets, and decorative pieces that you want to look “finished-finished.”
Method 3: Slip Stitch Join (Crochet Hook Seam)
Slip stitch join is the quickest crochet-hook method to join granny squares. It creates a small ridge (usually on the wrong side if you work it that way), and it’s a fantastic option when you want speed without a big, chunky seam.
What it looks like
A subtle seam that can resemble a little chain line. Depending on whether you work through both loops or back loops only, the seam can be slightly raised or fairly flat.
Step-by-step (classic slip stitch seam)
- Place two squares together. For a seam that hides more, try right sides together so you work on the wrong side.
- Insert hook into the first pair of matching stitches (many crocheters use back loops only to keep the seam neat).
- Yarn over and pull through all loops on the hook to make a slip stitch.
- Repeat across the edge, always entering matching stitches/spaces.
- At corners, work through the corner spaces (or corner chains) on both squares, then continue along the next side.
Make it prettier: three small upgrades
- Relax your tension: tight slip stitches = a wavy blanket. Aim for smooth and flexible.
- Try a contrast color: slip stitch joins can look like intentional piping when done in a bold shade.
- Use the same hook size (or one size larger) than you used for the squares if you tend to crochet tightly.
Best uses
Great for blankets, wraps, and projects where you want a simple join that doesn’t scream “HELLO I AM A SEAM” but still holds up well.
Method 4: Single Crochet Join (Strong + Decorative Ridge)
Single crochet join is the “yes, this seam is here and it’s fabulous” method. It creates a raised ridge and adds strength, which is perfect for heavily used blankets, pillow covers, and anything you expect to survive real life.
What it looks like
A textured ridge along the join. If you use a contrasting yarn, it becomes a bold outline that makes each square pop like stained glass.
Step-by-step
- Hold two squares together. For a ridge on the outside, place wrong sides together. For a ridge hidden inside, place right sides together.
- Insert hook through the first matching stitches/spaces on both squares.
- Yarn over, pull up a loop, then yarn over again and pull through both loops (one single crochet made).
- Continue across, working one single crochet in each matching stitch/space.
- Keep corners tidy by working into the corner spaces carefully (some patterns do one stitch; others do twofollow your square’s edge structure and aim for flat corners).
Why people love it
- Super sturdy: the seam holds up well to tugging, folding, and the occasional dramatic blanket burrito.
- Easy to keep even: single crochet has more structure than slip stitch, so it’s easier for many crocheters to maintain consistent tension.
- Design boost: change the joining color and your whole project gets a new vibe.
One honest warning
This method uses more yarn than a slip stitch seam and adds bulk. If you’re making a fitted garment, mattress stitch is usually the sleeker choice.
Troubleshooting: When Your Joined Squares Misbehave
Problem: My seam is wavy or ruffling
- Most common cause: joining too tightly (especially slip stitch joins).
- Fix: undo a few inches and rejoin with looser tension; consider a larger hook for crocheted seams.
- Prevention: block squares first and use stitch markers at corners and midpoints.
Problem: My squares don’t line up
- Most common cause: different stitch counts per side or uneven edging rounds.
- Fix: “ease in” a mismatch by occasionally stitching into a chain space or skipping a tiny spotbut keep it subtle and spaced out.
- Prevention: do a quick stitch count check before joining.
Problem: Corners look bulky
- Fix: join into corner spaces consistently, and avoid piling extra stitches into the corner unless your pattern requires it.
- Extra neatness: mattress stitch often produces the cleanest corners because it “zips” rather than stacks stitches.
Problem: My seam feels stiff
- Likely cause: bulky join (single crochet) or too-tight tension.
- Fix: switch to slip stitch join or a sewn method for more drape; loosen tension.
FAQ: Smart Questions People Ask After They’ve Joined Exactly 12 Squares
Should I join squares into rows first, then join the rows?
Usually, yes. Joining into long strips/rows helps keep your layout organized and makes it easier to spot mistakes early. After you have strips, join the strips together. This approach is especially helpful for blankets and large throws.
Can I “join as you go” instead of seaming later?
Yesjoin-as-you-go methods attach each new square to a neighbor while you crochet the final round (or an added joining round). It can save time and reduce end-weaving, but it requires planning your layout earlier since you’re connecting as you build.
What’s the best join for a granny square cardigan or vest?
For wearables, mattress stitch is often the most comfortable and polished because it keeps bulk down. If you want a decorative outline on a jacket-style piece, single crochet join can look amazingjust remember it adds structure.
Do I have to match the joining yarn exactly?
Nope. Matching yarn makes seams quieter; contrasting yarn turns seams into a design feature. If you’re unsure, test-join two squares with a few inches of seam in each color option and see what makes your heart do a little happy dance.
Conclusion: Pick a Join, Finish the Thing
The “best” way to attach granny squares is the one that matches your project’s personality. Want simple and speedy? Go whip stitch. Want sleek and invisible? Mattress stitch. Want fast with a hook and a low ridge? Slip stitch join. Want bold, sturdy texture? Single crochet join.
No matter which technique you choose, the real secret is consistency: block your squares, line up stitches, keep tension even, and repeat the same method across the whole project. Your blanket (or bag, or cardigan) will look intentionaland you’ll finally get your couch back from the granny-square pile.
Extra: of Joining Experiences (What Crocheters Learn the Hard Way)
Here’s the part nobody tells you when you start your first granny square project: joining is a skill, not a punishment. The first time you attach granny squares, it feels like trying to wrap a present with tape that only sticks to your fingers. You line up two squares perfectly… then somehow the corners drift like they’re avoiding commitment. That’s why experienced crocheters do a “dry run” firstlaying out the whole project, snapping a reference photo, and using stitch markers like tiny traffic cones that keep everything in its lane.
One of the biggest “aha” moments comes from tension. Slip stitch joins are fast, but if you pull each slip stitch tight (because neatness, right?), the seam turns into a drawstring. Suddenly your blanket ripples like it’s auditioning to be a sea creature. The fix is almost comically simple: loosen up. Some crocheters even go up a hook size for joining so the seam stays flexible. The same idea applies to sewn seams: snug is good; strangled is not.
Color choice is another experience-based lesson. Many people default to matching yarn for joining, then later realize a contrast seam could have elevated the whole design. A bold single crochet join can outline each square like a frame, making color changes look crisp and intentional. On the flip side, if you’re making a wearable, you may discover that “cute ridge” becomes “why is my armpit crunchy?”which is how mattress stitch wins the cardigan category. That nearly invisible seam can make a granny square garment feel smoother and more polished, especially when squares have busy patterns or multiple colors.
Then there’s the “ends” situation. Joining methods can reduce ends (join-as-you-go fans, we see you), but most projects still have a small forest of yarn tails. A common learning curve is realizing that weaving in ends isn’t a single stitch-and-done moment. The tails need to be woven through multiple directions, ideally through the bulkier parts of stitches, so they don’t wiggle free after a few washes. It’s not glamorous, but it’s the difference between a blanket that lasts and a blanket that slowly unravels during movie night.
Finally, a practical joining workflow often evolves with experience. Many crocheters start by joining random squares wherever they feel like it, then end up with a confusing, twisty shape that’s hard to keep flat. Over time, a cleaner system tends to emerge: join squares into rows (or columns), then join the rows together. This keeps the geometry predictable and makes it easier to correct mistakes early. And once you’ve finished one big granny square project, you’ll recognize the real victory: the join you chose becomes part of your style. Some people love the bold ridge of single crochet seams. Some prefer seams that vanish. Either way, you’re no longer “just making squares”you’re building fabric on purpose.




