Table of Contents >> Show >> Hide
- Why Upcycle Old Picture Frames?
- Quick Frame Check Before You Start
- At-a-Glance: Pick Your Upcycle
- Way #1: Turn a Frame Into a Stylish Serving or Catchall Tray
- Way #2: Make a Jewelry Organizer (or Key + Mail Station) From a Frame
- Way #3: Build a Good-Looking Memo Board From a Frame (Dry-Erase or Chalkboard)
- Finishing Touches That Make Any Frame Upcycle Look Professional
- Common Mistakes (and Quick Fixes)
- Real-World Upcycling Experiences (Extra )
- Conclusion
- SEO Tags
Old picture frames have a special talent: they show up everywhere (thrift stores, closets, your aunt’s garage),
and somehow you end up adopting them like stray kittens. The good news? Frames are sturdy, reusable “structures”
that can hold way more than photosmeaning they’re perfect for easy, high-impact upcycling.
Below are three practical, good-looking ways to upcycle old frames into pieces you’ll actually use:
a tray, an organizer, and a memo board. Each project is beginner-friendly, budget-friendly, and flexible enough
to match your stylemodern, farmhouse, maximalist, “I-found-this-at-8:59-PM-before-guests-arrived,” you name it.
Why Upcycle Old Picture Frames?
Upcycling keeps usable items out of the trash, saves money on home decor, and gives you a custom result you
can’t easily buy off the shelf. Frames are especially great because they’re already built with clean edges,
strong corners, and a finished profileso your DIY starts halfway to “store-bought.”
Quick Frame Check Before You Start
1) Make sure the frame is structurally sound
- Wiggle test: If the corners wobble, plan to re-tighten or re-glue before decorating.
- Back channel: Check that the groove (where glass/backing sits) isn’t cracked or split.
- Depth: Deeper frames are easiest for trays and bulletin boards, but shallow frames can still work.
2) Be smart about older paint and glass
-
Older paint: If you’re working with a vintage frame and you can’t confirm the paint history,
avoid aggressive dry sanding. Clean first, consider sealing, and use cautious prep methods. -
Glass: If the glass is chipped, replace it (acrylic/plexiglass is lighter and less fragile),
especially for projects you’ll handle often. - Ventilation: Painting, spray priming, and strong adhesives are always happier in fresh air.
At-a-Glance: Pick Your Upcycle
| Upcycle | Best For | Skill Level | Typical Time |
|---|---|---|---|
| Frame → Tray | Entryway catchall, vanity, coffee table styling | Beginner | 60–120 minutes (plus dry time) |
| Frame → Organizer | Jewelry, keys, small accessories, mail station | Beginner+ | 60–150 minutes |
| Frame → Memo Board | To-do lists, meal plans, reminders, habit trackers | Beginner | 30–120 minutes |
Way #1: Turn a Frame Into a Stylish Serving or Catchall Tray
A frame tray is the kind of project that makes people say, “Where did you buy that?” and you get to say,
“I didn’t. I rescued it from a dusty shelf and gave it a better future.” (Optional: hair flip.)
What you’ll need
- One sturdy picture frame (wood is easiest)
- Thin plywood, MDF, or hardboard cut to fit the back opening
- Wood glue + small brad nails or short screws (or a staple gun, depending on frame thickness)
- 2 handles (drawer pulls work great)
- Paint or stain + optional primer
- Optional: decorative paper/fabric, felt pads, clear sealer
Step-by-step
- Disassemble: Remove the backing, paper, and any old hardware. Keep the frame.
-
Create the tray bottom: Use the old backing as a template to cut a new bottom from thin wood.
The bottom should sit neatly in the back opening. -
Attach the bottom: Run a thin bead of wood glue along the back edge, set the bottom in place,
then secure with brads or short screws. (If your frame is delicate, pre-drill tiny pilot holes.) - Paint or stain: Clean first, prime if needed, then paint/stain. Let it fully dry.
-
Add handles: Measure so handles are centered and level. Pre-drill to prevent splitting,
then screw the handles on. -
Finish the underside: Add felt pads to protect surfaces. If you want a cleaner look, cover the
underside with fabric or paper using adhesive.
Design upgrades that make it look expensive:
- “Lined” interior: Add peel-and-stick wallpaper or fabric under a clear acrylic sheet for a neat finish.
- Mirror moment: Use acrylic mirror as the tray base for a glam vanity tray vibe.
- Two-tone paint: Paint the frame one color and the interior base another for contrast.
- Hardware swap: Matte black or brushed brass handles can instantly modernize a thrifted frame.
Example uses: An entryway “drop zone” for keys and sunglasses, a coffee table tray for candles
and remotes, a bathroom tray for skincare bottles, or a bedside tray for book-and-water-glass life decisions.
Pro tip: If you plan to carry heavy items, choose a chunky frame and attach the base with both
glue and fasteners (not glue alone). Trays have trust issues when overloaded.
Way #2: Make a Jewelry Organizer (or Key + Mail Station) From a Frame
Frames are basically ready-made organizer borders. Add the “inside” (mesh, cork, hooks), and you’ve got a
wall-mounted helper that stops necklaces from tangling into what can only be described as a shiny emotional spiral.
Option A: Hanging jewelry organizer with mesh
Best for: earrings, necklaces, bracelets, hair accessories
What you’ll need
- Picture frame (medium to large works best)
- Metal mesh, wire grid, or sturdy hardware cloth cut slightly larger than the opening
- Staple gun and staples (or small screws + washers)
- Small cup hooks or a hook rail (optional, for the bottom edge)
- Paint (optional)
Step-by-step
- Remove glass/backing: You want an open frame.
- Prep the frame: Tighten corners if needed. Paint now if you want a new color.
-
Attach mesh: Place the mesh on the back side of the frame opening and staple around the edges.
If the frame is hard wood, screws with washers can hold mesh securely. - Add hooks (optional): Screw small hooks into the bottom edge for necklaces or keys.
- Mount safely: Hang using appropriate wall anchors or into studs, especially if you’ll load it up.
Option B: Pretty pin-and-hang organizer with fabric + hooks
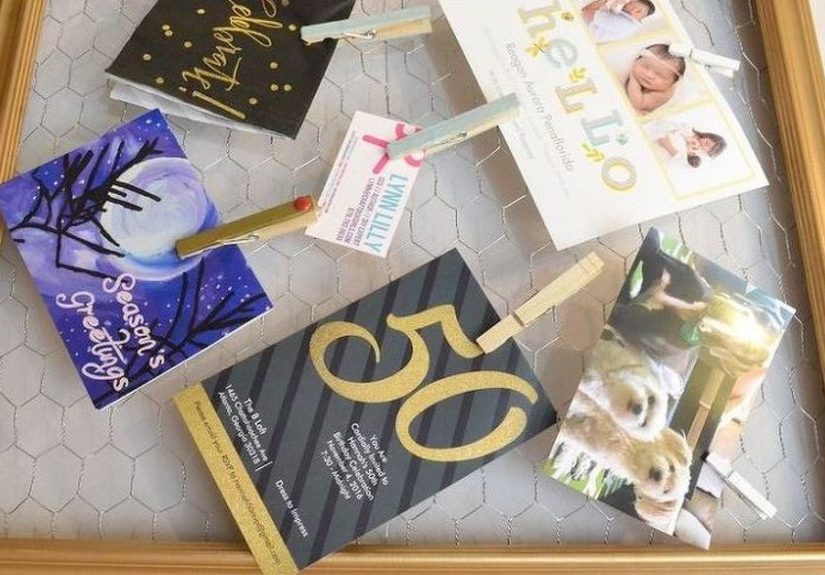
If mesh isn’t your style, add a padded backing (like cork or foam board) and wrap it with linen or cotton.
Now you can pin notes, clip photos, and hang keys belowaka the “command center” you always meant to have.
- Backing: cork sheet, cork board, or foam board cut to fit
- Wrap: fabric pulled tight and stapled to the back of the backing panel
- Assemble: put the wrapped panel into the frame and secure with frame tabs or small nails
- Finish: add hooks or a small shelf ledge if your frame is deep enough
Example uses:
- Bedroom jewelry display (no more “where’s the other earring?”)
- Entryway key station with a small mail clip
- Craft room organizer for scissors, ribbon spools, and inspiration notes
Pro tip: If you’re using mesh for earrings, choose a tighter grid for studs and small hoops,
or add ribbon strips across the opening so studs can poke through neatly.
Way #3: Build a Good-Looking Memo Board From a Frame (Dry-Erase or Chalkboard)
The humble memo board is underrated. Put it in a nice frame, though, and suddenly your grocery list looks
like it has a personal stylist. This project is also the fastest path from “I’ll remember that” to
“I absolutely will not remember that.”
Option A: The easiest dry-erase board (use the glass)
What you’ll need
- Frame with intact glass (or replace with acrylic)
- Decorative paper (wrapping paper, scrapbook paper, or printed calendar layout)
- Dry-erase marker
Step-by-step
- Clean the glass: Remove smudges so writing wipes off easily.
-
Add a background: Cut decorative paper to size and place it behind the glass, inside the frame.
Choose light patterns for readability. - Reassemble: Put the backing back on and hang the frame.
- Write + wipe: Use dry-erase markers on the glass surface.
Make it even better: Create sections with thin washi tape on the outside of the glass:
“To Do,” “This Week,” “Don’t Forget,” “Stop Buying More Frames.”
Option B: Chalkboard insert (classic, cozy, forgiving)
For a chalkboard version, you’ll swap the paper for a painted insert. This is great if you like chalk markers,
want a darker look, or prefer a softer, less “office supply aisle” vibe.
What you’ll need
- Thin wood panel or hardboard cut to fit the frame opening
- Primer (especially for bare wood)
- Chalkboard paint
- Foam roller or smooth brush
Step-by-step
- Cut and test-fit: The panel should sit neatly inside the frame’s back channel.
- Prime: A primer coat helps paint adhere and keeps the finish smooth.
- Paint: Apply thin, even coats. Let each coat dry and add a second (or third) coat if needed.
- Cure: Let the surface fully dry before use (follow your paint directions).
- Condition: Rub the side of chalk across the surface, then wipe clean. Now it erases better.
- Assemble and hang: Secure the insert in the frame and mount it.
Option C: Push-pin board (linen + cork = always cute)
- Backing: cork cut to size (or a thin cork roll over a foam board)
- Wrap: linen or canvas fabric pulled tight and stapled to the back
- Reassemble: place it in the frame and secure
- Use: pin invitations, receipts, kids’ art, and the business card you swear you’ll call
Example uses:
- Kitchen meal plan + grocery list
- Home office task board
- Family command center for school dates and reminders
- Habit tracker (“water,” “stretch,” “be nice to myself,” “stop buying frames”)
Pro tip: If your dry-erase writing “ghosts,” use a whiteboard cleaner or rubbing alcohol on a soft cloth.
For chalkboard paint, avoid soaking the surfaceuse a lightly damp cloth and dry it after.
Finishing Touches That Make Any Frame Upcycle Look Professional
- Corner cleanup: If corners gap, clamp and glue them before you paint.
- Hardware update: New hanging hardware and modern hooks instantly elevate thrifted frames.
- Color strategy: Pick one “anchor color” you already have in your room, then choose a complementary frame finish.
- Seal smart: A clear topcoat helps trays and organizers survive daily use.
- Rubber bumpers: Tiny bumpers on the back keep wall pieces straight and prevent scuffs.
Common Mistakes (and Quick Fixes)
“My tray bottom is sagging.”
Use a thicker base panel or add a simple brace strip across the center on the underside.
Also, make sure the base is secured with both adhesive and fasteners if you’ll carry weight.
“My frame is crooked on the wall.”
Add bumpers to the bottom corners and check that your hanging hardware is centered and tight.
If the frame is slightly warped, a second anchor point can stabilize it.
“The mesh is wavy.”
Pull it tighter before stapling, working opposite sides like you’re stretching a canvas.
If it’s already attached, remove a few staples, re-tension, and re-staple.
“My paint looks bumpy.”
Clean and de-gloss first, use thin coats, and consider a foam roller for a smoother finish.
Many frames have carved detailwork the paint into grooves, but don’t overload the brush.
Real-World Upcycling Experiences (Extra )
Upcycling frames is one of those projects that looks effortless onlineuntil you’re holding a frame that smells
like 1997 potpourri, the corners are loose, and you’re asking yourself why the backing paper is apparently
glued on with the strength of a thousand suns. If that sounds familiar, you’re not doing it wrong; you’re doing
it realistically. Here are a few “been there” moments that can save you time, money, and at least one dramatic sigh.
The Thrift Store Frame That’s Pretty… Until You Touch It
Many upcyclers learn quickly that ornate frames can be gorgeous but fragile. The trick is to treat the frame like
a decorative shell: stabilize first, decorate second. Tighten any loose joints, and if the corners flex, clamp and
glue before you paint. Otherwise, you’ll get that fun surprise where the frame looks perfect on the table, then
slowly becomes a parallelogram on the wall.
The “I’ll Just Sand It Real Quick” Trap
People often start with sanding because it feels like the official DIY handshake. But older finishes can be messy,
dusty, and unpredictable. A lot of successful frame upcyclers switch to a gentler approach: clean thoroughly,
lightly scuff only when necessary, and use a bonding primer to help paint stick. It’s not cutting cornersit’s
choosing the smartest corner to cut. Your lungs will send a thank-you note.
The Tray That Looked Amazing… Until It Had to Do Tray Things
A frame tray is easy to build; a frame tray that survives daily life is the real glow-up. The most common lesson:
the base matters. A thin backing panel may work for a lightweight catchall, but if you want to carry mugs, books,
or a breakfast situation, choose a sturdier base panel and reinforce it. Another “wish I knew” tip: pre-drill for
handles. It takes two minutes and prevents that heartbreaking crack that appears exactly where you wanted “clean and modern.”
The Jewelry Organizer That Turned Into a Tangle Museum
Upcyclers love the idea of hanging necklacesuntil they realize necklaces love each other a little too much.
The fix is simple: add spacing. Use a row of evenly spaced hooks, or install a small bar/rail so chains don’t pile
onto the same spot. Another win: mix storage types. Mesh for earrings, hooks for necklaces, and a tiny shelf or cup
for rings turns your organizer into a systemnot just a decorative suggestion.
The Memo Board That Accidentally Became the Family’s Favorite Object
A framed memo board is one of those “small” projects that ends up changing routines. People start using it for meal
plans, reminders, kid schedules, quick doodles, and the occasional motivational message that’s half sincere and half
comedy. The biggest lesson here is placement: put it where decisions happen. Kitchen, entryway, near the coffee maker
anywhere you naturally pause. And if you want it to stay cute, keep a marker/chalk in a clip on the frame so you’re
not hunting one down like it’s a missing sock.
The shared theme across all these experiences is simple: the best frame upcycles aren’t the fanciest. They’re the
ones designed for real lifesturdy bases, smart hardware, easy maintenance, and a finish you won’t baby. Once you
build one piece that actually earns its spot in your home, you’ll start looking at every dusty frame like it’s not
clutterit’s “raw materials.” (That’s how it starts.)
Conclusion
Upcycling old frames is one of the easiest ways to get custom home decor without custom price tags. Whether you turn
a frame into a tray, an organizer, or a memo board, you’re working with a structure that’s already built to look finished.
Start with the project that solves your most annoying daily problemlost keys, messy jewelry, forgotten to-dosand you’ll
end up with something that’s both pretty and useful. That’s the sweet spot.




