Table of Contents >> Show >> Hide
- Why Two-Material DIY Projects Are Kind of Genius
- Meet the Project: From Thrifted Table to Showpiece
- The Two Hero Materials: Sandpaper and Polycrylic
- Step-by-Step: Turn “This” Table Into “That” Beauty
- Creative Variations Using the Same Two Materials
- Safety, Time, and Cost: What to Expect
- Extra : Real-Life Lessons From Two-Material Makeovers
If you think you need a truckload of fancy products to flip a sad little table into a gorgeous showpiece, I have excellent news for you: you really
don’t. The viral “This to That With Just a Two Main Materials!?” project on Hometalk proves you can transform tired furniture with basically two
stars of the show sandpaper and a clear topcoat plus a bit of elbow grease and coffee-fueled determination.
In this guide, we’ll walk through how to turn a basic bargain table (or nightstand, or sideboard, or whatever lonely piece is hiding in your garage)
into something worthy of a magazine spread using just two main materials. We’ll talk about why simple two-material DIY projects are so powerful,
break down the steps in plain English, and share some real-life lessons from other makeovers so you can skip the rookie mistakes and go straight to
the “wow, you did that?” moment.
Why Two-Material DIY Projects Are Kind of Genius
Two-material projects sound almost too good to be true, but there are real advantages, especially if you’re new to DIY or working on a tight budget.
1. Less Overwhelm, More Action
A full-blown furniture refinishing kit can feel intimidating: stripper, conditioner, stains, dyes, multiple sealers, specialty brushes, and fifteen
types of sandpaper. When you limit yourself to two main materials, your brain can relax. You’re not juggling chemistry; you’re just sanding and
sealing. That simplicity makes you way more likely actually to start and finish the project.
2. Budget-Friendly and Thrift-Store Approved
Sandpaper and a water-based sealer like polycrylic are among the most affordable “big-impact” products in the DIY aisle. Combine those with a $10–$30
Facebook Marketplace or thrift-store find, and you’ve got a furniture flip that costs less than dinner and movie and lasts a whole lot longer.
3. Beginner-Friendly but Still Impressive
You don’t need advanced skills to sand and seal wood. As long as you work in the right order and avoid a few common mistakes (we’ll talk about those
in a minute), you can get a professional-looking finish without power tools or complicated techniques. The end result feels like a major glow-up, even
though the process is surprisingly straightforward.
Meet the Project: From Thrifted Table to Showpiece
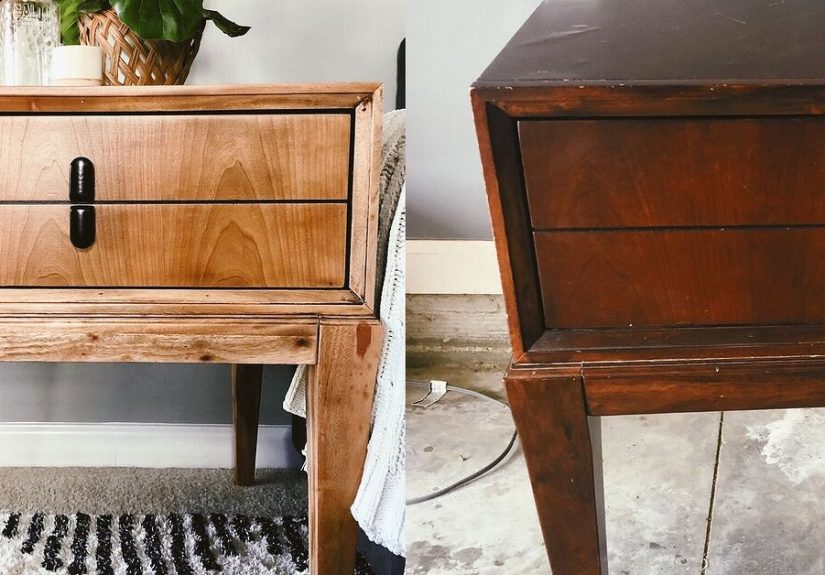
Picture this: you snag a small wood side table for around $15 from a local buy-and-sell group. The bones are solid, but the old finish is scratched,
shiny in weird places, and carrying mysterious cup rings from at least three different decades. Instead of painting over everything, the Hometalk-style
makeover focuses on revealing the beauty of the wood that’s already there.
The strategy is simple:
- Use sandpaper to strip away the old finish and smooth the surface.
- Use a clear polycrylic sealer to protect the freshly sanded wood and bring out its natural color.
That’s it. No stain. No paint. No fancy glaze. With careful sanding and a few thin coats of sealer, the piece goes from “this” (dull, dated, and
forgotten) to “that” (clean, modern, and ready for compliments).
The Two Hero Materials: Sandpaper and Polycrylic
Sandpaper: Your Low-Tech Magic Wand
Sandpaper is doing most of the heavy lifting here. You’ll generally want a few grits:
- Medium grit (80–120) to remove old finish and minor scratches.
- Fine grit (180–220) to smooth the wood and prep for sealer.
- Extra-fine grit (320+) for a quick between-coat buff if needed.
You can absolutely sand by hand if your piece is small. For larger surfaces, an inexpensive orbital sander speeds things up, but it’s not mandatory.
The key is to let the sandpaper do the work don’t grind so hard that you gouge the wood. Light, even pressure and long strokes in the direction of
the grain are your best friends.
Polycrylic: The Clear, Hard-Working Topcoat
Polycrylic is a water-based protective finish that dries clear, doesn’t yellow like some oil-based polyurethanes can, and has relatively low odor.
It’s ideal when you want a natural wood look with subtle sheen rather than a dark stain or paint. For a simple furniture flip, it gives you:
- Protection from spills, scuffs, and everyday wear.
- Clarity that lets the grain shine through instead of coloring it.
- Ease of use easy to brush on, quick-drying, and simple to clean up with soap and water.
Choose your sheen (matte, satin, semi-gloss, or gloss) based on the vibe you want. Satin is a great all-around choice that hides fingerprints but
still looks polished.
Step-by-Step: Turn “This” Table Into “That” Beauty
Step 1: Clean and Inspect
Before you touch the sandpaper, give the piece a good cleaning. Wipe away dust, grease, and crumbs with a mild cleaner and a damp cloth, then let it
dry completely. Check for loose joints, wobbly legs, or missing screws. Tighten what you can and glue any wobbly joints so the table is sturdy before
you glam it up.
Step 2: Sand Off the Old Finish
Start with your medium-grit sandpaper. Work in the direction of the wood grain and focus on getting a consistent, dull look across the surface that
tells you the old finish has been removed. For corners and carved details, fold the sandpaper or use a sanding sponge so you can get into all the
little nooks.
Once the old finish is mostly gone and the surface feels fairly smooth, switch to a finer grit. This second pass is less about stripping and more
about smoothing. You’re aiming for a touchably soft surface with no rough patches or visible scratch marks.
Step 3: Remove the Dust (Don’t Skip This!)
Dust is the enemy of a smooth topcoat. Vacuum the surface or wipe it with a dry microfiber cloth, then follow up with a slightly damp cloth or tack
cloth to catch the extra-fine particles. Let the wood dry again so there’s no moisture trapped under your sealer.
Step 4: Brush on the Polycrylic
Stir (don’t shake) the polycrylic so you don’t create bubbles. Use a high-quality synthetic-bristle brush or a foam brush, and apply a thin, even coat
with the grain. Resist the urge to brush over the same spot repeatedly that’s how you get streaks and bubbles.
Let the first coat dry according to the instructions on the can, usually a couple of hours. Once dry, lightly sand the surface with extra-fine
sandpaper to knock back any little nibs or rough spots. Wipe off the dust, then apply a second thin coat. For tabletops or high-traffic pieces, a
third coat is a good idea.
Step 5: Let It Cure and Then Style It
The piece will be dry to the touch relatively quickly, but full cure time can take a few days. During that time, be gentle no heavy decor or
standing on the table “just to see if it’s sturdy.” Once it’s fully cured, style it with a lamp, a stack of books, or a plant and enjoy your
two-material masterpiece.
Creative Variations Using the Same Two Materials
The beauty of this method is that you can tweak the look without adding a bunch of extra supplies:
- Rustic farmhouse: Sand a bit extra at the edges and corners before sealing to create a naturally distressed, well-loved look.
-
Modern minimal: Sand carefully until the grain looks super even and smooth, then use a satin or matte polycrylic for a sleek, clean
finish. -
Two-tone: Focus your sanding on the top and drawer fronts and leave the legs slightly darker. The polycrylic will bring both tones
together without needing stain.
You can repeat the same approach on other pieces – a nightstand, a bench, or even wooden chairs – and get a cohesive look throughout the room while
still keeping your supply list minimal.
Safety, Time, and Cost: What to Expect
One of the best parts of a two-material makeover is that it’s realistic for a single afternoon or weekend project. Here’s a rough breakdown:
- Time: 2–4 hours of active work plus drying time between coats.
- Cost: A basic set of sandpaper and a quart of polycrylic typically stay under $30, and you’ll have product left for future projects.
- Skill level: Beginner-friendly, as long as you read the label on your sealer and don’t rush the drying stages.
Always sand in a well-ventilated area and wear a dust mask to keep fine particles out of your lungs. When applying polycrylic, open a window if you
can, and protect your work surface with a drop cloth or cardboard.
Extra : Real-Life Lessons From Two-Material Makeovers
So what happens after you’ve done one of these “this to that” transformations? You start seeing potential everywhere. That slightly sticky nightstand?
Sand it. The orange-toned coffee table from the late ’90s? Sand it. The console table with a too-shiny finish that reflects every crumb? Yep, sand it,
seal it, call it a day.
Many DIYers who try a two-material flip for the first time say the biggest surprise is how forgiving the process is. Maybe you’re worried that you’ll
sand too much or leave swirl marks. The reality is that wood is more resilient than it looks. If you spot a scratch or uneven patch after your first
pass, you can usually fix it by going back with a finer grit and smoothing things out. It’s less like surgery and more like erasing pencil marks.
Another common experience is the “I wish I’d started sooner” moment. That table you’ve been ignoring because you thought refinishing it required
complicated tools? Once you realize it’s mostly “scrub with sandpaper, brush on clear coat,” it feels almost silly that you let it sit in the corner
for so long. Many people report that their first two-material flip becomes the gateway project that gives them confidence to tackle bigger DIY dreams:
building a headboard, refinishing a dresser, even installing simple shelving.
Of course, not every moment is glamorous. There will be dust. Your arm might feel like jelly after sanding the top of a solid wood table. You might
discover that someone before you used a mystery varnish that’s stubborn in patches. This is where patience comes in. Taking breaks, changing out worn
sandpaper instead of forcing it, and reminding yourself that progress is more important than perfection will keep you going when you’re tempted to give
up and drag the piece back to the curb.
What really sells people on two-material makeovers, though, is the transformation in how they feel about their homes. There’s a real shift when you
walk past a piece of furniture and think, “I made that look good.” The table isn’t just a place to drop keys; it’s a small daily reminder that you are
capable of learning new skills and improving your space on your own terms. That sense of ownership is addictive in the best way.
You also start to shop differently. Instead of scanning for glossy showroom pieces, you look for sturdy shapes and good wood underneath less-than-ideal
finishes. A scratched thrift-store find becomes an opportunity rather than an eyesore. You’re no longer at the mercy of whatever is trending in the big
box store; you can create unique pieces that fit your style, whether that’s coastal, farmhouse, mid-century, or “I just want it to look less orange.”
If you’re nervous about committing your “good” furniture to a first attempt, start with a small side table or plant stand. Use that as your practice
piece, learn how the sandpaper feels, and see how polycrylic dries on your wood. You’ll gain confidence without risking a big-ticket item. Once you’ve
done one, you’ll realize that the basic formula doesn’t really change just the size and shape of the piece in front of you.
In the end, “This to That With Just a Two Main Materials!?” isn’t just a catchy project title it’s a mindset. It’s about recognizing that you don’t
need a garage full of tools or a pro-level workshop to make a meaningful change in your home. Sometimes two simple materials, a free afternoon, and a
willingness to get a little dusty are all it takes to turn “this” tired furniture into “that” custom piece you’re proud to show off.
So grab some sandpaper, pick up a can of polycrylic, and go find the most neglected table in your house. In a few hours, you’ll be staring at it
thinking, “How was that ever a before picture?”





