Table of Contents >> Show >> Hide
- Why Use Velcro-Style Picture Hanging Strips?
- What You Need Before You Start
- How to Hang Pictures with Velcro: 10 Steps
- Step 1: Choose the Right Strips for the Frame
- Step 2: Check the Wall Surface and Room Conditions
- Step 3: Clean the Wall Properly
- Step 4: Prep the Frame
- Step 5: Mark the Placement on the Wall
- Step 6: Attach the Strips to the Frame
- Step 7: Press the Frame to the Wall
- Step 8: Remove the Frame Briefly and Reinforce the Bond
- Step 9: Rehang the Picture and Test It Gently
- Step 10: Remove It the Right Way Later
- Common Mistakes to Avoid
- Best Places to Use Velcro Picture Hanging Strips
- Are Velcro Strips Better Than Nails?
- Extra Experience and Real-Life Lessons from Hanging Pictures with Velcro
- Final Thoughts
- SEO Tags
Hanging pictures should not feel like a trust fall between your wall, your frame, and your last remaining ounce of patience. If you want a clean look without hammering nails into drywall, hook-and-loop picture hanging stripsoften casually called “Velcro strips”can be a smart, renter-friendly solution. They are easy to use, surprisingly tidy, and perfect for everything from family photos to lightweight wall art.
That said, this is one of those DIY jobs that looks foolproof right up until your frame slides off the wall at 2 a.m. and scares the soul out of everyone in the house. The good news? Most picture-hanging disasters happen for predictable reasons: the wall was dusty, the strips were undersized, the paint was too fresh, or the frame was hung too soon. In other words, a little prep goes a long way.
This guide breaks the process into 10 simple steps so you can hang pictures with Velcro-style strips neatly, securely, and without turning your wall into a patching project. Along the way, you will also learn where these strips work best, what mistakes to avoid, and how to remove them later without wrecking your paint job.
Why Use Velcro-Style Picture Hanging Strips?
The biggest advantage is obvious: no nails, no drill, no shower of mysterious drywall dust in your hair. These hanging strips are designed to grip the wall and the frame, then lock together so the picture stays in place. They are especially handy for renters, dorm rooms, apartments, offices, and anyone who likes to redecorate every time they watch one home makeover video online.
They also help frames sit more flush against the wall than some wire-hung options. That means less tilting, less crookedness, and less of that annoying “why does this frame always look drunk?” effect. For gallery walls, they can make alignment easier because you can reposition the frame more cleanly than with traditional nails.
Still, these strips are not magic. They work best on clean, smooth, indoor surfaces and on frames that fit the product’s weight rating. They are not ideal for every wall type, every climate, or every valuable piece of art. If you treat them like a universal solution, your wall may file a complaint. If you use them correctly, though, they can be a DIY lifesaver.
What You Need Before You Start
- Velcro-style picture hanging strips sized for your frame
- A clean microfiber cloth
- Isopropyl rubbing alcohol
- Tape measure
- Pencil
- Level or small laser level
- Your picture frame or wall art
How to Hang Pictures with Velcro: 10 Steps
Step 1: Choose the Right Strips for the Frame
Before you peel anything, check the size and weight of your frame. This part matters more than people think. The strip package will tell you how much weight it can support and how many pairs you need. Do not “eyeball it” and decide your frame is “probably fine.” That sentence has launched many a frame onto many a floor.
If the picture is large but lightweight, you may still need multiple strip pairs to distribute the load evenly. If it is heavy, bulky, or especially valuable, consider whether adhesive hanging is really the best method. In general, follow the packaging exactly rather than improvising with extra strips or mismatched products.
Step 2: Check the Wall Surface and Room Conditions
Velcro-style hanging strips usually work best on smooth, sealed surfaces such as painted drywall, finished wood, tile, metal, or glass. They are far less reliable on rough brick, heavily textured walls, peeling paint, wallpaper, or damp surfaces. If your wall feels like sandpaper, the strips may not bond well enough for a secure hold.
Also think about the room itself. Bathrooms, kitchens, and laundry rooms can be challenging because heat, humidity, and steam can weaken adhesives over time. That does not mean it is impossible to hang art there, but it does mean you should be extra cautious about placement, strip selection, and weight.
Step 3: Clean the Wall Properly
This is the least glamorous step and one of the most important. Wipe the wall area with isopropyl rubbing alcohol and let it dry fully. Do not use household cleaners or surface sprays, even the ones that smell like a lemon orchard and promise to remove everything except regret. Many leave behind residue that can interfere with the adhesive.
If the wall was recently painted, do not rush the process. Fresh paint needs time to cure before adhesive products are used. Hanging too early can weaken the bond or damage the finish when the strips are removed later.
Step 4: Prep the Frame
Turn the frame over and inspect the back. The mounting area should be smooth, firm, and clean. If the frame has sawtooth hangers, loose wire, protruding hardware, paper backing that lifts easily, or fuzzy felt pads in the strip placement area, fix that first. Hook-and-loop strips need good contact with a solid, flat portion of the frame.
This is also the moment to think like gravity. Where will the weight sit? Where will the tension pull? Positioning the strips evenly near the corners or along the sides helps keep the frame level and reduces wobble once it is on the wall.
Step 5: Mark the Placement on the Wall
Use a tape measure and pencil to lightly mark where the top or center of the frame should go. For most wall art, the visual sweet spot is around eye level, though this can vary depending on ceiling height, furniture placement, and whether the piece is part of a gallery wall.
A level is your friend here. Even the prettiest frame in the world looks suspicious when it leans a quarter inch to the left. If you are creating a grouping, use painter’s tape or paper templates first so you can step back and check spacing before you commit.
Step 6: Attach the Strips to the Frame
Separate and pair the strips as directed by the product, then press them together until they fasten securely. Attach the paired strips to the back of the frame in the recommended positions. Press firmly for the amount of time suggested on the packaging, making sure the full strip surface contacts the frame.
The goal is full, even contact. Do not place strips over dust, fabric, loose cardboard, or decorative trim that leaves gaps underneath. If the frame back is uneven, the strip may bond poorly at first and fail later, usually at a very dramatic moment.
Step 7: Press the Frame to the Wall
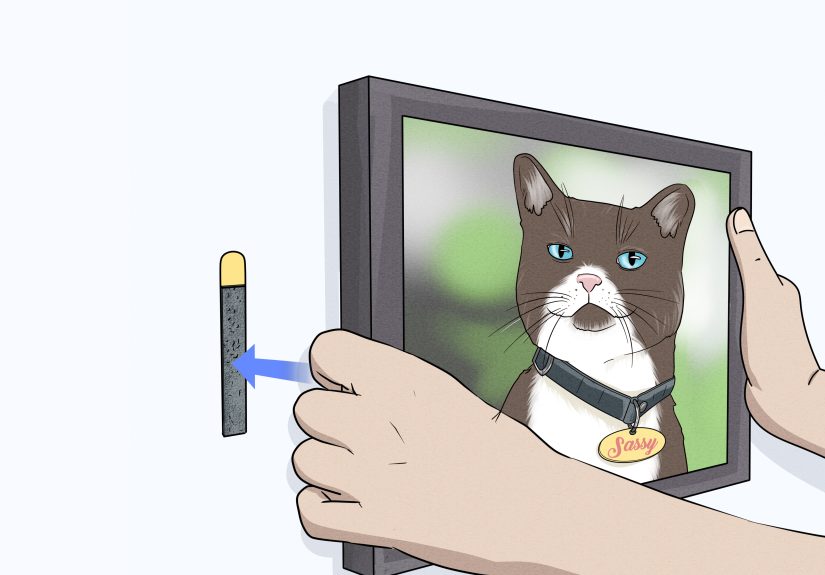
Remove the wall-side liners and carefully line the frame up with your pencil marks. Press the frame firmly against the wall. Use both hands and apply steady pressure where the strips sit. This is not a “gentle tap and hope for the best” situation. Give the adhesive a real chance to bond.
Pause, check the level, and make tiny adjustments only if the product instructions allow it. Once the strips grip, repeated sliding can reduce performance. A few extra seconds of careful alignment now can save you from redoing the whole thing later.
Step 8: Remove the Frame Briefly and Reinforce the Bond
This is the step many people skip, and then they wonder why the frame did a surprise swan dive. With many picture hanging strip systems, you press the frame onto the wall, then carefully pull the frame away from the bottom to separate the interlocking strips. That leaves the adhesive portions stuck in place on both the wall and frame.
Once separated, press the wall-mounted strips firmly again. Then wait the recommended amount of timeoften about an hourbefore reattaching the frame. Yes, waiting is annoying. No, the adhesive does not care about your schedule. Give it the curing time it needs.
Step 9: Rehang the Picture and Test It Gently
After the waiting period, line the frame back up and press until the strips lock together. You may feel or hear a slight click depending on the product. Step back and check for level. Then give the frame a very gentle tug to confirm it feels secure.
Do not yank it like you are testing a seat belt in an action movie. A cautious check is enough. If the frame shifts, sags, or seems loose, remove it and troubleshoot before leaving it up. Common causes include too few strips, poor wall prep, uneven frame backing, or a surface that is simply not a good match for adhesive hanging.
Step 10: Remove It the Right Way Later
One of the best things about Velcro-style picture hanging is easier redecorating. When it is time to move the frame, separate it from the wall as directed, then stretch the adhesive tabs slowly downward along the wall. Do not pull the tab outward from the wall. That is the move most likely to damage paint.
Go slowly, support the wall-facing part if needed, and be patient. Removal is not the time for brute force. Done correctly, the strips should come off far more cleanly than nails, screws, or mystery adhesive squares from the bottom drawer of your junk cabinet.
Common Mistakes to Avoid
- Using the wrong strip size: Always match the strip rating to the frame’s real weight.
- Skipping the wall cleaning step: Dust and residue weaken the bond fast.
- Hanging on textured or damaged walls: Rough surfaces reduce contact.
- Ignoring cure time: Adhesive needs time to build strength.
- Using strips on very valuable or irreplaceable art: For heirlooms or expensive pieces, traditional professional hanging may be safer.
- Placing art over beds or high-risk spots: Even a good bond should not be treated carelessly.
Best Places to Use Velcro Picture Hanging Strips
These strips shine in spaces where you want flexibility. Think apartments, dorm rooms, kids’ rooms, home offices, hallways, and temporary gallery walls. They are also useful for seasonal decor, lightweight canvas art, framed prints, and photos that you like to rotate through the year.
They are especially handy when symmetry matters. If you are lining up three matching prints over a sofa or making a neat row in a hallway, not having to patch extra nail holes after every adjustment feels like winning a small domestic lottery.
Are Velcro Strips Better Than Nails?
Better is not always the right word. Different is more accurate. Nails are often better for very heavy frames, valuable art, plaster trouble spots, and situations where long-term structural support matters most. Velcro-style hanging strips are better for convenience, damage reduction, easy repositioning, and lightweight to medium-weight wall decor on suitable surfaces.
In other words, do not compare them like rivals in a boxing ring. Think of them as tools with different jobs. If your goal is easy, neat, low-drama decorating, adhesive strips are often the more practical pick.
Extra Experience and Real-Life Lessons from Hanging Pictures with Velcro
One of the most useful things people learn after hanging pictures with Velcro-style strips is that success usually comes from patience, not strength. Many first-timers assume the trick is pressing as hard as humanly possible, when the real secret is the whole routine: the right strip size, a clean wall, an even frame back, and enough waiting time. People who skip those little details often blame the strips, when really they rushed the process like they were assembling furniture five minutes before guests arrived.
In rental homes, these strips can feel almost magical. You get the satisfaction of decorating without mentally calculating how much spackle, touch-up paint, and landlord diplomacy the move-out process will require. A lightweight black frame in an entryway, a small print above a desk, or a set of family photos down a hallway can all go up quickly and look polished. For many renters, that flexibility is the whole point. You can try a layout, live with it for a while, and change your mind later without turning the wall into a geology sample.
Families also tend to like Velcro hanging strips because homes evolve constantly. A nursery becomes a toddler room. A toddler room becomes a space themed around dinosaurs, astronauts, or whatever creature currently rules the household. Being able to swap art out without drilling new holes every six months is incredibly practical. It also helps in homes where children bump into walls, slam doors, or turn hallways into racetracks. Frames mounted more flush against the wall often wobble less than loosely hung pieces.
There are cautionary tales too, of course. A common one involves textured paint. Someone hangs a picture, it looks great for a week, and then gravity submits its rebuttal. Another involves kitchen walls near steam or heat, where adhesives can have a tougher life than expected. And then there is the classic mistake of trusting a strip with a frame that is technically under the weight limit but awkwardly bulky, unbalanced, or backed with material that gives the adhesive poor contact.
The best real-world strategy is to treat hanging strips as a smart system, not a shortcut. Test them with smaller frames first. Use them where the wall surface is smooth and stable. Save your antique mirror, sentimental heirloom, or expensive original art for more secure hardware. And once you find a method that works in your space, write it down mentally: clean with alcohol, measure twice, wait the full hour, and resist the urge to “just slap it up.” Funny enough, the people who get the best results are often the people who stop trying to outsmart the instructions.
In the end, hanging pictures with Velcro is less about gadgetry and more about everyday practicality. It is a simple solution that works beautifully when used with common sense. And honestly, any decorating method that lets you improve a room without summoning a drill, a patch kit, and a minor existential crisis deserves at least a little respect.
Final Thoughts
If you want an easy, low-mess way to decorate, hanging pictures with Velcro-style strips is one of the simplest home hacks around. The method is beginner-friendly, renter-friendly, and surprisingly polished when done right. The key is not speed. It is technique. Choose the correct strip size, prep the wall, place the frame carefully, give the adhesive time to bond, and remove it properly when the day comes.
Do that, and your pictures can stay beautifully in placewithout nails, without chaos, and without your wall looking like it lost an argument with a toolbox.




