Table of Contents >> Show >> Hide
- Why an Antique Buffet Makes a Great Kitchen Island
- Planning Before You Start
- Choosing the Right Antique Buffet
- Step-by-Step: How to Repurpose an Antique Buffet Into a Kitchen Island
- Design Ideas for Different Kitchen Styles
- Smart Storage Ideas
- Safety and Practical Considerations
- Common Mistakes to Avoid
- Cost and Time Expectations
- Real-Life Experience: Lessons From Repurposing an Antique Buffet Into a Kitchen Island
- Conclusion
- SEO Tags
An antique buffet already knows how to work hard. For decades, it may have held china, silverware, holiday linens, mystery keys, and at least one candle that no one remembers buying. So when a kitchen needs more storage, more counter space, and a little more soul, turning a repurposed antique buffet into a kitchen island feels less like a DIY shortcut and more like giving good furniture a promotion.
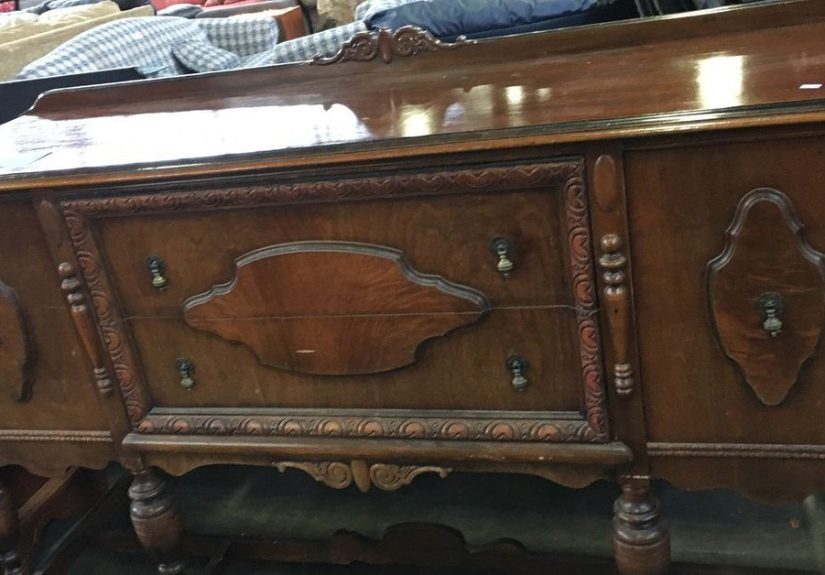
A buffet-turned-kitchen-island can add charm that brand-new cabinets often spend thousands of dollars trying to imitate. It brings carved details, solid wood, drawers, doors, patina, and personality into the busiest room in the house. Even better, it can be customized with a butcher-block top, stone slab, casters, shelves, towel bars, hooks, or a painted finish that matches your kitchen style.
But before you drag Grandma’s buffet into the center of the kitchen and declare yourself a design genius, there are a few practical details to consider. A kitchen island must be beautiful, yes, but it must also be stable, food-safe, comfortable to use, and placed where it will not turn your morning coffee routine into an obstacle course. This guide explains how to transform an antique buffet into a kitchen island with style, safety, storage, and long-term function in mind.
Why an Antique Buffet Makes a Great Kitchen Island
The best kitchen islands do three things well: they provide usable work surface, offer storage, and improve the way people move through the room. An antique buffet can do all three while also adding character that looks collected rather than copied.
It Has Built-In Storage
Most antique buffets were designed for dining rooms, which means they often include deep drawers, cabinets, shelves, and sometimes even divided compartments. In a kitchen, those same features can hold mixing bowls, baking sheets, napkins, utensils, cutting boards, cookbooks, serving trays, or small appliances. Instead of starting from scratch, you begin with a furniture piece that already understands organization.
It Adds Warmth to Modern Kitchens
Many kitchens today feature clean cabinet lines, stone countertops, stainless steel appliances, and bright white surfaces. Those are lovely, but they can sometimes feel a little too perfect, like a kitchen that has never met spaghetti sauce. An antique buffet brings warmth, wood grain, curves, hardware, and history. It creates contrast and makes the kitchen feel layered, lived-in, and personal.
It Can Be Budget-Friendly
A custom kitchen island can become expensive quickly, especially when cabinetry, countertops, electrical work, and installation are included. A secondhand buffet may cost far less, especially if you find one at an estate sale, antique shop, thrift store, salvage market, or online marketplace. Even after adding a countertop, paint, sealant, hardware, and minor repairs, a repurposed buffet kitchen island can still be a smart alternative to a fully custom build.
Planning Before You Start
The most successful buffet island projects begin with measuring, not daydreaming. Daydreaming is delightful, but it does not tell you whether your dishwasher door will still open.
Measure Your Kitchen Clearances
Walkways around a kitchen island matter. In many kitchens, a minimum of about 36 inches of clearance can work, while 42 to 48 inches is more comfortable for busy kitchens or spaces with multiple cooks. If the island will have seating, doors, drawers, or appliances opening nearby, give yourself more room whenever possible.
Use painter’s tape on the floor to mark the buffet’s footprint before moving the actual furniture. Then walk around it, open cabinets, pretend to unload groceries, and imagine someone else standing there asking where the spoons are. If the layout feels cramped during this pretend performance, it will feel worse during dinner prep.
Check the Height
Standard kitchen counter height is commonly around 36 inches. Many antique buffets are slightly lower, often in the 32- to 36-inch range. A lower buffet can still work beautifully as a baking station, coffee bar island, serving island, or casual prep surface. If you want it closer to counter height, you can raise it with a thicker countertop, new legs, a built-up base, or locking casters.
Be careful not to raise it so much that it looks awkward or becomes unstable. The finished island should feel natural to use, not like furniture wearing platform shoes.
Decide Whether You Want Seating
Not every repurposed antique buffet needs seating. In fact, many look better and function better as storage-and-prep islands. If you do want stools, plan for a countertop overhang. A 12-inch overhang is commonly used for counter-height seating, while deeper overhangs may need additional brackets, corbels, or structural supports.
Seating also requires more aisle space behind the stools. Without enough room, people will sit down, scoot back, and immediately block traffic like a stylish human roadblock.
Choosing the Right Antique Buffet
Not every buffet is ready for island life. Some are sturdy heroes. Others are wobbly drama queens held together by hope, wax, and one suspicious nail. Choose carefully.
Look for Solid Construction
A good candidate should have a strong frame, stable legs, functional drawers, and minimal structural damage. Solid wood is ideal, but quality veneer over a sturdy frame can also work if the piece is handled properly. Avoid furniture with severe water damage, active pest issues, major warping, or legs that wobble when you look at them too confidently.
Inspect the Back
Buffets were usually designed to sit against a wall, so the back may be unfinished. Since a kitchen island is visible from all sides, you may need to add beadboard, shiplap, trim, plywood panels, decorative molding, or paint to make the back look intentional. This is one of the easiest ways to make the final piece look custom rather than improvised.
Check Drawer and Door Function
Drawers should slide smoothly, and cabinet doors should close securely. Sticky drawers can often be fixed with sanding, wax, replacement glides, or minor adjustments. Missing hardware can be replaced. However, if every drawer fights you like it has personal issues, factor that repair time into the project.
Step-by-Step: How to Repurpose an Antique Buffet Into a Kitchen Island
Step 1: Clean and Assess the Piece
Start by removing drawers, hardware, shelf paper, dust, and anything hiding in the back corners. Clean the surface with a gentle wood-safe cleaner. Once it is clean, inspect joints, legs, drawer runners, and the top. Tighten screws, glue loose joints, clamp repairs, and replace weak supports as needed.
If the piece has old paint or an unknown finish, test before sanding. Furniture with older coatings may contain lead or other unsafe materials. Use a lead test kit or consult a professional if you are unsure, especially before sanding, scraping, or using heat.
Step 2: Reinforce the Structure
A buffet used in a dining room may not have been built to support a heavy countertop, repeated chopping, or people leaning on it while discussing snacks. Add reinforcement where needed. This may include corner blocks, interior bracing, a plywood subtop, stronger legs, or support rails under the countertop.
If you plan to install a stone countertop, consult a fabricator or contractor. Stone is heavy, and the buffet must be able to support the weight safely. Butcher block, sealed hardwood, stainless steel, and laminate are often more DIY-friendly options.
Step 3: Finish the Back
Because the island will be visible from all sides, treat the back like a front. Add a smooth panel, beadboard, decorative trim, or open shelving. Paint or stain it to match the rest of the piece. If you want a furniture-style kitchen island, keep the details consistent on all sides.
Step 4: Add a Countertop
The countertop is where the transformation becomes obvious. A butcher-block top creates a warm farmhouse or cottage look. Marble or quartz gives the piece a refined, designer feel. Stainless steel leans more professional and practical. A thick wood slab can make the buffet feel rustic and substantial.
For food prep, choose a surface that can be cleaned properly and finished safely. If using butcher block, apply a food-safe oil or finish according to the product directions. If the island is mainly for serving, storage, or display, you have more flexibility, but durability still matters.
Step 5: Paint, Stain, or Restore
There are three main style routes: restore the wood, paint the piece, or combine both. Restoring the original wood highlights craftsmanship and age. Painting can make a dark buffet feel fresh and modern. A two-tone finish, such as a stained top with a painted base, can bridge old and new beautifully.
Popular colors include soft white, warm gray, sage green, navy blue, charcoal, black, and creamy beige. For a bolder kitchen, try deep red, olive, dusty blue, or mustard. Antique brass, matte black, polished nickel, or unlacquered brass hardware can completely change the mood.
Step 6: Add Functional Details
Small additions can make a buffet island more useful. Consider a towel bar on one side, hooks for measuring cups, a paper towel holder, a spice shelf, pull-out baskets, drawer dividers, or a lower shelf for mixing bowls. If the island is movable, use heavy-duty locking casters rated for the full weight of the piece plus countertop and stored items.
Design Ideas for Different Kitchen Styles
Farmhouse Buffet Island
For a farmhouse look, pair a painted buffet base with a butcher-block countertop. Add cup pulls, bin pulls, beadboard backing, and open shelves for baskets or ceramic bowls. A lightly distressed finish can work, but do not overdo it unless you want the island to look like it survived a barn fight.
Traditional Antique Island
If the buffet has beautiful wood grain, carved legs, or original hardware, let those details shine. Use a honed stone or dark wood top and keep the finish classic. This style works especially well in kitchens with inset cabinetry, warm metals, vintage rugs, and pendant lighting.
Modern Vintage Mix
For a modern kitchen, paint the buffet in matte black, deep green, or warm white. Add a crisp quartz top and simple hardware. The contrast between antique shape and clean modern finishes creates a collected look without feeling fussy.
Cottage Kitchen Island
A smaller buffet can become a charming cottage island with soft paint, floral curtains inside open cabinet areas, ceramic knobs, and a wood top. This works well in compact kitchens where a full built-in island would feel too bulky.
Smart Storage Ideas
A repurposed antique buffet into kitchen island project should not only look beautiful; it should earn its place. Use drawers for flatware, kitchen towels, parchment paper, measuring spoons, and small tools. Use cabinets for mixing bowls, Dutch ovens, cutting boards, or small appliances. Add dividers to prevent the classic “drawer of chaos,” where spatulas and peelers go to form alliances.
If the buffet has a large center cabinet, install pull-out trays or baskets. If it has shallow drawers, use them for linens, napkin rings, candles, or baking supplies. If you remove lower drawers, you can create open shelving for cookbooks, baskets, or display-worthy cookware.
Safety and Practical Considerations
Make It Stable
A kitchen island should not rock, tilt, or slide during use. If the piece is stationary, level it carefully and consider discreet floor anchoring if needed. If it is movable, use locking casters and avoid using it for heavy chopping while unlocked.
Use Kitchen-Safe Finishes
Painted surfaces should be sealed with a durable topcoat appropriate for kitchens. Wood countertops used for food prep should be treated with a food-safe finish. Always allow finishes to cure fully before placing food, dishes, or appliances on the surface.
Think Twice About Electrical Add-Ons
Adding outlets can make an island more useful, but electrical work should follow local code and should usually be handled by a licensed electrician. This is especially important for islands because placement, wiring, and safety requirements can vary by jurisdiction.
Common Mistakes to Avoid
Choosing a Piece That Is Too Big
A buffet may look perfect in a seller’s photo and enormous in your kitchen. Always measure first. An island that crowds the room will not feel charming; it will feel like a traffic cone with drawers.
Ignoring the Back Side
An unfinished back is one of the fastest ways to make the project look incomplete. Add trim, paneling, or paint so the island looks good from every angle.
Skipping Reinforcement
Old furniture can be strong, but it was not always designed for kitchen-level use. Reinforce before adding a heavy top or loading the cabinets with cookware.
Using the Wrong Topcoat
A kitchen island deals with water, crumbs, oil, heat, cleaning sprays, and the occasional heroic pancake flip. Choose finishes that can handle real life.
Cost and Time Expectations
The cost of turning an antique buffet into a kitchen island depends on the condition of the furniture and the materials you choose. A budget project might include a secondhand buffet, paint, basic hardware, and a wood top. A higher-end version might include professional refinishing, custom stone, electrical work, and specialty hardware.
For many DIYers, the project can take a weekend or two if the repairs are minor. More complex transformations may take several weeks, especially if you are waiting for countertops, curing finishes, or convincing yourself that yes, you really do need to sand one more time.
Real-Life Experience: Lessons From Repurposing an Antique Buffet Into a Kitchen Island
The first thing many people learn during this project is that antique furniture has opinions. A new cabinet arrives square, predictable, and emotionally available. An antique buffet arrives with quirks. One drawer may glide perfectly while another behaves like it was sealed shut during the Roosevelt administration. A back panel may be thin. A leg may be slightly shorter than its siblings. The hardware may be gorgeous but attached with screws that appear to have been installed by a very determined ancestor.
That is part of the charm, but it also means patience matters. The best experience starts with accepting that the project is not just decorating; it is problem-solving. Before making cosmetic decisions, spend time with the piece. Open every drawer. Look underneath. Check whether the top is flat. Push gently from different sides to test for wobble. Place it in the kitchen with tape first, then with the actual furniture if possible. Live with the idea for a day before committing. Sometimes the perfect-looking buffet is better as a coffee bar against the wall than as a center island.
One useful lesson is to prioritize the countertop early. The countertop affects the height, weight, function, and overall style. A butcher-block top is warm, forgiving, and relatively approachable for DIY installation. Stone looks beautiful but requires more structural planning. A stained wood slab can look custom and substantial, but it needs proper sealing. The top should overhang enough to protect the base and provide comfort if seating is included, but not so much that it looks like the buffet is wearing a hat that is too large.
Another experience-based tip: do not underestimate the back of the buffet. In photos, people often show the pretty front. In real kitchens, guests see every side. Adding beadboard or a smooth panel to the back can make the island feel finished. Trim around the edges can hide seams and create the look of custom cabinetry. This is one of those small upgrades that quietly says, “Yes, this was planned,” even if half the project involved muttering in the garage.
Storage planning also changes the final result. It is tempting to fill the island with whatever does not fit elsewhere, but a better strategy is to assign a clear job. If the island is near the stove, store pots, pans, and cooking tools. If it is near the baking zone, store mixing bowls, flour, rolling pins, and measuring cups. If it is mainly for entertaining, use it for serving boards, linens, candles, and platters. A buffet island works best when its storage supports the way the kitchen actually functions.
Finally, the most satisfying part of repurposing an antique buffet into a kitchen island is the feeling that the kitchen now has a story. Instead of a generic block of cabinetry, you have a piece with age, detail, and usefulness. It may have a nick or two. It may not be perfectly symmetrical. But once it is cleaned, reinforced, topped, sealed, and styled, it becomes the kind of kitchen feature people ask about. And that is the magic: you did not just add counter space. You rescued furniture, improved your kitchen, and gave an old buffet a second career with better lighting.
Conclusion
A repurposed antique buffet into kitchen island project is one of the most rewarding ways to blend storage, sustainability, and style. It gives old furniture new purpose while adding warmth and personality to the kitchen. With careful measuring, smart reinforcement, a durable countertop, safe finishes, and thoughtful storage planning, an antique buffet can become a practical island that looks like it has always belonged there.
The secret is balance. Respect the furniture’s history, but adapt it for modern kitchen life. Keep the charming details, fix the weak spots, choose finishes that can handle daily use, and make sure the island supports how you cook, gather, and live. Done well, the result is not just a DIY project. It is a functional centerpiece with character, usefulness, and just enough vintage attitude to make your kitchen feel truly one of a kind.
Note: This article is written in original American English for web publishing, with no inserted source links or citation placeholders inside the HTML content.





