Table of Contents >> Show >> Hide
- Why This Recipe Works (And Why It’s Not Just “Chicken… Next to Rice”)
- The Base Recipe (Serves 4–6)
- Step-by-Step: How toi Make One-Pan Chicken and Rice Bake
- Food Safety: How to Know It’s Done
- Flavor Variations (So You Don’t Get “Chicken and Rice Fatigue”)
- Substitutions That Actually Work
- Troubleshooting: Fixes for Common Problems
- Make-Ahead, Storage, and Reheating
- Conclusion: The One-Pan Win You’ll Make Again (And Again)
- Kitchen Experiences: 500-ish Words of “Yep, Been There” Moments
- SEO Tags
Some dinners are complicated. This is not one of them. A One-Pan Chicken and Rice Bake is the weeknight miracle where chicken gets juicy,
rice turns fluffy, your kitchen smells like you actually planned ahead, and the sink stays suspiciously empty. It’s comfort food with a good résumé:
minimal prep, big flavor, and leftovers that reheat like they’re trying to impress you.
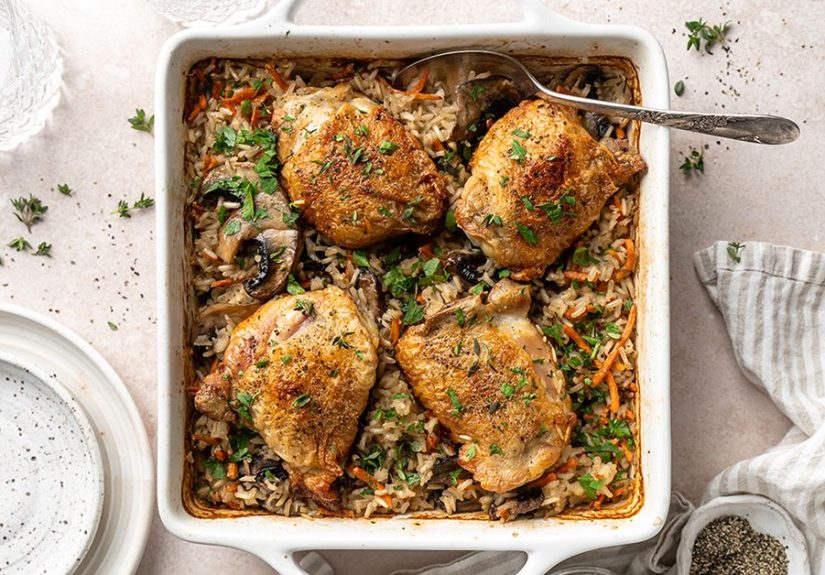
The concept is simple: rice + seasoned liquid + chicken + aromatics, baked together so the grains soak up savory broth while the chicken cooks on top.
The technique is also forgivinglike a good friend who doesn’t judge you for measuring garlic with your heart.
Why This Recipe Works (And Why It’s Not Just “Chicken… Next to Rice”)
1) The rice cooks in flavored steam
When you cover the pan, you trap steam. That steam cooks the rice evenly and keeps the chicken moist. The broth (plus any juices from the chicken)
becomes the rice’s entire personalityin a good way.
2) Long-grain rice stays fluffy instead of gluey
For most one-pan bakes, long-grain white rice is the sweet spot: it absorbs liquid predictably and doesn’t clump as easily as short-grain
varieties. Brown rice can work, but it needs a longer bake and more liquid (we’ll cover how).
3) Chicken on top = built-in self-basting
As the chicken cooks, drippings fall into the rice. That’s not a messthat’s flavor. Bone-in, skin-on thighs are especially forgiving and stay juicy,
but you’ve got options.
The Base Recipe (Serves 4–6)
This version is designed to be flavorful without requiring 19 ingredients, three sauté pans, or the emotional energy of a cooking show finale.
Ingredients
- Chicken: 6 bone-in, skin-on chicken thighs (about 2 to 2½ pounds), or 4 bone-in breasts (see notes)
- Rice: 1½ cups uncooked long-grain white rice (not instant)
- 3 cups low-sodium chicken broth (warm if possible)
- 1 medium yellow onion, diced
- 3 cloves garlic, minced
- 2 tablespoons olive oil (divided)
- 2 teaspoons kosher salt (divided), plus more to taste
- 1 teaspoon black pepper
- 1½ teaspoons paprika (smoked paprika is great here)
- 1 teaspoon dried thyme (or Italian seasoning)
- 1 tablespoon butter (optional, but extremely persuasive)
- 1 cup frozen peas (add near the end)
- 1 tablespoon lemon juice + optional lemon zest (for brightness)
- Chopped parsley for serving (optional)
Equipment
- 9×13-inch baking dish, braiser, or deep oven-safe skillet
- Foil (or a tight-fitting lid)
- Instant-read thermometer (highly recommended)
Step-by-Step: How toi Make One-Pan Chicken and Rice Bake
Step 1: Heat the oven
Preheat to 375°F. Lightly oil your baking dish or skillet. If you’re using a skillet, choose something deep enough to hold broth
without turning your oven into a slip ’n slide.
Step 2: Season the chicken (don’t be shy)
Pat the chicken dry (this helps the skin crisp later). Season with 1 teaspoon salt, pepper, paprika, and thyme. Drizzle with 1 tablespoon olive oil.
Step 3: Build the rice base
In the baking dish, stir together the rice, onion, garlic, remaining 1 teaspoon salt, and 2 cups of the broth. Add the remaining 1 cup broth on top.
Dot with butter if using.
Tip: If you want extra toasty flavor, you can briefly sauté onion and garlic in oil first. But if tonight is a “no extra steps” night,
skip it. Your dinner will still taste like you meant to do this.
Step 4: Place chicken on top
Nestle the chicken thighs skin-side up right on the rice. Try not to bury them; we’re baking, not hiding evidence.
Step 5: Cover and bake
Cover tightly with foil (or a lid). Bake for 35–40 minutes.
Step 6: Uncover, add peas, and finish
Remove the foil. Sprinkle peas over the rice (they’ll warm through fast). Bake uncovered for another 15–20 minutes, or until the rice
is tender and the chicken is cooked through.
Step 7: Rest, brighten, and serve
Let the dish rest for 10 minutes. This helps the rice finish absorbing liquid and keeps everything from sliding around like a cooking
show blooper reel. Stir lemon juice into the rice, top with parsley (and lemon zest if you like), and serve.
Food Safety: How to Know It’s Done
Chicken is safe when it reaches 165°F at the thickest part. Thighs are often even better (more tender) when they climb higher,
but 165°F is the safety minimum. If your chicken is done but the rice isn’t, pull the chicken to a plate, cover it, and keep baking the rice with
a splash of hot broth.
Flavor Variations (So You Don’t Get “Chicken and Rice Fatigue”)
Lemon-Herb Comfort
- Add lemon zest, extra thyme, and a handful of baby spinach stirred in during the resting stage.
- Finish with a little Parmesan if you want “cozy but classy.”
Mushroom & Thyme (Cozy Cabin Energy)
- Stir in 8 ounces sliced mushrooms with the onion/garlic.
- Add a splash of Worcestershire for depth.
Cajun-Inspired (Weeknight Party)
- Swap thyme for Cajun seasoning, add diced bell peppers, and finish with scallions.
- Serve with hot sauce and pretend you’re on vacation.
Tex-Mex Rice Bake
- Stir in drained black beans and a small can of diced green chiles.
- Top with cheese at the end and bake until melted.
Substitutions That Actually Work
Chicken choices
- Thighs (bone-in, skin-on): most forgiving and flavorful.
- Breasts (bone-in): work well; check temperature early to avoid drying out.
- Boneless chicken: best added later so it doesn’t overcookbake rice covered first, then add chicken for the final uncovered stage.
Rice choices
- Long-grain white: easiest and fluffiest.
- Basmati or jasmine: aromatic and great; keep the liquid similar and watch cook time closely.
- Brown rice: plan on longer baking (often 60–75 minutes covered) and more broth. Consider partially baking the rice before adding chicken.
- Instant rice: not recommendedit can turn mushy and finish long before the chicken.
Troubleshooting: Fixes for Common Problems
“My rice is crunchy.”
Usually the cover wasn’t tight enough or the dish needed more time. Add ¼ to ½ cup hot broth, cover tightly, and bake 10–15 minutes more.
“My rice is mushy.”
Too much liquid or too long in the oven can do it. Next time, reduce broth slightly, use long-grain rice, and avoid adding watery vegetables too early.
Also: measure rice and broth like you mean it (future-you will thank you).
“My chicken skin isn’t crispy.”
Covered baking steams the skingreat for rice, less great for crunch. Pat the chicken dry, uncover for the last 15–20 minutes, and if your oven has a
broiler, give it 1–3 minutes at the end (watch closely).
Make-Ahead, Storage, and Reheating
This bake is meal-prep friendly. Refrigerate leftovers in shallow containers so they cool quickly, and eat within 3–4 days for best quality.
For reheating, add a small splash of broth or water (rice loves moisture) and heat until steaming hot; aim for 165°F if you want a
clear safety target.
Conclusion: The One-Pan Win You’ll Make Again (And Again)
A One-Pan Chicken and Rice Bake is the kind of dinner that makes life feel a little more manageable: everything cooks together, the flavors
build naturally, and cleanup is merciful. Once you’ve nailed the base methodrice + seasoned liquid + chicken + tight coveryou can take it in a dozen
directions without learning a dozen new recipes. That’s not laziness. That’s strategy.
Kitchen Experiences: 500-ish Words of “Yep, Been There” Moments
There’s a special kind of confidence that comes from sliding a one-pan dinner into the oven. You feel like a responsible adult. A person with a plan.
A person who definitely has matching socks. And then, five minutes later, you remember you used the last of the foil on something extremely important
(like covering a bowl of cut onions you swore you’d use “tomorrow”).
The first “experience” almost everyone has with a chicken-and-rice bake is learning that tight coverage is not optional. If the foil is
loose, the steam escapes, and the rice will stay stubbornly crunchylike it’s auditioning to be a snack instead of dinner. The fix is simple: add a
splash of hot broth, seal it like you’re wrapping a birthday present for someone you actually like, and give it more time. The lesson sticks.
Another classic moment: the rice is perfect, but the chicken skin is… soft. Not bad. Just not “crispy, golden, I-want-to-take-a-photo” good. That’s when
you discover the great compromise of this dish: steam first (for rice), crisp later (for chicken). Uncover at the end and let the oven do its thing.
If you broil for a minute or two, you’ll get that crackly finishjust stay nearby. Broilers turn “crispy” into “charcoal” faster than you can say,
“Wait, why does it smell like campfire?”
Then there’s the seasoning experiencespecifically, realizing that rice is basically a sponge with opinions. If your broth is bland, the rice will be bland.
If your seasoning is bold, the rice will proudly carry it like a banner. Many home cooks end up developing a signature: smoky paprika and lemon, mushroom
and thyme, Cajun spice with peppers, or a Tex-Mex version that magically disappears before you’ve even set the table. The best part is that the method
stays the same. Only the mood changes.
One of the most underrated experiences is the “vegetable save.” You meant to make a salad. You really did. But the day happened. So you toss frozen peas
into the pan at the end and suddenly you’re a person who serves a balanced meal. If you’ve got spinach, it wilts beautifully during the rest. If you’ve got
broccoli florets, they can roast on top uncovered at the end. The one-pan bake is quietly supportive like that.
Finally, the leftover experience: you open the fridge the next day and there it isan actual ready-to-eat lunch that doesn’t require a spreadsheet or a
protein shaker. Add a splash of broth, reheat, maybe squeeze a little lemon, and it tastes like you tried again on purpose. It’s the kind of practical joy
that makes you think, “I should do this every week,” which is exactly what happens. Not because you’re boring. Because you’re smart.





