Table of Contents >> Show >> Hide
- Why this no-knead focaccia works (the short, tasty science)
- What you’ll need
- Choose your schedule
- Step-by-step: No-knead skillet focaccia
- Topping ideas that actually work
- Troubleshooting (because dough is a living thing, not a spreadsheet)
- How to serve and store skillet focaccia
- Frequently asked questions
- of real-world focaccia experiences (the kind you actually learn from)
- Conclusion
If you’ve ever wanted to make bread that looks like it came from a bakery but requires the physical effort of… opening a bottle of olive oil,
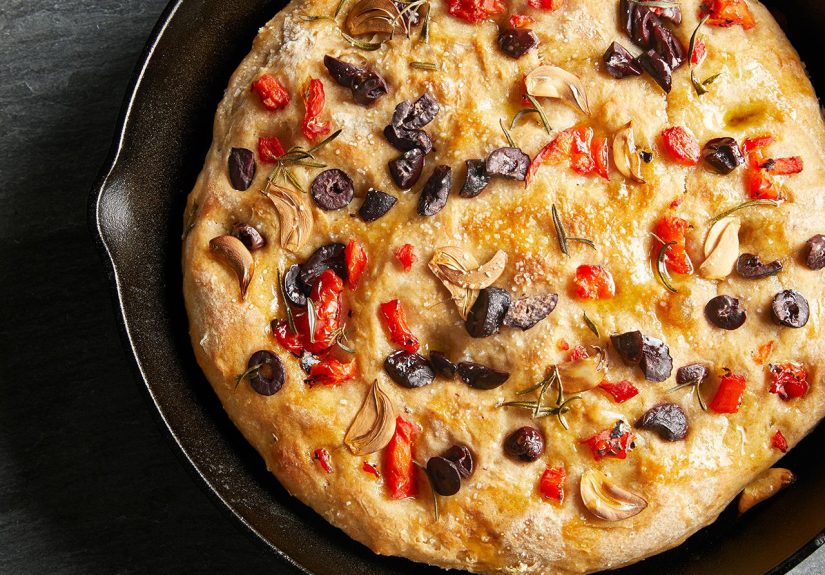
you’re in the right place. This no-knead skillet focaccia is fluffy, glossy, dimpled, and unapologetically crisp on the bottom
thanks to a generously oiled cast-iron skillet and a high-hydration dough that basically builds its own gluten while you live your life.
The vibe: “I’m a bread person now.” The reality: you stirred a bowl, waited, poked dough with your fingers, and took the credit. As you should.
Why this no-knead focaccia works (the short, tasty science)
Traditional kneading develops gluten quickly. This recipe does it slowly. With a wet (high-hydration) dough, gluten strands form
over time as flour absorbs water and fermentation progresses. That’s why you can skip kneading and still get a focaccia with an airy crumb and
big bubbles.
- Time + hydration = gluten development without the workout.
- Cold fermentation (optional but amazing) = deeper flavor and easier handling.
- Olive oil in the skillet = fried, crisp edges and a golden bottom crust.
What you’ll need
Equipment
- 10-inch cast-iron skillet (12-inch also works; your focaccia will be slightly thinner)
- Large mixing bowl
- Wooden spoon or sturdy spatula
- Measuring cups/spoons or a digital kitchen scale (recommended for consistent results)
- Plastic wrap, lid, or a damp towel
Ingredients (10-inch skillet)
- 3 cups (360g) bread flour (all-purpose works too; bread flour gives a chewier bite)
- 1 1/2 cups (360g) warm water (about 95–105°F; warm, not hot)
- 2 tsp (8–10g) kosher salt (use less if you’re using fine/table salt)
- 1 tsp (3–4g) instant yeast (or 1 1/4 tsp active dry yeast)
- 1 tsp honey or sugar (optional, but helps yeast get moving and supports browning)
- 4–6 Tbsp extra-virgin olive oil (yes, really)
- Flaky salt for finishing (optional but highly encouraged)
- Toppings (pick 1–3): fresh rosemary, thin-sliced garlic, olives, cherry tomatoes, sliced red onion
Skillet size note: Using a 12-inch skillet? Keep the same dough, but expect a thinner focaccia and shave a few minutes off the bake time.
Or scale up slightly if you want it taller.
Choose your schedule
Option A: Overnight (best flavor, easiest handling)
Mix at night, refrigerate, bake the next day. This slow fermentation builds flavor and makes the dough less sticky-feeling when you shape it.
Option B: Same-day (still excellent)
Start in the morning, bake in the afternoon. You’ll get great focacciajust a bit less of that “wow, what is that subtle depth?” flavor.
Step-by-step: No-knead skillet focaccia
1) Mix the dough (5 minutes)
- In a large bowl, whisk together the flour, salt, yeast, and (if using) honey/sugar.
-
Pour in the warm water. Stir with a spoon or spatula until no dry flour remains. The dough will look shaggy, sticky, and like it’s questioning your life choices.
That’s normal. - Drizzle 1 tablespoon of olive oil over the dough. Give it a few more stirs to coat the surface a bit.
2) First rise (hands-off)
Overnight method: Cover the bowl and refrigerate 8 to 24 hours.
Same-day method: Cover and let rise at room temperature 3 to 4 hours, until noticeably puffy and bubbly.
Optional “boost” (not kneading, just being helpful):
During the first hour at room temperature (before refrigerating, or during a same-day rise),
you can do 2–4 quick “stretch-and-folds” in the bowl (grab an edge, stretch up, fold over itself).
This adds strength and helps trap bigger bubbles laterbut the recipe still works without it.
3) Oil the skillet like you mean it
-
Pour 2–3 tablespoons of olive oil into the cast-iron skillet. Tilt to coat the bottom and sides.
You’re not just preventing stickingyou’re building that signature crisp, almost-fried crust. - Scrape the dough into the skillet. If it clings to the bowl like it pays rent, use a wet hand or lightly oiled spatula to coax it out.
4) Second rise (in the skillet)
- Gently turn the dough once or twice so the oiled side becomes the top. This helps keep the surface supple.
-
Cover the skillet and let the dough rise until puffy and relaxed:
- From the fridge: 2 to 3 hours at room temp
- Same-day dough: 1 to 2 hours
How to tell it’s ready: It should look airy, spread close to the edges, and jiggle slightly if you gently nudge the skillet.
If it still snaps back aggressively when touched, it needs more time.
5) Dimple + top (the fun part)
- Heat oven to 450°F. (If you have a baking stone/steel, preheat it too for extra bottom browning.)
- Drizzle another 1–2 tablespoons olive oil over the dough.
-
Oil your fingertips and press straight down to make deep dimples all overconfident, not timid.
You’re creating valleys for olive oil to pool and crisp. -
Add toppings. Keep it simple: rosemary + flaky salt is iconic. If using garlic, slice thin and don’t bury it (it can burn if it’s too exposed).
If using tomatoes, halve them and lightly pat dry to reduce excess moisture. - Finish with flaky salt (and a little black pepper if you want that “grown-up sandwich shop” aroma).
6) Bake until golden and dramatic
-
Bake on the middle rack for 20–25 minutes (10-inch skillet), until deeply golden on top.
If using a 12-inch skillet, start checking around 18–20 minutes. -
If you want extra crisp edges, you can carefully lift the focaccia out of the skillet (use a spatula) and bake it directly on the rack for 3–5 minutes.
This is optional, but it’s also the difference between “nice bread” and “who taught you to do this?” - Cool on a rack at least 10 minutes before slicingsteam needs a moment to settle so the crumb stays airy, not gummy.
Topping ideas that actually work
Focaccia toppings can go from “Italian bakery” to “my garden sneezed” quickly, so here are combinations that bake well without turning soggy or bitter.
Classic
- Rosemary + flaky salt + extra olive oil
- Thin-sliced garlic + rosemary + black pepper
Sandwich-friendly
- Caramelized onions (add after baking if very wet) + thyme
- Olives + oregano + lemon zest (zest after baking for best aroma)
“Dinner party but make it low effort”
- Cherry tomatoes + rosemary (pat tomatoes dry; press lightly into dimples)
- Everything-bagel seasoning (yes, really) + flaky salt
Tip: Save delicate cheeses and herbs for after baking when possible. Parmesan and pecorino can work,
but very finely grated cheese on top can brown fast and turn bitter if it overbakes.
Troubleshooting (because dough is a living thing, not a spreadsheet)
My dough didn’t rise much
- Check yeast freshness. Old yeast = sad bubbles.
- Room temperature matters. If your kitchen is cool, give it more time.
- Salt and yeast shouldn’t be dumped in the same spot before mixingsalt can slow yeast if concentrated.
It’s sticking to the skillet
- Use enough oil. This is not the moment for restraint.
- Let it cool a few minutes, then loosen with a thin spatula around the edges.
- If your skillet is older/seasoning is uneven, consider lining the bottom with parchment (still oil it).
The top browned but the inside feels gummy
- It may need a few more minutes in the ovenespecially if toppings added moisture.
- Let it cool longer before slicing; the crumb finishes setting as it cools.
- Next time, slightly reduce water (by 2–3 tablespoons) if your flour brand absorbs less.
I didn’t get big bubbles
- Don’t over-handle the dough right before bakingbe gentle when dimpling.
- Give it enough time in the skillet to get truly puffy.
- High hydration helps; measuring by weight improves consistency.
How to serve and store skillet focaccia
Best ways to serve
- Warm with olive oil and balsamic (the classic “I totally planned this” starter)
- As a sandwich bread (prosciutto + arugula + lemony mayo is elite)
- Alongside soup or salad, especially anything tomato-based
- Split and toast for an aggressively good breakfast with eggs
Storage
- Room temp: Wrap loosely and store 1–2 days. Reheat at 300°F for about 8–10 minutes to re-crisp.
- Freeze: Slice, wrap well, and freeze up to 2 months. Reheat from frozen at 350°F until warmed through.
Frequently asked questions
Can I use all-purpose flour instead of bread flour?
Yes. Bread flour tends to give a slightly chewier structure and better bubble retention, but all-purpose flour still produces a soft, flavorful focaccia.
If using all-purpose, you may find the dough spreads a bit moretotally fine in a skillet.
Do I have to do an overnight rise?
Nope. Same-day works great. Overnight just boosts flavor and makes the schedule easier because your dough does the heavy lifting while you sleep.
Can I make it dairy-free/vegan?
This recipe is naturally dairy-free as writtenno butter, no milkjust flour, water, yeast, salt, and olive oil. Most toppings work too.
What if I don’t have cast iron?
Any oven-safe skillet can work, though cast iron is especially good at holding heat and helping the bottom crisp.
A metal cake pan or 9×9 pan can also work; watch bake time and thickness.
of real-world focaccia experiences (the kind you actually learn from)
Most people don’t “mess up” no-knead skillet focaccia so much as they experience it. Because focaccia dough is wet and lively, the first bake often comes with
a few moments of confusion that later turn into strong opinions (usually pro-olive-oil). Here are the most common home-kitchen experiencesand how to turn them
into your advantage.
Experience #1: The dough looks too wet, so you panic-add flour. This is the #1 focaccia heartbreak. Wet dough is the point.
When bakers add extra flour to make it “manageable,” the bread can turn dense and bready instead of airy and bubbly.
A better move is to oil your hands, use a bowl scraper or spatula, and trust the rise. If the dough feels sticky, that’s not a failureit’s a hydration feature.
Experience #2: Your kitchen runs cold and the dough moves like it’s buffering. In winter (or in air-conditioned homes), dough can take
much longer than the recipe suggests. Many bakers discover the hard way that yeast doesn’t wear a smartwatch. The fix is simple:
give it time, or create a gentle warm spot (like an oven with the light on). When the dough finally puffs, you’ll get the bubbles you wanted all along.
Experience #3: The dimpling becomes oddly emotional. Dimpling is where the dough turns from “mysterious blob” into focaccia.
People either go too gentle (shallow dents that disappear) or too aggressive (deflating the dough completely).
The sweet spot is confident presses straight down with oiled fingertipsdeep enough to make valleys, but not so rough that you smear the dough into a thin layer.
It’s less “massage” and more “friendly poke.”
Experience #4: Toppings can betray you. Fresh tomatoes look gorgeous, but they also release water. Garlic tastes incredible, but it can burn.
Many bakers learn to pat wet toppings dry, tuck aromatics slightly into the dough, and save delicate ingredients for after baking.
Once you’ve had a perfect rosemary-and-salt focaccia, you also realize: simple is not boring. It’s classic for a reason.
Experience #5: The first slice is cut too soon. The smell is unfair. The crackly top is persuasive.
But slicing hot focaccia can compress the crumb and make the interior seem gummy, even when it baked correctly.
Bakers who wait 10–20 minutes usually get a more open, tender interiorand a better slice that doesn’t look like it lost an argument.
Experience #6: Everyone suddenly has focaccia “plans.” Once you make skillet focaccia successfully, it becomes your unofficial personality.
Friends want “the bread.” Family requests it for holidays. You start thinking things like “What if I do olives next time?” and “Could this become sandwich bread?”
(It can.) The best part is that the recipe is flexible: you can tweak fermentation time, change toppings, and scale the thicknesswhile keeping the core method
the same. That’s when focaccia stops being a one-time bake and becomes a reliable go-to.
In other words: the learning curve is short, the payoff is loud, and the only real non-negotiable is thisuse enough olive oil.
Focaccia isn’t the place to be shy. It’s the place to be golden.




