Table of Contents >> Show >> Hide
- Why a pallet fence is the ultimate budget DIY
- Step 1 – Plan your free pallet fence like a pro
- Step 2 – How to find free, safe pallets
- Step 3 – Prep your pallets for fence duty
- Step 4 – Build the Hometalk-style pallet fence
- Step 5 – Make your pallet fence look intentional, not accidental
- How long will a pallet fence last?
- Safety tips and when a pallet fence isn’t enough
- Real-life inspiration for your Hometalk-style pallet fence
- Experience: what a weekend pallet fence build really feels like
- Conclusion: a free fence with big impact
Fencing prices got you choking on your coffee? You’re not alone. Lumber costs, hardware, and labor can make a simple backyard fence feel like a luxury purchase. That’s why the classic
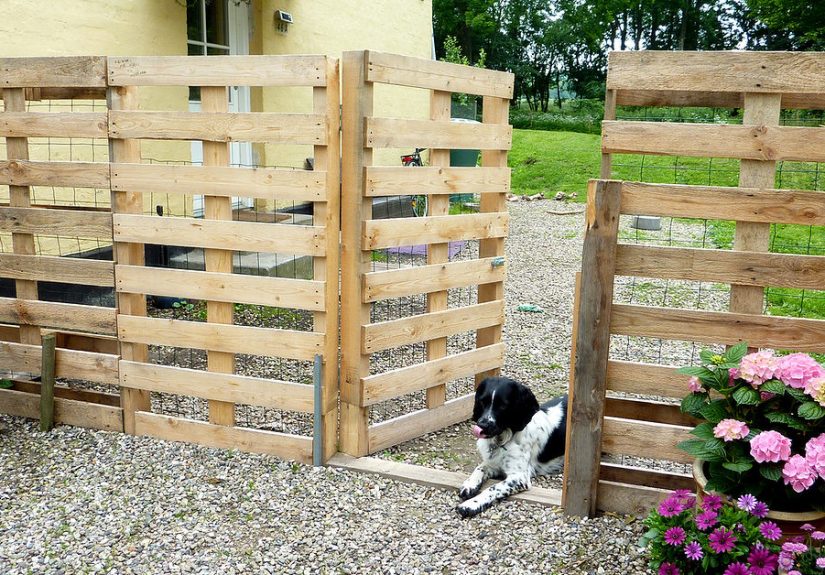
pallet fencepopular on Hometalk and all over DIY blogsis such a game-changer. With a little planning, basic tools, and some creativity, you can build a sturdy, good-looking
fence from free pallets and spend your money on more exciting things… like plants, patio lights, or a pizza reward when you’re done.
In this guide, we’ll walk through how to build a pallet fence that can cost you virtually nothing, how to find safe pallets, and how to customize your fence so it looks intentionalnot like
your yard is being attacked by old shipping crates. We’ll also add a “Hometalk-style” experience section at the end so you can picture what the whole weekend project really feels like.
Why a pallet fence is the ultimate budget DIY
A DIY pallet fence is popular for three main reasons: price, speed, and personality. First, the obvious partif you can source pallets for free, the cost of your fence drops
dramatically. Many home improvement and garden fences made from pallets end up costing little more than a box of exterior screws and maybe a can or two of paint.
Pallets also go together quickly. They’re pre-framed mini wall sections, so instead of building individual pickets and rails, you’re mostly connecting rectangles. That’s why homesteaders and
off-grid homeowners love pallet fences for gardens, compost bins, chicken runs, and quick privacy screens.
Finally, there’s the look. Left natural, pallet fences have a relaxed, rustic feel. With paint or stain, they can mimic a modern horizontal slat fence or a cottage-style whitewashed picket
fence. You can even tuck flower boxes and planters into the pallet openings for bonus charm.
Step 1 – Plan your free pallet fence like a pro
Clarify what your fence needs to do
Before you grab your drill, decide what the fence is for:
- Garden fence: Keep rabbits, chickens, or dogs out of your veggies.
- Pet run or play area: Create a safe zone for pets or kids.
- Privacy screen: Block a view, frame a patio, or hide a compost bin or A/C unit.
Your goal affects the height and style. For example, two stacked pallets may work for privacy, but a single row is often plenty for a garden barrier or dog run.
Measure and sketch your layout
Grab a tape measure and a notepad (or a design app if you’re fancy). Measure:
- Total length of the fence run.
- Any corners, jogs, or changes in direction.
- Where you want a gate or access opening.
Sketch a simple rectangle or outline of your yard, then mark where each pallet will sit. Standard pallets are often about 40" x 48", but they vary. If you can, collect pallets that are
roughly the same size so your fence looks uniform and is easier to assemble.
Check local rules (boring but important)
Even a free pallet fence can be subject to local codes or HOA rules. Some areas have height limits for front or backyard fences, or require a permit for anything over a certain height. A
quick call to your zoning office can save you the heartbreak of having to take your beautiful free fence down later.
Step 2 – How to find free, safe pallets
Where to look for free pallets
You’d be surprised how many businesses are thrilled for you to haul their pallets away. Potential sources include:
- Garden centers and nurseries
- Big-box and hardware stores
- Small manufacturing shops and warehouses
- Local grocery stores or pet supply shops
- Online classifieds and community groups (Craigslist, Facebook Marketplace, Buy Nothing groups)
Always ask permission. Many stores keep pallets for returns or have contracts with pallet recyclers, but plenty of smaller operations are happy to let them go, especially if they’re low on
storage space.
How to read pallet stamps and avoid bad wood
Most pallets used for shipping are stamped with treatment codes. When you’re building a fenceespecially near food gardens or childrenthose codes matter:
- HT (Heat Treated): Good. These pallets were sanitized with high heat instead of chemicals.
- MB (Methyl Bromide): Avoid. MB is a chemical fumigant that can be hazardous, and pallets with this stamp are not recommended for home or garden projects.
- Unmarked or stained pallets: Skip anything with strong odors, oil stains, or unknown spills. When in doubt, leave it out.
Many modern pallets are made from durable hardwoods and are not pressure-treated with outdoor chemicals, but it’s still smart to be picky so your fence is safe as well as cheap.
Step 3 – Prep your pallets for fence duty
Once you have a pile of free pallets, it’s time to prep them. This is the unglamorous part, but it makes your fence sturdier and longer-lasting.
-
Inspect for damage. Toss any pallets that are badly cracked, rotten, or missing critical boards. A few cosmetic cracks are fine, but structural damage will make your fence
wobbly. -
Remove or hammer in stray nails. Use a hammer or pry bar to deal with nails or staples sticking out. Remember, you’ll be walking near this fenceand so will kids, dogs, and
lawn tools. - Clean the wood. A quick scrub with a stiff brush and a bucket of soapy water removes dust and grime. Let pallets dry thoroughly in the sun before building.
- Optional: Light sanding. If you’ll be brushing past the fence a lot, run a sander over rough spots and splintery edges. Your future bare legs will thank you.
If you live in a wet climate, consider pre-treating the bottoms of the pallets with an exterior wood sealer or stain. That’s where moisture and rot usually start first.
Step 4 – Build the Hometalk-style pallet fence
Many viral Hometalk setups use lightweight pallets anchored to simple posts or metal stakes. The idea is to create a basic frame in the ground and then attach pallets like ready-made fence
panels. Here’s a simple version you can adapt to your space.
Materials
- Free pallets (ideally matching sizes)
- Metal T-posts, metal stakes, or 4"x4" wood posts
- Exterior-grade screws (2.5"–3")
- Drill/driver with bits
- Level and tape measure
- Post driver or sledgehammer (for T-posts)
- Optional: concrete mix for permanent posts, hinges and latch for a gate
Option A – Easy garden fence with stakes
- Mark the fence line. Use stakes and string to outline your fence so everything stays straight.
-
Drive in metal posts. Every time a pallet will end, pound a T-post or metal stake into the ground. Typically you’ll have one at each pallet joint and at corners. Make sure
they’re deep enough to feel solidabout 18–24 inches for most soils. - Stand the pallets upright. Place the first pallet against the posts with the slats running horizontally for a classic fence look. Check that it’s level.
-
Screw the pallet to the posts. Use exterior screws through the side boards into the post at several points. Repeat with each pallet down the line, pulling them tight together
so there are no big gaps. -
Secure corners. At corners, you can butt one pallet into the side of another and tie both into a shared corner post, or overlap them in an “L” and screw them together for
extra rigidity.
This method is fast and ideal for garden fences, chicken runs, or temporary barriers. If you want something more permanent or need to contain heavy dogs, go for sturdier posts.
Option B – Stronger pallet fence with buried posts
-
Dig post holes. For a more long-lasting fence, dig holes for 4"x4" wood posts every pallet width (or every 6–8 feet). Set posts in concrete, checking that they’re
plumb and aligned. -
Attach pallets as panels. Once the concrete cures, screw pallets directly to the posts at top and bottom. If the pallets are shorter than you’d like, you can stack two and
screw them together where they meet. - Add a gate. For a simple gate, frame a pallet with extra boards if needed, then mount it between two posts using heavy-duty outdoor hinges and a latch.
This approach takes more time and a bit of digging, but it dramatically improves stability and lifespanimportant if kids will climb or dogs will lean on the fence.
Step 5 – Make your pallet fence look intentional, not accidental
One fear with any pallet project is that it’ll look like something from the back of a warehouse. Good news: a few finishing touches can turn “trash pile” into “designer rustic.”
Paint, stain, or whitewash
- Whitewashed farmhouse: A thinned-out white paint coat gives the fence a soft, cottage feel while still letting the wood grain show.
- Bold color statement: Turquoise, deep charcoal, or even barn red can make the fence a focal point instead of something you’re trying to hide.
- Natural stain: If you love the wood look, use an exterior stain and sealer to protect the boards and deepen the grain.
Add planters and decor
The open spaces in pallets are perfect for turning your fence into a vertical garden:
- Attach shallow planter boxes for herbs or flowers.
- Line openings with landscape fabric and fill with soil for built-in planters.
- Hang galvanized buckets or fabric grow bags on hooks for a flexible garden wall.
- Add solar lights along the top edge for nighttime glow.
You can also mount signs, house numbers, or decorative metal art. Small touches go a long way toward making a zero-dollar fence look custom and intentional.
How long will a pallet fence last?
A common question is, “If it’s free, will it just fall over next year?” The answer depends on your climate, how you build it, and how well you maintain it. In many backyards, a pallet fence
built with solid posts and reasonably protected wood can last several years. If you keep the bottom from sitting in pooled water, seal the wood, and occasionally tighten screws, you can extend
its life even further.
Keep expectations realistic: pallet wood wasn’t originally designed to be a permanent fence material. Think of it as a medium-term solutionawesome for gardens, starter yards, or rental
properties where you want function and charm without giant expense.
Safety tips and when a pallet fence isn’t enough
Pallet fences are fun and frugal, but they’re not perfect for every situation. Keep these safety points in mind:
- Select safe pallets. Avoid MB-stamped pallets and anything with suspicious stains or strong smells. When in doubt, walk away and grab another pallet.
-
Beware climbing hazards. Those horizontal slats make an excellent laddergreat for plants, not great for toddlers. If small children will be nearby, consider adding vertical
boards, wire mesh, or choosing a different fence style altogether. -
Know your dog. Some dogs are professional escape artists. If your dog jumps high, chews wood, or barrels into fences at full speed, you may need taller, stronger materials or
a secondary barrier. -
Secure the structure. Don’t rely on loose, freestanding pallets for anything important. Anchor to posts, use quality screws, and check periodically for wobble, rot, or loose
boards.
If you’re looking for a code-compliant boundary fence on a property line, talk with your local building department. A pallet fence may work as a temporary or secondary barrier, while a more
permanent standard fence handles the official boundary duties.
Real-life inspiration for your Hometalk-style pallet fence
Scroll through DIY blogs and you’ll see pallet fences used in just about every way possible:
- Simple pallet rectangles forming a neat vegetable garden enclosure.
- Painted fences with flower boxes built into each section.
- Extra-tall pallet walls doubling as privacy screens with hanging planters.
- Dog runs and play areas that cost almost nothing but look thoughtfully designed.
One popular approach is to use pallets as the primary structure and then add “upgrades” like a nicer top rail, decorative post caps, or a contrasting paint color on just the gate. Small
details like these transform a free fence into something you’ll be proud to show off when neighbors peek over and ask, “Wait… you built that out of pallets?”
Experience: what a weekend pallet fence build really feels like
It’s one thing to read a step-by-step guide; it’s another to picture what actually happens over a weekend of pallet-fence building. Here’s how this kind of Hometalk-style project typically
plays out for many DIYers.
Friday afternoon often starts with the “pallet hunt.” After a couple of quick calls, you pull up behind a garden center where a manager points to a stack of pallets near the dumpster. You pick
through the pile, checking for HT stamps, skipping anything cracked or suspiciously oily, and load the winners into the truck or onto a borrowed trailer. By the time you get home, you already
feel like you’ve scored something valuablefor exactly zero dollars.
Saturday morning is “prep and plan” time. With a coffee in one hand and a tape measure in the other, you walk your fence line, marking corners with stakes. You realize there’s a tree right
where you wanted the gate, so you adjust the layout. That’s the nice thing about a pallet fence: it’s forgiving. You can tweak the design on the fly without wrecking your budget.
Next comes the grunt workdriving posts and standing pallets. The first section takes the longest as you fuss with the level, adjust the height, and figure out exactly how many screws feel
“solid enough.” By the third pallet, you’ve found a rhythm. One person holds the pallet steady, the other runs the drill, and the fence line appears a panel at a time. It’s surprisingly
satisfying to step back and see an actual structure taking shape where there was nothing a few hours earlier.
Inevitably, there’s at least one “creative problem” to solve. Maybe the ground slopes more than you thought, leaving a gap under one pallet, or you realize one of your pallets is narrower than
the others. That’s where a scrap board, a shim, or a bit of extra digging saves the day. These small improvisations are part of the charmyou’re repurposing materials, not assembling a kit.
As the afternoon goes on, you get to the fun part: styling. You test paint colors on a spare board, decide between a clean modern stain and a farmhouse whitewash, and maybe add a planter box to
one of the sections just to see how it looks. Suddenly, this isn’t just a free fenceit’s a design feature.
By Sunday evening, you’re tired in that good, “I actually built something” way. The dogs are investigating their new boundary, the garden feels protected, and the yard looks more put together.
You grab a photo from the best angleideally when the light is soft and goldenand share it with friends or in a DIY group. The comments roll in: “Can’t believe that’s made from pallets!” “How
much did it cost?” Being able to say, “Almost nothing” never gets old.
That’s the real Hometalk spirit: taking simple, often overlooked materials and turning them into projects that feel personal, clever, and surprisingly polished. Your pallet fence isn’t just a
budget hack. It’s a story you’ll tell every time someone walks through your gate.
Conclusion: a free fence with big impact
Building a pallet fence that costs you next to nothing is absolutely doable, even if you’re new to DIY. With free pallets, a few basic tools, and some weekend determination, you can create a
functional, attractive barrier around your garden, pets, or patio. Plan your layout, choose safe pallets, anchor them securely, and give the finished fence a little style with paint, plants,
or lights.
Will it outlast a professionally built cedar fence? Probably not. But in terms of valueespecially when your budget is tighta pallet fence is hard to beat. It keeps animals where they belong,
gives your yard more structure, and offers a perfect canvas for your creativity. And every time you look at it, you’ll know you turned someone else’s throwaway material into a project worth
showing off.





