Table of Contents >> Show >> Hide
- Why This Layered Version Works
- Ingredients
- Equipment & Prep
- Step-by-Step: Layered Pumpkin Cheesecake
- How to Slice It Like You Own a Fancy Dessert Bar
- Troubleshooting & Pro Tips
- Variations That Still Taste Like Fall
- Serving Ideas
- Storage & Make-Ahead
- My Layered Pumpkin Cheesecake Chronicles (Real-Life Experience)
- Conclusion
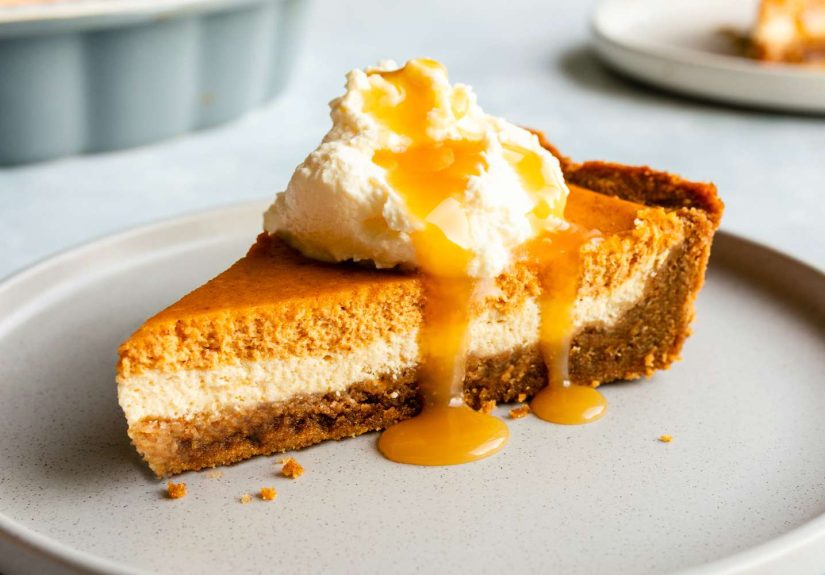
Some desserts walk into a room and politely introduce themselves. A layered pumpkin cheesecake kicks the door open, shakes hands with everyone’s taste buds, and then asks if you’ve considered adding whipped cream. This is that cheesecake: a buttery spiced crust, a creamy vanilla layer, and a pumpkin-spice layer stacked like autumn’s best outfitcozy, dramatic, and somehow still classy.
The goal here isn’t just “pumpkin flavor.” It’s contrast: tangy cream cheese against warm spice; light vanilla against rich pumpkin; crunchy crust against cloud-soft filling. And yes, we’ll talk about the stuff that makes cheesecakes behavebecause nothing ruins the fall vibe like a cratered top that looks like it lost a fight with a meteor.
Why This Layered Version Works
Most pumpkin cheesecake recipes mix pumpkin into the whole batter, which is deliciousbut one-note. Layering gives you two textures and flavors in every slice. The vanilla layer stays bright and tangy, while the pumpkin layer brings the cozy spices. Together? It tastes like pumpkin pie and classic cheesecake decided to co-parent and absolutely nailed it.
The trick is keeping both batters similar in thickness so the layers stay neat. We build a smooth “base” cheesecake batter first, then transform part of it into pumpkin batter. That way, both layers share the same structure (cream cheese, eggs, dairy), which helps them bake evenly and slice cleanly.
Ingredients
This recipe is written for a 9-inch springform pan and yields about 10–12 slices (unless your family “samples” half of it before dinnerno judgment).
For the Crust
- 2 cups graham cracker crumbs (or crushed gingersnaps for extra fall energy)
- 3 tablespoons granulated sugar
- 1 teaspoon ground cinnamon (optional, but very on-brand)
- 6 tablespoons unsalted butter, melted
- Pinch of salt
For the Cheesecake Base (Makes Both Layers)
- 24 oz full-fat cream cheese, room temperature
- 1 cup granulated sugar
- 1 tablespoon cornstarch (optional but helpful for a stable, creamy set)
- 1/2 teaspoon fine salt
- 2 teaspoons pure vanilla extract
- 3/4 cup sour cream, room temperature
- 1/2 cup heavy cream, room temperature
- 4 large eggs, room temperature
To Turn Half Into Pumpkin Batter
- 1 cup pure pumpkin puree (not pumpkin pie filling)
- 1 1/2 teaspoons ground cinnamon
- 1 teaspoon ground ginger
- 1/4 teaspoon ground nutmeg
- 1/8 teaspoon ground cloves (optional, but it adds that “bakery air” smell)
Optional Toppings (Choose Your Adventure)
- Lightly sweetened whipped cream
- Caramel sauce (salted is a flex)
- Toasted pecans or candied pepitas
- A dusting of cinnamon or pumpkin pie spice
Equipment & Prep
- 9-inch springform pan
- Stand mixer or hand mixer
- Roasting pan (for a water bath) or a sturdy baking pan for a steam-pan method
- Heavy-duty foil (if using the classic water bath)
- Instant-read thermometer (optional, but nice if you’re a “trust but verify” baker)
Pro prep move: Set your cream cheese, eggs, sour cream, and heavy cream out about 45–60 minutes before you start. Cheesecake batter hates being rushed. Cold ingredients = lumpy batter. Lumpy batter = you “accidentally” inventing cream-cheese meteorites.
Step-by-Step: Layered Pumpkin Cheesecake
1) Preheat and Prep the Pan
- Preheat oven to 325°F.
- Grease the inside of your springform pan lightly.
- Wrap the outside of the pan in 2–3 layers of heavy-duty foil (if using a traditional water bath). Go high up the sidesthink “rain boots,” not “flip-flops.”
2) Make (and Bake) the Crust
- In a bowl, mix crumbs, sugar, cinnamon (if using), salt, and melted butter until it looks like damp sand that would absolutely build a strong sandcastle.
- Press firmly into the bottom of the pan (use a measuring cup to pack it tight).
- Bake for 10 minutes. Remove and let cool while you make the filling.
3) Make the Cheesecake Base Batter
- Reduce mixer speed to low-medium. Beat cream cheese until smooth and creamyabout 1–2 minutes. Scrape the bowl.
- Add sugar, cornstarch (if using), and salt. Mix just until combined and silky. Scrape again.
- Add vanilla, sour cream, and heavy cream. Mix on low until smooth.
- Add eggs last, one at a time, mixing on low only until each disappears into the batter. Stop as soon as it’s blended. Overmixing eggs adds air, and air loves turning into cracks later.
4) Split the Batter and Create the Pumpkin Layer
- Scoop about half of the batter into a second bowl (eyeballing is fine; your cheesecake won’t call the math police).
- To one bowl, add pumpkin puree and spices. Mix gently (spatula or low mixer speed) until uniform.
5) Build the Layers (Neat and Drama-Free)
- Pour the vanilla batter onto the cooled crust and smooth the top.
- Slowly spoon the pumpkin batter over the vanilla layer. Start around the edges and work inward, then gently smooth.
Layering tip: If your pumpkin batter feels slightly thicker, that’s okay. Spoon it on in dollops so you don’t “dig” into the vanilla layer. Think: snowing pumpkin batter onto a vanilla field.
6) Bake with Moisture (Two Options)
Option A: Classic Water Bath (Bain-Marie)
- Place the wrapped springform pan into a large roasting pan.
- Pour hot water into the roasting pan until it reaches about halfway up the sides of the springform pan.
- Bake at 325°F for 60–75 minutes, until edges look set and the center still has a gentle wobble.
Option B: Steam Pan Method (Less Splash Risk)
- Place cheesecake on the middle rack.
- Place a sturdy metal pan on the lower rack and pour in hot water (about 1 inch deep) to create steam.
- Bake at 325°F for 60–75 minutes, same doneness cue: set edges, slightly wobbly center.
7) Cool Like a Pro (This Is Where Cracks Get Prevented)
- Turn off the oven. Crack the oven door open slightly and let the cheesecake cool inside for 45–60 minutes.
- Remove from oven, lift from water bath (if used), and cool at room temperature until no longer warm.
- Cover and refrigerate at least 6 hours, preferably overnight, for the cleanest slices and best texture.
How to Slice It Like You Own a Fancy Dessert Bar
- Use a long, sharp knife.
- Dip the blade in hot water and wipe it dry between cuts.
- Slice with steady pressureno sawing. Cheesecake is soft; it bruises emotionally.
Troubleshooting & Pro Tips
“Help, My Cheesecake Cracked!”
First: it’s still delicious. Second: cracks usually mean the cheesecake baked a little too long or cooled too quickly. Next time, pull it earlier when the center still gently jiggles, and cool it gradually in the oven. For today? Cover it with whipped cream and act like it was the plan. You’re an artist now.
Lumpy Batter
This is almost always cold cream cheese. Room temperature is non-negotiable for smooth cheesecake. If you’re stuck, let the batter rest 10 minutes, then whisk gently by hand to smooth. Avoid high-speed mixing once eggs are in.
Watery Pumpkin Layer
Make sure you used pumpkin puree, not pumpkin pie filling. If your puree seems very loose, blot it lightly with paper towels or strain briefly in a fine mesh sieve before mixing.
Water Bath Leaks
Foil helps, but it’s not magic. You can also set your springform pan inside an oven-safe silicone pan liner or use the steam-pan method to avoid direct water contact.
Variations That Still Taste Like Fall
Gingersnap Crust
Swap graham crackers for crushed gingersnaps. It makes the crust taste like a spicy cookie hug and pairs beautifully with the pumpkin layer.
Pecan-Graham Crunch
Mix 1/2 cup finely chopped toasted pecans into the crumbs for extra texture (and a little “Southern holiday table” energy).
Mini Layered Pumpkin Cheesecakes
Use a muffin tin with liners. Press crust into each cup, add vanilla then pumpkin batter, and bake shorter (start checking around 18–22 minutes). They’re adorable, portable, and dangerously easy to “taste test” repeatedly.
Leaning Into the “Rustic” Look
Prefer dramatic tops? A Basque-style approach embraces a darker, more caramelized surface and doesn’t require a water bath. It won’t be layered the same way, but it’s a fun cousin to keep in your back pocket.
Serving Ideas
For a classic vibe: whipped cream and a dusting of cinnamon. For a “wow” vibe: caramel drizzle plus toasted pecans. For a “I’m hosting and thriving” vibe: a small bowl of whipped cream, a bowl of nuts, and let people build their own topping situation like it’s a cheesecake sundae bar.
Storage & Make-Ahead
- Fridge: Cover and refrigerate up to 5 days.
- Freeze: Chill fully, then freeze slices wrapped tightly (plastic wrap + foil) for up to 1 month. Thaw overnight in the fridge.
- Make-ahead win: Cheesecake tastes even better the next day because the flavors settle and the texture firms up.
My Layered Pumpkin Cheesecake Chronicles (Real-Life Experience)
The first time I made a layered pumpkin cheesecake, I treated it like a casual weeknight projectlike “Sure, I’ll just whip this up real quick.” That was adorable of me. Cheesecake is not a sprint; it’s a slow dance with dairy. Once I accepted that (and stopped trying to rush the cooling phase like a person late for brunch), everything got easierand significantly less cracked.
Here’s the biggest lesson from repeated bakes: your mixer speed is a mood. When I mixed the eggs on medium-high because I was feeling confident, the batter got airy, the cheesecake puffed, and then it sank in a way that felt personal. When I switched to low speed, added eggs last, and stopped mixing the moment everything looked combined, the surface came out smooth and calmlike it had just finished yoga.
I also learned that pumpkin puree has opinions. Some brands are thicker, some are looser, and that changes the pumpkin layer’s texture. One year, my pumpkin layer was slightly softer than the vanilla layer, and while it still tasted great, the slices weren’t as sharply defined. Now I keep it consistent by using the same amount of puree (1 cup) and giving it a quick blot if it looks watery. Not “dry it into dust,” just “remove the extra moisture that’s trying to sabotage my layers.”
Let’s talk crust choices, because crust is the foundation of trust in any relationship. Graham crackers are classic, but once I tried a gingersnap crust, it was hard to go back. The spice in the cookie amplifies the pumpkin layer without making the whole cheesecake taste like a candle store. (You know the one.) If you’re serving this for Thanksgiving, gingersnap crust plus a drizzle of caramel basically guarantees that someone will ask for the reciperight after they ask if there’s more.
Water baths deserve a mention because they’re the source of equal parts success and mild kitchen drama. I’ve done the classic foil-wrapped bain-marie, and when it works, it’s gorgeous: even baking, creamy texture, fewer cracks. But I’ve also had the one time when water found its way into the pan and turned my crust into a sad, damp suggestion of itself. That’s when I started using the steam-pan method more often. It gives you a moist baking environment without the “will my pan leak?” suspense. If you’re new to cheesecake, steam-pan is a confidence booster.
Finally, the cooling step. I used to yank cheesecakes out of the oven the moment the timer beeped, proud of my efficiencyuntil I realized I was basically temperature-shocking a delicate dessert. Now I cool it in the turned-off oven with the door cracked, then on the counter, then in the fridge overnight. The result is a cheesecake that slices cleanly, tastes richer, and doesn’t look like it’s been through something.
The best part of making this layered pumpkin cheesecake recipe, though, is the reaction. People see the layers and assume you spent all day on it. You don’t correct them. You just smile mysteriously and accept compliments like a humble autumn wizard.
Conclusion
This layered pumpkin cheesecake recipe is the kind of dessert that feels special without requiring you to become a pastry monk. Keep your ingredients at room temperature, mix gently, bake with moisture, and cool slowly. Do that, and you’ll get creamy, sliceable layers that taste like fall showed up wearing its best sweater.





