Table of Contents >> Show >> Hide
- What Is Sponge Painting?
- Why DIY Sponge Painting Still Works
- Tools and Materials You Will Need
- How to Choose Colors for Sponge Painting
- Best Walls for Sponge Painting
- How to Sponge Paint a Wall: Step-by-Step
- Step 1: Clear the room and protect everything
- Step 2: Clean the wall thoroughly
- Step 3: Repair small flaws
- Step 4: Prime if needed
- Step 5: Apply the base coat
- Step 6: Mix your sponge-paint glaze
- Step 7: Dampen the sponge
- Step 8: Load the sponge lightly
- Step 9: Start in a top corner
- Step 10: Keep a wet edge
- Step 11: Step back often
- Step 12: Add a second layer if desired
- Step 13: Remove tape and let it cure
- Common Sponge Painting Mistakes to Avoid
- Can You Sponge Paint Over an Existing Painted Wall?
- Where Sponge Painting Looks Best
- How to Make Sponge Painting Look Modern
- DIY Sponge Painting Experiences: What It Actually Feels Like
- Final Thoughts
- SEO Tags
If your walls are looking a little too plain, too flat, or too “apartment before personality moved in,” sponge painting can be a surprisingly fun fix. This classic faux-finishing technique uses a sponge to layer paint or glaze over a base coat, creating soft texture, depth, and movement. Done well, it can make a wall feel warmer, richer, and much more custom than a standard one-color paint job.
The best part? You do not need a professional crew, a medieval plaster workshop, or the patience of a saint. You just need the right tools, a little planning, and the willingness to dab a wall repeatedly without asking yourself, “Why am I petting my house?”
In this DIY guide, you will learn how to sponge paint a wall step by step, how to choose colors that actually work together, what mistakes to avoid, and how to get a finish that looks intentional instead of accidental. Whether you want a subtle washed effect or a bolder textured statement, this technique can absolutely be done by a careful beginner.
What Is Sponge Painting?
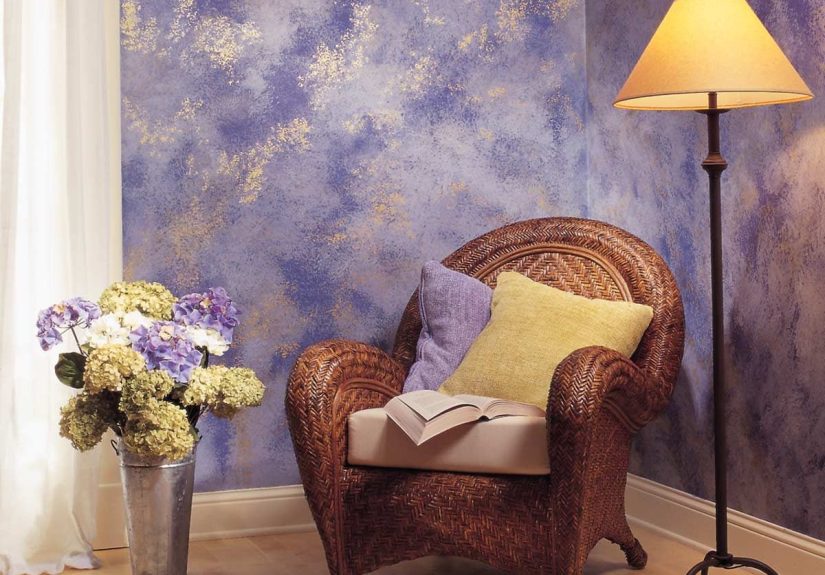
Sponge painting is a decorative wall-painting technique that creates a mottled, layered finish by dabbing paint or a paint-and-glaze mixture onto a wall with a sponge. It is often used to soften a solid wall color, add visual depth, or mimic the look of an old-world plaster finish.
Unlike a crisp painted stripe or a geometric mural, sponge painting is meant to be irregular. That is the whole charm. A natural, uneven pattern helps the wall feel textured and relaxed rather than stiff and overly perfect. The finish can range from soft and cloudy to dramatic and high-contrast depending on your color choices and how heavily you apply the top layer.
Why DIY Sponge Painting Still Works
Sponge painting has been around for ages, and yes, it had a very enthusiastic moment in home decor history. But the technique itself is still useful when you approach it with modern color choices and a lighter hand. Instead of pairing dusty mauve with faux Tuscan drama, try layered whites, warm greiges, soft greens, clay tones, smoky blues, or tonal neutrals. Suddenly the look feels updated, intentional, and stylish.
It also works because it is forgiving. A roller shows every lazy move. Sponge painting, on the other hand, is built on variation. Tiny imperfections blend into the finish. That makes it a great option for DIYers who want something artistic without needing laser-straight precision.
Tools and Materials You Will Need
- Base coat paint
- Top-coat paint or glaze mixture
- Natural sea sponge
- Paint tray or shallow container
- Roller and roller cover
- Angled brush for cutting in
- Painter’s tape
- Drop cloths
- Bucket of clean water
- Clean rags or lint-free cloths
- Mild cleaner or degreaser
- Spackle or filler for small holes
- Fine-grit sandpaper or sanding sponge
- Primer, if your wall needs it
- Disposable gloves
- Sample board or scrap drywall for practice
A quick tip before you shop: a natural sea sponge usually creates a more organic pattern than a flat synthetic kitchen sponge. A kitchen sponge can work in a pinch, but a sea sponge tends to produce more variation and a softer, more attractive finish.
How to Choose Colors for Sponge Painting
This is where many DIY projects either become beautiful or become a very emotional trip back to the paint aisle. Color choice matters.
For a subtle look
Choose a base color and a sponge color from the same family. Think warm beige with creamy taupe, soft gray with pale silver, or muted sage with a lighter green-gray. This creates texture without shouting across the room.
For a richer layered look
Use two top colors over one base coat. Start with the softer tone, let it dry, then add a second color sparingly. This creates more depth and keeps the wall from looking flat.
For a bold statement
Pair colors with more contrast, but do it carefully. Navy over a pale gray base can look elegant. Bronze over warm beige can feel earthy and dramatic. Just avoid combinations that fight each other unless your design goal is “confident chaos.”
Always test your colors first on a sample board. Sponge painting looks different once it dries, and different again once it covers a large section of wall. Paint is funny like that. It loves surprises, usually at the least convenient moment.
Best Walls for Sponge Painting
Sponge painting works best on smooth or lightly textured interior walls. Accent walls, powder rooms, dining rooms, bedrooms, and small alcoves are especially good candidates. The technique can make a cozy room feel layered and custom without overwhelming the space.
If the wall is heavily textured, very damaged, or patchy in a way you cannot fully repair, the finish may look too busy. In that case, you may want to do extra prep or choose a different treatment. Sponge painting adds visual movement, so it does not need help from a wall that already looks like a topographic map.
How to Sponge Paint a Wall: Step-by-Step
Step 1: Clear the room and protect everything
Move furniture away from the wall and cover floors and nearby pieces with drop cloths. Remove outlet covers and switch plates. Tape trim, ceiling lines, baseboards, and any edges you want to keep clean. This part is not glamorous, but neither is scrubbing dried glaze off a baseboard with a toothbrush at 10 p.m.
Step 2: Clean the wall thoroughly
Wipe the wall with a damp cloth and mild cleaner to remove dust, grease, and grime. Let it dry completely. Paint and glaze stick better to clean surfaces, and sponge painting especially benefits from a smooth, debris-free starting point.
Step 3: Repair small flaws
Fill nail holes, dents, and small cracks with spackle. Once the filler dries, sand the area smooth and wipe away the dust. You do not need a museum-quality wall, but obvious defects can stand out under a decorative finish.
Step 4: Prime if needed
If you are covering a dark color, a stained wall, fresh drywall patches, or a glossy surface, apply primer first. If the existing wall is already clean, sound, and close in color to your base coat, primer may not be necessary. Use judgment here. Primer is not exciting, but it often prevents later regret.
Step 5: Apply the base coat
Roll on your base color evenly. Use a brush to cut in the edges, then blend into the rolled paint so the wall looks consistent. Let the base coat dry fully before you begin sponging. Do not rush this step. If the wall is still tacky, your sponge technique can drag the paint and create streaks instead of texture.
Some decorative systems call for a compatible glaze mixed with paint, while others allow straight paint as the sponged layer. Follow the instructions for the products you are using, especially when it comes to drying times and sheen compatibility.
Step 6: Mix your sponge-paint glaze
In a paint tray or container, combine your top color with glaze if you want more working time and a softer finish. A glaze mixture generally makes the application easier to control because it slows drying and allows gentler blending. Stir thoroughly so the color is even.
If you want a stronger, more opaque effect, use less glaze. If you want a softer, more translucent look, use more glaze. Start with a test patch first so you can see how the mixture behaves on your wall.
Step 7: Dampen the sponge
Wet your sea sponge with clean water, then wring it out well. It should be damp, not dripping. A dripping sponge is basically a tiny chaos machine. A damp sponge helps the paint go on more evenly and prevents heavy blobs.
Step 8: Load the sponge lightly
Dip the sponge into the paint mixture, then blot off the excess on the tray or a clean rag. You want the sponge loaded, but not overloaded. Too much paint can create smears, drips, and obvious repeated marks.
Step 9: Start in a top corner
Begin in an upper corner and work down in sections that are comfortable to reach. Dab the sponge onto the wall using light pressure. Rotate the sponge often and change your wrist angle as you work. This helps create a random pattern instead of obvious repeats.
Try not to move in perfectly straight rows. That is the enemy. A natural-looking sponge-painted wall usually comes from irregular, overlapping dabs and a loose circular rhythm rather than a rigid grid.
Step 10: Keep a wet edge
Work in small sections and overlap slightly into the previous area before it dries. This prevents harsh seams. If one section dries before the next one meets it, you can end up with visible borders that scream, “The project took a snack break here.”
Step 11: Step back often
Every few minutes, back up and look at the wall from across the room. Sponge painting can look uneven when you are standing inches away, but balanced from a distance. This is the moment to decide whether you need more color, less color, or a little blending.
Step 12: Add a second layer if desired
Once the first sponge layer dries, you can add a second color for more depth. Use it more sparingly than the first. Too many heavy layers can muddy the finish and make the wall feel overworked.
Step 13: Remove tape and let it cure
When the finish is dry to the touch, remove the painter’s tape carefully. Let the wall dry thoroughly before moving furniture back or hanging decor. Decorative finishes often look better the next day when everything has settled and dried evenly.
Common Sponge Painting Mistakes to Avoid
Using too much paint
This is the biggest one. If the sponge is overloaded, the wall will look blotchy and heavy. Blot often.
Not rotating the sponge
If you use the same side of the sponge the same way every time, the pattern becomes repetitive. Rotate early, rotate often.
Working on a tacky base coat
If the base coat is not fully dry, the top layer can smear or pull it off. Patience wins here.
Skipping the sample board
Testing your color mix and pressure on a board saves you from fixing a four-foot-wide mistake later.
Choosing colors with no contrast
If the sponge color is too close to the base, the finish can disappear. If the contrast is too strong, it can feel harsh. Aim for enough difference to show depth without creating visual noise.
Ignoring room lighting
Natural light, warm bulbs, and cool LEDs can all change how sponge painting reads. Check your sample in the same room where it will live.
Can You Sponge Paint Over an Existing Painted Wall?
Yes, in many cases you can. The wall should be clean, dry, and in good condition. If the existing paint is glossy, damaged, or dramatically darker than your new base coat, proper prep becomes more important. That might mean light sanding, repairs, or primer before you begin.
If your home was built before 1978 and you plan to sand or disturb old paint, use lead-safe caution before starting. Older painted surfaces can present a lead-dust risk, so do not casually attack them with a sanding block and optimism.
Where Sponge Painting Looks Best
- Accent walls behind beds or sofas
- Dining rooms that need warmth and depth
- Powder rooms where you can be more dramatic
- Hallways or niches that feel too plain
- Bedrooms where a soft, layered finish feels calming
It can also work beautifully in Mediterranean, rustic, transitional, cottage, and eclectic interiors. The trick is to keep the color palette aligned with the rest of the room.
How to Make Sponge Painting Look Modern
If you love the technique but worry it may look dated, the answer is simple: modernize the palette and lighten the effect. Use soft mineral tones, earthy neutrals, warm whites, or muted greens and blues. Keep the contrast controlled. Focus on depth rather than drama. And consider using the technique on a single wall instead of the entire room.
In other words, do not go full faux villa unless that is truly your dream. A little texture goes a long way.
DIY Sponge Painting Experiences: What It Actually Feels Like
One of the most relatable experiences with sponge painting is how strange the first ten minutes feel. You spend all this time carefully prepping the wall, rolling on a beautiful base coat, and making everything neat. Then suddenly the project asks you to dab random patches all over that nice clean wall. Your brain objects. Loudly. It feels wrong before it feels right.
That is why so many first-time DIYers hesitate at the beginning. They dab too lightly, stand too close, and try to control every mark. The result often looks timid. Then, after stepping back, they realize the finish needs more overlap and more variety. Sponge painting rewards confidence. Not reckless confidence, of course. We are painting a wall, not joining a stunt team. But you do have to trust the process enough to let the pattern build gradually.
Another common experience is discovering how much the sponge itself matters. Many people try the technique with whatever sponge is nearest the sink, only to realize it leaves blocky, repetitive shapes. Once they switch to a natural sea sponge, the finish usually becomes softer and more believable. The pattern feels less manufactured and more organic. That single material change can make a huge difference.
There is also the classic lesson in paint loading. Nearly everyone overloads the sponge at least once. The first heavy dab lands on the wall like a dramatic plot twist. Suddenly there is a dark blob staring back at you. The good news is that sponge painting is forgiving. You can often soften the area with a cleaner section of sponge, blot it with a rag, or later balance it by adding more base color in surrounding spots. In other words, minor mistakes are not project-ending disasters. They are just part of the learning curve.
Many DIYers also notice that the wall looks better from across the room than it does from six inches away. Up close, sponge painting can seem messy, irregular, and slightly chaotic. From a normal viewing distance, though, it blends into a layered finish with softness and depth. That is an important mental shift. This is not trim work. It is not supposed to look machine-perfect at nose level.
Another real-world experience is timing. Sponge painting tends to move faster once you understand your rhythm, but the setup and testing phase can take longer than expected. Mixing colors, checking the sample board, adjusting the glaze ratio, and practicing your pressure all matter. The project becomes much more enjoyable when you stop rushing and treat it like a decorative finish rather than a race to get the couch back in place.
People also tend to remember the moment the wall “clicks.” At first it looks patchy. Then a few more sections go on, the pattern starts connecting, and suddenly the finish looks intentional. That is the payoff. It is creative, tactile, and a little addictive. By the time one wall is finished, many DIYers are already eyeing the powder room, the hallway, or that sad little nook by the stairs like it is next on the makeover list.
And finally, there is the satisfaction factor. Sponge painting feels handmade in the best way. The wall has movement. It has softness. It has character. It does not look like every other flat-painted room on the block. For a relatively affordable DIY project, that is a pretty great return on effort.
Final Thoughts
Learning how to sponge paint a wall is less about artistic genius and more about good prep, smart color choices, and a relaxed technique. Clean the wall well, let the base coat dry fully, use a damp natural sponge, work from the top down, rotate constantly, and build the finish slowly. That is the formula.
Whether you want a subtle tonal texture or a richer layered accent wall, sponge painting gives you room to be creative without requiring advanced painting skills. Practice first, trust your sample board, and remember: if a dab looks odd up close, step back before panicking. Sometimes the wall is fine. Sometimes the wall is actually fabulous. Sometimes you just need coffee.




