Table of Contents >> Show >> Hide
- What You Need Before You Start
- Why This Model Works
- How to Make an Inflatable Cube Out of Paper: 11 Steps
- Step 1: Start with a Perfect Square
- Step 2: Fold Both Diagonals
- Step 3: Fold the Paper in Half Horizontally and Vertically
- Step 4: Collapse the Paper into the Waterbomb Base
- Step 5: Fold the Bottom Corners Up on the Front
- Step 6: Repeat the Same Folds on the Back
- Step 7: Bring the Side Corners into the Center
- Step 8: Fold the Top Triangles Down to Make Tabs
- Step 9: Tuck the Tabs into the Pockets
- Step 10: Open the Model Gently and Find the Inflation Hole
- Step 11: Blow to Inflate and Shape the Cube
- Tips for a Better Inflatable Cube
- Common Mistakes and How to Fix Them
- Fun Ways to Use an Inflatable Paper Cube
- Conclusion
- Experiences Related to Making an Inflatable Paper Cube
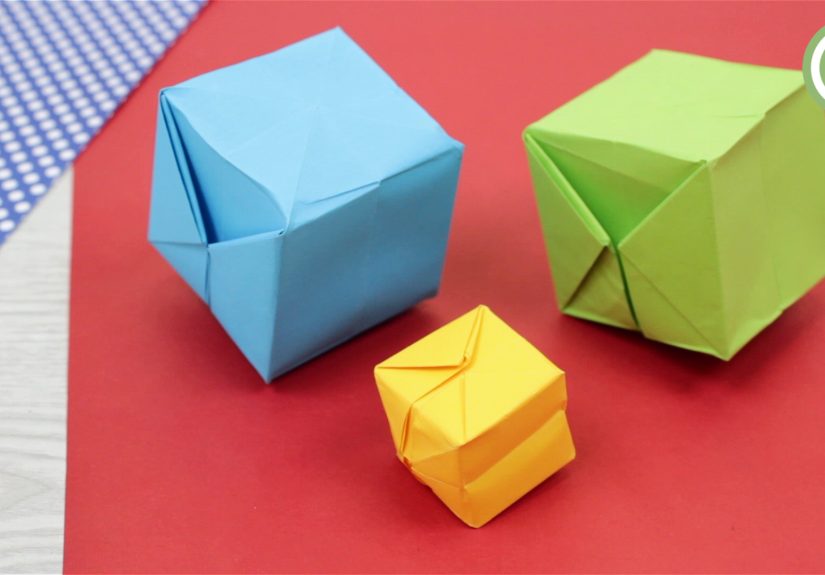
If you have ever looked at a flat square of paper and thought, “You know what this needs? More drama,” congratulations: you are emotionally prepared for the inflatable paper cube. Often called a waterbomb or paper balloon, this classic origami model starts as a humble sheet and ends as a puffy little cube you can inflate with one triumphant breath. It is equal parts geometry, patience, and tiny magic trick.
The beauty of this project is that it feels more impressive than it really is. You do not need glue, tape, wizard certification, or an engineering degree. You just need a square sheet of paper, a flat surface, and a willingness to make crisp folds instead of the sort of lazy “that looks close enough” crease that always comes back to haunt crafters. This guide breaks the process into 11 clear steps, plus tips on choosing paper, fixing common mistakes, and getting a sharper cube shape at the end.
Whether you are making one as a rainy-day craft, a classroom geometry activity, party decor, or simply because turning paper into a blow-up cube sounds delightfully weird, this tutorial will walk you through it in plain English. Let’s fold something charmingly unnecessary and surprisingly satisfying.
What You Need Before You Start
- 1 square sheet of paper, ideally 6 x 6 inches or larger
- A smooth table or desk
- Clean, dry hands
- A little patience and a little lung power
Origami paper is the easiest option because it is lightweight and takes a crease well. Regular printer paper can work too, but it is slightly stiffer and may feel more stubborn when you get to the inflation stage. If you are a beginner, start with larger paper. Tiny squares are adorable, but they also turn your fingers into clumsy forklift equipment.
Why This Model Works
The inflatable cube is based on the traditional waterbomb structure, a classic fold that transforms a square into a compact base and then into a hollow, expandable form. In other words, you are not just folding random corners and hoping for the best. You are building a small three-dimensional shell with pockets, flaps, and hidden volume. That is why clean reference folds matter so much: each crease helps the model know where to collapse, where to lock, and where to puff outward later.
How to Make an Inflatable Cube Out of Paper: 11 Steps
Step 1: Start with a Perfect Square
Place your paper flat in front of you. If your paper has a colored side and a white side, begin with the white side facing up. Make sure it is truly square. Not “close enough.” Not “my scissors were feeling creative.” A real square. Uneven edges can throw off the whole model and make the last step maddening.
Step 2: Fold Both Diagonals
Fold the paper diagonally in half to form a triangle, then unfold it. Turn the paper and fold the opposite diagonal, then unfold again. You should now see an X-shaped crease pattern across the sheet. These diagonal lines are the early road map for the model, so press firmly and neatly.
Step 3: Fold the Paper in Half Horizontally and Vertically
Turn the paper so it looks like a square again rather than a diamond. Fold it in half horizontally, crease it, and unfold. Then fold it vertically and unfold. Now your paper should have a starburst of intersecting creases: two diagonals, one horizontal, and one vertical. It may already look more organized than most group projects.
Step 4: Collapse the Paper into the Waterbomb Base
This is the first moment where origami stops looking flat and starts looking clever. Use the creases you made to gently push the sides inward so the paper collapses into a triangular base. The horizontal and vertical folds should fold inward while the diagonal folds guide the collapse. Flatten the result into a neat triangle with open flaps at the bottom.
If this step feels awkward, that is normal. The paper is basically remembering all the directions you just taught it. Once the folds catch, the shape snaps into place in a very satisfying way.
Step 5: Fold the Bottom Corners Up on the Front
Take the right bottom corner of the top layer and fold it upward so it meets the top point of the triangle. Repeat with the left bottom corner. You should now have a diamond shape on the front. Run your finger or thumbnail along each crease to sharpen it. Crisp folds here help the model stay symmetrical later.
Step 6: Repeat the Same Folds on the Back
Flip the model over and do the exact same thing on the reverse side: fold both bottom corners of the top layer up to the top point. Once both sides match, you should have a tidy double-diamond shape. If one side looks slightly wonky, fix it now. Origami is very forgiving early on and hilariously unforgiving near the end.
Step 7: Bring the Side Corners into the Center
On the front side, take the right corner of the top layer and fold it inward toward the center line. Then fold the left corner inward to meet the center line as well. The front should now look narrower, almost like a kite shape. Flip the model over and repeat on the other side.
This step creates the flaps and pockets that help the inflatable cube lock together. Take your time. Neat alignment here makes the final inflation step dramatically easier.
Step 8: Fold the Top Triangles Down to Make Tabs
You will notice little triangular sections at the top of the folded layers. Fold those top triangles downward to create small tabs. Do this on the front and back. These folds are temporary-looking, but they are secretly setting up the pocket system that keeps the model closed. Origami loves a plot twist.
Step 9: Tuck the Tabs into the Pockets
Unfold the small tabs slightly just enough to spot the pockets underneath. Carefully tuck each tab into its matching pocket. Repeat on all sides where needed. This is the locking stage. Once the tabs are inserted cleanly, the model should feel much more secure and compact.
If a tab refuses to go in, do not force it like you are stuffing a suitcase five minutes before checkout. Open the pocket gently, sharpen the crease, and try again. Paper has feelings. Mostly about being crumpled.
Step 10: Open the Model Gently and Find the Inflation Hole
At this point the model will still look flat, which can make you briefly question your life choices. Do not panic. Gently separate the sides a little and locate the small hole at one end of the model. This hole is where you will blow air into the paper cube. Make sure the tabs are tucked in securely before moving on.
Step 11: Blow to Inflate and Shape the Cube
Blow a small, steady breath into the hole. As air enters, the paper should expand outward into a rounded cube-like form. Once inflated, gently pinch and shape the edges and corners to make the form look more square. Congratulations: you now have an inflatable paper cube, which is somehow both a geometry lesson and a party trick.
Tips for a Better Inflatable Cube
Use the Right Paper
Lightweight origami paper is usually the sweet spot. It is easier to fold, easier to inflate, and less likely to crack along the creases. Heavier paper can create a sturdier finished cube, but it may take more effort to shape. If you are brand-new to this, avoid cardstock unless your goal is to develop character through struggle.
Make Sharp Creases Early
The final cube only looks polished when the earlier folds are precise. Every crooked crease tends to multiply into a more obvious problem later. A careful first half makes the second half much smoother.
Go Bigger if You Are Learning
A 6 x 6 inch square is beginner-friendly. Larger paper gives you more room to handle the flaps and identify the pockets. Once you understand the sequence, you can scale down and make smaller cubes for garlands, decorations, or gift toppers.
Inflate Gently
You do not need to blow like you are trying to launch a hot-air balloon. A steady puff works better than a dramatic gust. If the cube resists inflation, check the pockets and gently pry the layers apart a little first.
Common Mistakes and How to Fix Them
The Model Will Not Collapse Properly
This usually means one or more of the basic creases are weak or slightly off. Flatten the sheet, re-crease the diagonals and the horizontal and vertical folds, then try collapsing again.
The Tabs Keep Popping Out
The pockets may not be fully open, or the folds may be too loose. Sharpen the fold lines and insert the tabs more carefully. Smaller, cleaner motions often work better than brute force.
The Cube Inflates but Looks Lumpy
That is common on the first try. Once the model is puffed up, gently pinch the edges and adjust the corners by hand. Think of it like fluffing a paper pillow into a cube.
The Paper Tears During Inflation
This can happen with old paper, overly thin paper, or aggressive blowing. Use fresh paper, make smoother creases, and inflate more gently next time.
Fun Ways to Use an Inflatable Paper Cube
- String several together to make a paper garland
- Use patterned paper for party decor
- Draw faces on them for kid-friendly crafts
- Turn them into ornaments or table decorations
- Use them in classrooms to discuss geometry, symmetry, and volume
The inflatable cube is one of those rare crafts that works for kids, teens, adults, teachers, and random people who just like making oddly satisfying things with their hands. It is simple enough to learn in one sitting but charming enough to repeat once you get the hang of it.
Conclusion
Learning how to make an inflatable cube out of paper is a perfect example of why classic origami never goes out of style. With one square sheet and a sequence of smart folds, you can create something playful, geometric, and genuinely impressive. The real secret is not speed; it is precision. Start with a true square, crease carefully, tuck the tabs neatly, and let the final puff of air do its little miracle.
Once you make one successfully, you will probably want to make several more. That is the danger of paper crafts: first you make one cube for fun, and next thing you know, your desk looks like a tiny inflatable architecture exhibit. Honestly, there are worse hobbies.
Experiences Related to Making an Inflatable Paper Cube
The experience of making an inflatable paper cube is a funny mix of skepticism, concentration, and delight. Most beginners start out thinking the same thing: There is no way this flat little triangle mess is going to become a cube. Then the folds begin stacking up, the shape starts narrowing into something more structured, and suddenly the project becomes much more addictive than expected. It is one of those crafts that sneaks up on you. At first it looks like a simple paper-folding activity. Ten minutes later, you are emotionally invested in whether the tabs will cooperate.
One of the most common experiences people have is underestimating the importance of neat creases. The first cube often comes out a little puffy in the wrong places, slightly crooked, or shaped more like a lumpy marshmallow than a clean cube. That is not failure; that is basically the initiation ceremony. By the second or third attempt, most people slow down, align corners more carefully, and discover that the model becomes dramatically easier to inflate. It is a small but satisfying lesson: in paper folding, the invisible preparation is what makes the visible magic happen.
There is also a very specific moment of suspense right before inflation. The model looks flat, sealed, and somewhat mysterious. You find the tiny hole, take a breath, and wonder whether you missed a fold twenty steps ago. Then it expands. Maybe not perfectly. Maybe not elegantly. But it expands. That instant feels oddly triumphant, like you just convinced paper to change careers and become a balloon. Kids usually react with a burst of laughter. Adults often react with surprise, followed by the universal crafting phrase: “Wait, let me make another one.”
Teachers and parents often describe this project as a strong attention-builder because it combines hand coordination, pattern recognition, and a visible payoff. Unlike some crafts that look confusing until the final second, this one offers small rewards throughout the process. The base collapses in a clever way. The flaps start creating symmetry. The pockets lock things together. Then the final inflation gives the project its dramatic finish. It is excellent for learners who enjoy seeing logic turn into shape.
Another shared experience is customization. Once people successfully fold one inflatable cube, they rarely stop at plain paper. They start reaching for patterned origami paper, holiday prints, metallic sheets, doodles, markers, stickers, and all the other dangerous gateways to “just one more craft.” A plain cube becomes a face, a tiny lantern, a garland piece, or a table decoration. The simple form invites creativity because it is both structured and playful.
In the end, making an inflatable cube out of paper is memorable not because it is the hardest origami model in the world, but because it delivers a tiny moment of wonder. You begin with a square, follow a series of precise folds, and finish with something that looks impossible for its material. That transformation is what keeps people coming back to traditional paper folding. It is quiet, inexpensive, screen-free, and surprisingly satisfying. Also, it is deeply enjoyable to hand someone a flat-looking folded shape, tell them to blow into it, and watch their expression when it turns into a cube. Science? Art? Mild sorcery? A little of all three.




