Table of Contents >> Show >> Hide
- Why Use a Dollar Tree Wastebasket for a Scarecrow?
- Supplies You Will Need
- Choosing the Right Wastebasket
- Step-by-Step Instructions: How to Make a Scarecrow From a Dollar Tree Wastebasket
- Design Variations to Try
- Common Mistakes and How to Avoid Them
- Where to Display Your Dollar Tree Wastebasket Scarecrow
- Budget Tips for This DIY Fall Decor Project
- Extra Experience: What I Learned Making a Wastebasket Scarecrow
- Conclusion
- SEO Tags
Note: This article is written for web publishing and is based on practical DIY crafting methods, common fall decor techniques, and real budget-friendly materials often found at dollar stores, craft stores, and home improvement retailers. Product availability may vary by location.
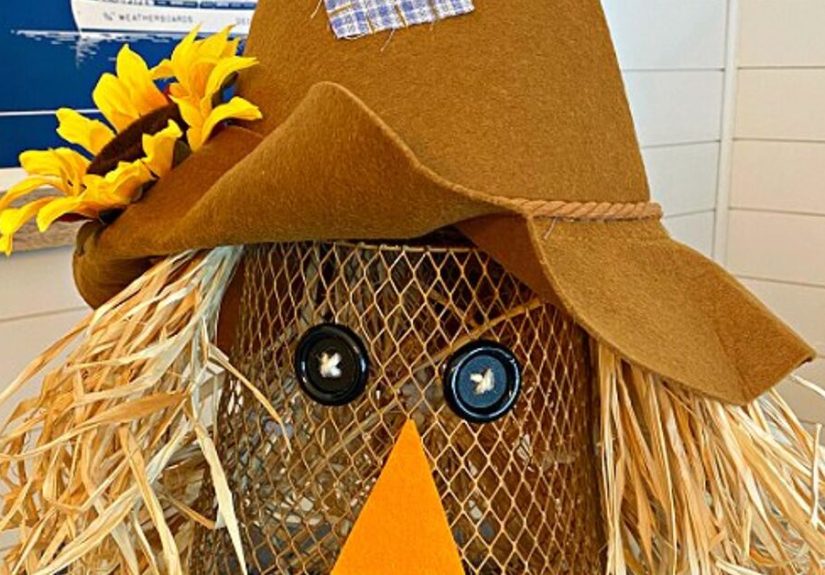
If autumn had a mascot, it would probably be a scarecrow wearing a slightly crooked hat, smiling like it knows where all the pumpkin spice is hidden. The good news? You do not need a barn, a hayfield, or a craft room the size of a school gym to make one. With one simple Dollar Tree wastebasket, a little raffia, some buttons, felt, ribbon, and hot glue, you can create a charming DIY scarecrow that looks adorable on a porch, mantel, entry table, classroom shelf, or fall party display.
This project is popular because it checks every box a seasonal craft should: affordable, beginner-friendly, customizable, lightweight, and cute enough to make guests say, “Wait, that started as a trash can?” Yes. Yes, it did. The humble wastebasket has entered its glow-up era.
In this guide, you will learn how to make a scarecrow from a Dollar Tree wastebasket step by step, including what supplies to buy, how to build the face, how to add straw-like hair, how to decorate the hat area, and how to display your finished piece without it falling over like it just heard the price of real estate.
Why Use a Dollar Tree Wastebasket for a Scarecrow?
A small plastic or wire-style wastebasket makes an excellent base for a scarecrow head because it already has structure, height, and a rounded shape. Instead of stuffing fabric, sewing burlap, or building a wooden frame, you start with a ready-made form. That makes this DIY fall decor project especially friendly for beginners, busy parents, teachers, apartment dwellers, and anyone who loves seasonal decorations but does not want to spend the afternoon wrestling with lumber.
Many Dollar Tree wastebaskets have an open-weave or textured pattern, which is useful because you can thread twine, pipe cleaners, floral wire, or zip ties through the openings. That means buttons, raffia bundles, ribbons, and small accessories can be secured more firmly than they would be on a smooth plastic surface. If you choose a solid plastic wastebasket instead, the project still works; you will simply rely more on hot glue, adhesive dots, or craft-safe glue.
The finished scarecrow is lightweight and easy to move. It can sit on a hay bale, next to pumpkins, inside a tiered tray arrangement, or on a covered porch. It is more decorative than functional, so do not expect it to frighten birds away from your tomatoes. It is more likely to charm them into staying for brunch.
Supplies You Will Need
Before you start, gather your materials so you are not wandering around mid-project with glue strings stuck to your sleeve. Most supplies can be found at Dollar Tree, craft stores, or in your own leftover craft bin.
Basic Materials
- 1 small Dollar Tree wastebasket, preferably wire, woven, or textured plastic
- Large buttons, googly eyes, felt circles, or wood discs for the eyes
- Orange felt, craft foam, or cardstock for the nose
- Black felt, yarn, paint marker, or thin rope for the mouth
- Natural raffia, straw-colored yarn, jute, or paper grass for hair
- Fall ribbon, burlap ribbon, plaid fabric, or a small bandana
- Artificial sunflower, faux leaves, berries, mini pumpkins, or other fall picks
- Pipe cleaners, floral wire, twine, or zip ties
- Hot glue sticks
Helpful Tools
- Hot glue gun
- Scissors
- Wire cutters if using floral wire
- Black permanent marker or paint marker
- Ruler or measuring tape
- Clothespins or clips to hold pieces while glue cools
If children are helping, use kid-safe scissors and have an adult handle the hot glue gun. Low-temperature glue guns are a good option for family crafting, but even those can still get hot enough to surprise your fingers. Crafting should create memories, not tiny glue-related drama.
Choosing the Right Wastebasket
The best wastebasket for this scarecrow craft is small enough to sit comfortably on a table or porch display but large enough to create a visible face. A round or slightly tapered shape works beautifully because it resembles a head. A wire or basket-weave design is ideal because it gives you openings for attaching decorations.
Color matters too. A tan, brown, cream, orange, black, or neutral-colored basket will blend naturally with fall decor. However, if all you find is a bright blue or pink wastebasket, do not panic. You can paint it, cover it with burlap, wrap it with ribbon, or simply let your scarecrow have a bold personality. Somewhere out there, a scarecrow in hot pink is living its best life.
If the wastebasket has a rim, treat that rim like the bottom edge of a hat. If it has a wider opening, you can turn it upside down so the wide part becomes the hat brim. Test both directions before decorating. Place it on your table, step back, squint like a professional designer, and decide which angle looks more scarecrow-ish.
Step-by-Step Instructions: How to Make a Scarecrow From a Dollar Tree Wastebasket
Step 1: Clean and Prep the Wastebasket
Wipe the wastebasket with a dry or slightly damp cloth to remove dust, price sticker residue, or mystery store shelf glitter. If you plan to paint the basket, let it dry completely first. For most versions, painting is optional. The open structure of the basket gives the scarecrow a rustic look on its own.
Decide which side will be the front. If the basket has a seam or label mark, rotate it to the back. A small planning step now keeps your scarecrow from looking like it got dressed in the dark.
Step 2: Create the Eyes
Large buttons are a classic scarecrow choice because they instantly create a handmade country look. Thread twine or thick string through each button in an X pattern before attaching it. This tiny detail makes the eyes look stitched, even though no actual sewing is required.
If your wastebasket has openings, push the string ends through the basket and tie them securely inside. Add a dab of hot glue behind each button for extra hold. If the basket is solid plastic, glue the buttons directly to the surface and hold them in place for a few seconds while the glue sets.
For a playful version, use oversized googly eyes. For a farmhouse version, use wood beads or painted wood circles. For a slightly silly version, use two mismatched buttons. Scarecrows are not known for passing symmetry exams, so do not worry if one eye sits a little higher than the other.
Step 3: Add the Nose
Cut a triangle from orange felt, craft foam, or cardstock. A triangle about 2 to 3 inches tall works well for many small wastebaskets, but adjust the size based on your basket. Before gluing, place the nose between the eyes and check the spacing. The face should look friendly, not startled.
For a sturdier nose, glue two layers of felt together and let them cool or dry before attaching the piece to the basket. Add small stitch marks around the edge with a black marker or paint pen. This gives the nose the classic patched-on scarecrow look.
Hot glue works well for felt on plastic or wire baskets. If you are using cardstock, avoid too much glue because it can warp the paper. A thin line around the edge is usually enough.
Step 4: Make the Mouth
A scarecrow mouth should be simple, cheerful, and slightly imperfect. Cut a curved smile from black felt, use a black paint marker, or glue on a short piece of black yarn or jute. Add small vertical stitch marks across the smile to create a sewn effect.
If you want extra personality, tilt the smile slightly to one side. This gives your scarecrow a mischievous expression, like it just told the pumpkins a joke and is waiting for them to laugh.
You can also make the mouth from a trimmed piece of black foam or felt. A scalloped or wavy edge creates a whimsical look. Just remember: simple is better. Too many facial details can make the scarecrow look crowded, especially on a small basket.
Step 5: Add Raffia Hair
Raffia is one of the best materials for scarecrow hair because it looks like straw, bends easily, and adds instant rustic texture. Separate the raffia into small bundles. Tie each bundle in the middle with floral wire, twine, or a pipe cleaner.
Attach bundles to the sides of the basket, letting the ends stick out like messy straw hair. Add a few bundles around the back and top so the hair looks full from multiple angles. If the basket has openings, thread wire through the holes and twist it inside. If not, use hot glue and press the bundle firmly until secure.
Trim the raffia if needed, but do not make it too neat. Scarecrow hair should look windblown, not like it just came from a salon that serves espresso.
Step 6: Create the Hat Look
There are several ways to make the wastebasket look like a scarecrow hat. The easiest method is to use the basket’s rim as the hat brim. Wrap burlap ribbon, plaid ribbon, or fall ribbon around the rim and glue it in place. Add a bow, sunflower, faux leaf, or mini pumpkin to one side.
If you want a fuller hat, place a small straw hat on top of the basket and secure it with glue, wire, or twine. Mini straw hats are often available at craft stores, especially during fall. You can also cut a hat brim from cardboard, cover it with burlap, and attach it around the top edge of the basket.
A turned-up brim adds charm. Use a safety pin, floral wire, or hot glue to lift one side of the brim, then add a flower or leaf cluster. This little detail makes the scarecrow look finished rather than simply assembled.
Step 7: Add a Scarf or Bow
A scarf or bow brings color to the project and helps separate the face from the base. Tie a strip of plaid fabric, burlap ribbon, or a bandana around the lower portion of the basket. If your scarecrow is sitting on a stand, this can act like a collar. If it is displayed as a head only, it still adds a polished fall touch.
Choose colors that match your seasonal decor. Orange, mustard yellow, burgundy, brown, cream, olive green, and black-and-white buffalo check all work well. If your home leans modern farmhouse, use neutral burlap and cream ribbon. If you love classic Halloween, add black, orange, and purple accents.
Step 8: Decorate With Fall Embellishments
Now comes the fun part: accessories. Add faux leaves around the hat, glue a sunflower near the brim, tuck in berries, attach a mini pumpkin, or add a small patch of fabric to the side. The trick is to use embellishments in clusters rather than scattering them randomly.
For example, place one sunflower, two leaves, and a small bow on one side of the hat. That creates a focal point. If you add decorations everywhere, your scarecrow may start looking like it lost a fight with the seasonal aisle.
Keep scale in mind. Large flowers can overwhelm a small wastebasket. Tiny accents may disappear. Medium-size embellishments usually work best.
Step 9: Stabilize the Scarecrow
Because the basket is lightweight, you may need to stabilize it depending on where you display it. For indoor use, place a small bean bag, fabric pouch filled with rice, or clean decorative stones inside the basket. For a covered porch, use a heavier base such as a small wood slice, planter, crate, or hay bale.
If the scarecrow will be outdoors, keep it under cover. Raffia, felt, ribbon, and hot glue do not love rain. Moisture can weaken glue and make natural materials droop. A covered porch, entryway bench, or sheltered patio is ideal.
Design Variations to Try
Farmhouse Scarecrow
Use burlap ribbon, wood buttons, natural raffia, cream fabric, and muted orange accents. Add a small buffalo-check bow for a cozy farmhouse look. This version pairs beautifully with white pumpkins, galvanized metal buckets, and neutral fall wreaths.
Classic Harvest Scarecrow
Use orange felt, yellow raffia, plaid ribbon, sunflowers, and faux maple leaves. This is the most traditional style and works well on porches with mums, pumpkins, hay bales, and cornstalks.
Halloween Scarecrow
Use black ribbon, orange accents, bat-shaped felt, purple ribbon, or a tiny witch hat. Keep the face friendly if children will be around, or make it slightly spooky for a Halloween display. A battery-operated tea light placed nearby can add a soft glow, but avoid placing heat sources inside the basket.
Classroom Scarecrow
Use craft foam instead of hot-glued felt, glue dots instead of hot glue, and paper raffia for easy cleanup. Students can create facial features with markers, stickers, or pre-cut shapes. Teachers can use the finished scarecrow as part of a fall bulletin board, reading corner, or harvest festival table.
Common Mistakes and How to Avoid Them
Using Too Much Hot Glue
Hot glue is useful, but giant blobs can show through open-weave baskets. Apply glue in controlled lines or dots, then press pieces into place. If glue strings appear, wait until they cool and gently pull them away.
Skipping the Dry Fit
Before gluing anything, arrange the eyes, nose, mouth, hair, and hat decorations. Take a quick photo with your phone. This helps you remember the layout and avoid the classic crafting moment where everything looked perfect until the glue got involved.
Making the Face Too Small
Small features can disappear from a distance. If the scarecrow will be viewed from a porch or walkway, use larger eyes, a bold nose, and a visible smile. Strong shapes photograph better and look more intentional.
Displaying It in Bad Weather
This project is best for indoor or covered outdoor decor. Rain, strong wind, and direct sun can damage the materials over time. If you want to use it outside, add a clear craft sealer to painted pieces and bring the scarecrow indoors during storms.
Where to Display Your Dollar Tree Wastebasket Scarecrow
This DIY scarecrow is versatile because it is small and lightweight. Place it on an entryway table with mini pumpkins and a leaf garland. Set it on a covered porch beside a mum planter. Add it to a fireplace mantel with candles and fall foliage. Use it as a centerpiece for a harvest party, Thanksgiving kids’ table, or classroom event.
For a fuller display, group it with different heights and textures. A hay bale, wooden crate, lantern, pumpkin stack, and pot of mums can turn one small scarecrow into a complete fall vignette. The secret is layering: tall items in the back, medium pieces in the middle, and smaller accents in front.
Budget Tips for This DIY Fall Decor Project
The beauty of a Dollar Tree scarecrow craft is that you can keep costs low by using what you already own. Save ribbon scraps from old gift wrapping, reuse buttons from worn-out clothing, cut fabric from an old plaid shirt, or repurpose faux flowers from last year’s wreath.
You do not need every embellishment in the craft aisle. In fact, using fewer materials often creates a cleaner, more stylish result. A basket, two button eyes, one felt nose, one raffia bundle, one ribbon, and one sunflower can be enough.
If you are making several scarecrows for a party, classroom, craft fair, or family activity, buy supplies in multi-packs. Divide raffia, buttons, felt sheets, and ribbon among multiple projects. Each scarecrow can have a slightly different personality, which is half the fun.
Extra Experience: What I Learned Making a Wastebasket Scarecrow
The first thing you learn when making a scarecrow from a Dollar Tree wastebasket is that the basket has opinions. It may roll slightly, tip forward, or refuse to sit at the exact angle you imagined. This is normal. The solution is not to panic; it is to add weight inside the basket before you start decorating. A small pouch of rice, a few clean stones, or even a folded beanbag can make the whole project feel sturdier.
The second lesson is that the face determines the mood. Two round buttons and a small smile create a sweet country scarecrow. Googly eyes make it goofy. A crooked smile makes it playful. A darker mouth and angled eyebrows can push it toward Halloween. Before attaching anything permanently, test a few expressions. You may be surprised how much personality changes with one tiny adjustment.
Raffia is both wonderful and chaotic. It gives the project that perfect straw-haired look, but it also sheds little pieces on the table like autumn confetti. Work over newspaper, a tray, or a large sheet of paper so cleanup is easy. Tie raffia bundles tightly before attaching them, and trim only after the glue or wire is secure. If you trim first, the bundle may loosen and become a tiny hay explosion.
Another helpful experience is to decorate in layers. Start with the face, then add hair, then ribbon, then hat accents. When you add embellishments too early, they can get in the way of attaching bigger pieces. Think of it like dressing the scarecrow: face first, hair second, accessories last. Even scarecrows deserve a sensible getting-ready routine.
For porch displays, I have found that this project looks best when paired with natural textures. Pumpkins, mums, wicker baskets, wood crates, cornstalks, and burlap all help the wastebasket scarecrow look intentional. On its own, it is cute. In a styled fall scene, it becomes the charming little mayor of Pumpkin Town.
Finally, do not chase perfection. The appeal of a handmade scarecrow is its slightly wonky charm. A little uneven raffia, a tilted flower, or a smile that leans to one side makes the finished piece feel handmade in the best way. This is not a museum sculpture. It is a cheerful fall craft made from a wastebasket, which means it already has a great sense of humor.
Conclusion
Learning how to make a scarecrow from a Dollar Tree wastebasket is a reminder that great seasonal decor does not have to be expensive or complicated. With a simple basket, raffia, buttons, felt, ribbon, and a few fall accents, you can create a cheerful scarecrow that brings warmth and personality to your home.
This project is especially useful because it can be adapted for many styles. Keep it rustic with burlap and raffia, make it playful with googly eyes, turn it spooky with Halloween colors, or create a polished farmhouse version with neutral ribbon and sunflowers. Whether you display it on your porch, mantel, classroom shelf, or Thanksgiving table, this budget-friendly DIY scarecrow proves that creativity often begins with the most ordinary object in the aisle.
And honestly, turning a wastebasket into fall decor is the kind of crafty magic autumn deserves.




