Table of Contents >> Show >> Hide
- What You’ll Need (Supplies and Smart Substitutions)
- Choose Your Scroll Style (Fast, Classic, or Fancy)
- How to Make a Classic Two-Rod Paper Scroll (Step-by-Step)
- How to Make a Quick Single-Roll Scroll (10 Minutes or Less)
- Make It Look Like Old Parchment (Aged Paper Techniques)
- Write Like a Royal Scribe (Without Needing Calligraphy Skills)
- Decorating Your Scroll (Make It Extra, But Tasteful)
- Display and Storage: Keep Your Scroll From Unscrolling Itself
- Troubleshooting (Because Paper Has Opinions)
- Kid-Friendly Classroom Version (Low Mess, High Fun)
- FAQ: Quick Answers Before the Glue Dries
- Extra: Real-World Scroll Experiences and Practical Lessons (About )
- Conclusion
A paper scroll is basically a letter that decided it deserved a dramatic entrance. It’s perfect for party invitations,
classroom projects, treasure hunts, cosplay props, or turning a simple note into something that feels like it should be
delivered by a messenger in a cape (optional, but encouraged).
This guide walks you through a few scroll stylesfrom quick-and-kid-friendly to “wow, did you steal that from a fantasy movie?”
with tips for clean rolling, sturdy ends, and optional “aged parchment” effects that won’t leave your kitchen looking like a wizard duel.
What You’ll Need (Supplies and Smart Substitutions)
Paper choices (pick based on your goal)
- Printer paper: easiest and cheapest; best for quick scrolls and practice.
- Kraft paper (brown): great for rustic vibes, maps, and “ancient document” looks.
- Cardstock: sturdier and less wrinkly; ideal for invitations and display scrolls.
- Watercolor paper: thick, textured, and great for staining or painting (but harder to roll tightly).
- Rice paper or mulberry-style paper: lightweight and elegant; handle gently.
Rods, rollers, and “I’m not going to the craft store” options
- Wooden dowels: the classic choice (usually 1/4"–3/8" diameter works well).
- Cake pop sticks / skewers: great for mini scrolls.
- Pencils: surprisingly effective for small scrolls (bonus: built-in eraser for mistakes).
- Cardboard tube: the fast route (paper towel roll cut down, or a poster tube).
Adhesives and finishing materials
- Glue stick: low-warp, kid-friendly, clean edges.
- Craft glue (PVA/white glue): strong hold, but use thinly to avoid ripples.
- Double-sided tape: instant bond, very neat for invitations.
- Painter’s tape: great for temporary holds while drying.
- String, ribbon, twine, or hemp cord: for tying the scroll.
Tools
- Scissors or a craft knife (plus a cutting mat if you’re using a knife)
- Ruler or straight edge
- Pencil for light marking
- Optional: paintbrush or sponge brush (for staining/painting)
Choose Your Scroll Style (Fast, Classic, or Fancy)
1) The Classic Two-Rod Scroll (most “scroll-looking”)
Paper is attached to two dowelsone at the top and one at the bottomso it can roll from both ends. This is the
“official proclamation” look and hangs nicely on a wall.
2) The Single-Roll Scroll (quick, great for notes)
Paper rolls around itself (or around a single rod) and ties in the middle. Perfect for message-in-a-bottle vibes,
love notes, or treasure clues.
3) The Tube Scroll (kid-proof and classroom-friendly)
Tape paper to a cardboard tube and roll it up. It’s sturdy, fast, and forgivinglike sweatpants for crafting.
How to Make a Classic Two-Rod Paper Scroll (Step-by-Step)
Step 1: Size your paper like you mean it
Decide how big you want the scroll. For a “letter scroll,” try 8.5" x 11" or 8.5" x 14" paper.
For a dramatic scroll, go longer: 8.5" x 22" (two sheets taped neatly) or use a roll of kraft paper.
Pro tip: Longer paper looks more impressive, but also reveals your handwriting for a greater distance.
Choose wisely, brave scribe.
Step 2: Cut and prep the rods
Cut two dowels to match the width of your paper (or a bit wider if you want visible rod ends). If the dowels feel rough,
lightly sand the ends. Optional: paint them (gold, black, “ancient wood,” or whatever matches your theme).
Step 3: Attach the paper to the dowels (cleanly)
Lay the paper flat. Place a dowel along the top edge, leaving about 1/2" of paper above it to wrap around.
- Apply a thin line of glue or double-sided tape along the paper edge.
- Wrap the paper over the dowel and press firmly.
- Repeat on the bottom edge with the second dowel.
Keep it neat: Too much glue makes the paper ripple. A thin, even layer wins every time.
Step 4: Roll the scroll so it behaves
Once attached, gently roll the top dowel downward a few turns, and roll the bottom dowel upward a few turns.
You’re training the paper to curl without creasing. If it wants to spring back, roll it tighter, then hold it for 10–20 seconds.
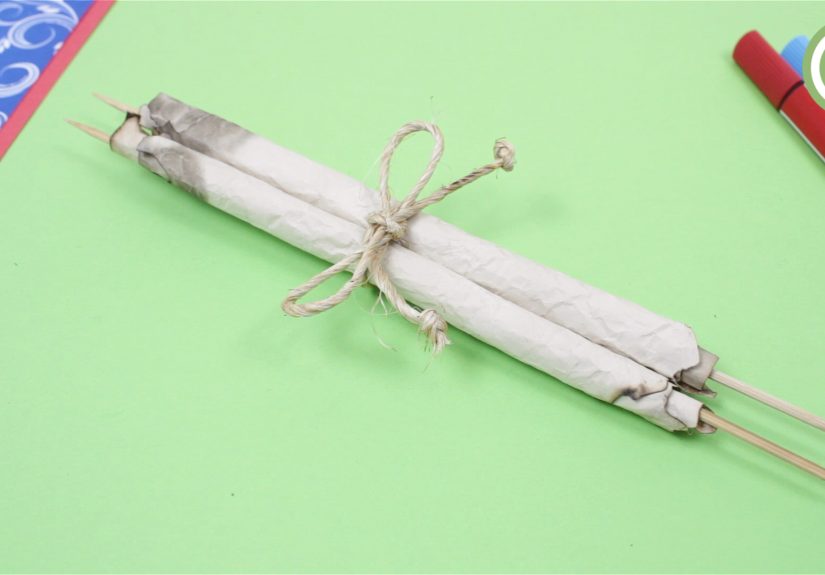
Step 5: Tie it off (and make it look official)
Bring the two rolled ends toward the center so the message is hidden inside. Tie with ribbon, twine, or cord.
Want extra flair? Add a wax-seal look with a sticker seal, a stamped label, or a dab of hot glue pressed with a coin (adult help recommended).
How to Make a Quick Single-Roll Scroll (10 Minutes or Less)
- Write or print your message.
- Optional: lightly curl the paper by rolling it around a dowel or marker.
- Roll the paper from one side into a tube.
- Secure the roll with a ribbon or string tied in the center.
Great for: love notes, birthday messages, scavenger hunt clues, and “I forgot the card so I made art” moments.
Make It Look Like Old Parchment (Aged Paper Techniques)
If you want a medieval scroll vibe, you’re basically aiming for “warm tan color, uneven edges, and a little texture.”
Here are safe, beginner-friendly ways to get there.
Tea staining (gentle, classic, smells nice)
- Brew strong tea (several tea bags in hot water). Let it cool slightly.
- Place paper on a baking sheet, tray, or protected surface.
- Brush tea onto the paper with a sponge brush or wide paintbrush.
- For darker spots, dab extra tea around the edges or add a few tea droplets.
- Let dry flat. If it warps, press it under books after it’s fully dry.
Coffee staining (darker, more dramatic)
Coffee tends to stain deeper and faster than tea. Brush it on the same way. Sprinkle a tiny bit of instant coffee for speckling,
then brush lightly so it “blooms” into spots. Let dry fully before writing, rolling, or gluing.
Drying without warping (the underrated secret)
- Air-dry: safest; takes longer but keeps paper calmer.
- Press flat after drying: place parchment-style paper between clean sheets, then stack books on top.
- Use thicker paper: cardstock or watercolor paper warps less than thin printer paper.
“Old edges” without risky fire tricks
Burning edges can be dangerous and isn’t necessary for a convincing aged look. Try these instead:
- Tear the edges: gently rip along the border for a rough, authentic edge.
- Scuff with sandpaper: lightly distress corners for a worn effect.
- Shade with brown marker or watercolor: add darker edges to mimic age.
- Crumple, then smooth: creates creases that look “handled,” then flatten under books.
Write Like a Royal Scribe (Without Needing Calligraphy Skills)
Handwriting tips that instantly look better
- Use a fine-tip black pen for crisp lines, or a brown pen for an “antique ink” feel.
- Write larger than you thinkscrolls are meant to be read from a bit of distance.
- Leave margins. Even “ancient” documents needed breathing room.
Printing tips (for invitations and clean layouts)
- Choose a readable serif font for formal scrolls (think “old book,” not “Halloween slime”).
- Print first, then stain lightlyheavy soaking can blur ink unless it’s waterproof.
- If you stain first, make sure the paper is completely dry before printing.
Layout ideas you can copy right now
- Treasure map scroll: stain paper, draw coastlines, add an “X,” label landmarks, tie with twine.
- Party invitation scroll: cardstock + double-sided tape + ribbon; keep it clean and elegant.
- Classroom history scroll: kids write a proclamation, timeline, or story sequence and roll it up.
- D&D / fantasy prop scroll: add a fake “seal,” a border pattern, and slightly uneven staining.
Decorating Your Scroll (Make It Extra, But Tasteful)
- Ribbon + charm: tie a small charm or bead onto the ribbon tail.
- Tassels: glue tassels to dowel ends for a fancy finish.
- Painted dowel tips: gold ends scream “important document.”
- Border art: simple corner flourishes look classy and don’t require being Picasso.
- Stickers and stamps: ideal for kid crafts and themed parties.
Display and Storage: Keep Your Scroll From Unscrolling Itself
Scrolls have one job: to roll. Unfortunately, sometimes they take that job way too seriously.
- For wall display: use the two-rod style and tie a hanging cord to the top dowel.
- For gifting: slide the scroll into a mailing tube or wrap in kraft paper.
- To “train” a stubborn scroll: roll it tighter than you want, leave it tied for a few hours, then loosen.
Troubleshooting (Because Paper Has Opinions)
Problem: My paper is wavy after gluing
Too much wet glue is usually the culprit. Use a thinner layer next time, or switch to double-sided tape.
You can also press the glued area under a book after it dries (with clean paper on top to protect it).
Problem: The stain looks blotchy
Blotchy can be a feature, not a bugaged parchment is rarely “even.” If you want it smoother,
brush in long strokes and keep the sheet evenly damp rather than spot-soaked.
Problem: The scroll keeps popping open
Pre-curl it by rolling around a dowel first. Then tie it tighter for a while to “set” the curl.
Ribbon helps because it grips better than slippery string.
Problem: The dowels slip out or detach
Make sure you wrap at least 1/2"–3/4" of paper around the dowel for a strong bond.
For heavier paper, double-sided tape plus a thin glue line creates a very secure hold.
Kid-Friendly Classroom Version (Low Mess, High Fun)
If you’re making this with kids (or adults who craft like excited kids), choose the easiest setup:
construction paper, markers, tape, and a cardboard tube.
- Cut construction paper to size.
- Have kids write or draw their message (story sequence, history proclamation, pirate map, etc.).
- Tape one edge to a cardboard tube.
- Roll it up and tie with yarn or ribbon.
Bonus idea: Make a “scroll library” where each student creates a scroll and trades with a classmate to read.
It’s reading practice disguised as dramatic theater.
FAQ: Quick Answers Before the Glue Dries
What paper works best for a realistic parchment scroll?
Light cardstock or kraft paper is a great balance of “looks authentic” and “rolls nicely.”
Watercolor paper is beautiful for painting or heavy staining, but it’s thicker and doesn’t roll as tightly.
Should I write before or after staining?
If your ink might smear, stain first and let it dry completely. If you’re printing with standard inkjet ink,
staining after can cause bleeding. A safe approach is stain first, dry fully, then write with a waterproof pen.
How do I keep the scroll from tearing near the dowels?
Use thicker paper, wrap a wider glue/tape area, and avoid yanking the scroll open.
For extra strength, add a thin strip of tape on the inside where the paper meets the dowel.
Extra: Real-World Scroll Experiences and Practical Lessons (About )
People often start making a paper scroll because it looks “easy,” and technically it isuntil the paper decides it wants
to behave like a spring-loaded snack wrapper. The good news is that scroll-making gets smoother the moment you treat it
like a tiny engineering project instead of “just rolling paper.”
One of the most common “aha” moments comes from switching adhesives. A lot of crafters begin with liquid glue because it
feels strong, but paper hates excess moisture. That’s why glue sticks and double-sided tape are such a cheat code: they hold
well and keep the paper flatter. If you’re making scroll invitations, this one choice can take your project from “cute DIY”
to “wait, you bought these?”
Another surprisingly real issue is handwriting confidence. Scrolls feel fancy, which can make people suddenly doubt their
perfectly normal handwriting. A simple fix is to embrace structure: draw faint pencil guidelines (lightly!), write bigger,
and leave generous margins. For themed scrollslike pirate maps or fantasy questsimperfections actually help. Slightly uneven
letters and hand-drawn icons can look more authentic than something that’s too perfect.
Tea and coffee staining also tends to create two types of scroll-makers: the “I want consistent vintage parchment” group and
the “chaos, but make it aesthetic” group. Both are valid. If you want consistent color, brush evenly and keep the paper uniformly
damp. If you want realism, let some edges darken more than others, add a few droplets, and gently crumple the paper before staining.
Real old documents weren’t evenly tinted; they were handled, folded, stored, and exposed to time in messy ways.
Scrolls also shine in group activities. In classrooms, they’re an easy way to turn writing practice into something students
actually want to share. In parties, scrolls instantly level up the themeespecially if each guest receives a “quest” or clue.
For family crafts, scrolls are a low-cost project that feels meaningful because the message is part of the art. It’s not just a
craft; it becomes a keepsake.
Finally, the best scroll-making lesson is patience at the drying stage. Stained paper looks done when it’s mostly drybut if
you roll it too soon, it can stick to itself or wrinkle in ways you didn’t plan. Let it dry fully, flatten it under books if needed,
and only then attach dowels and roll. That extra waiting time is usually the difference between “pretty cool” and “wow, this is legit.”
Conclusion
Making a paper scroll is a simple DIY craft that delivers maximum impact: it turns ordinary paper into something dramatic,
decorative, and genuinely fun. Start with the classic two-rod scroll for the most authentic look, or choose a quick single-roll
scroll when you need fast results. Add tea or coffee staining if you want an aged parchment effect, decorate with ribbon or twine,
and remember the golden rule of scrolls: thin glue, patient drying, and a confident roll.




