Table of Contents >> Show >> Hide
- Why a Frozen Inspired Ornament Wreath Works So Well
- What You’ll Need
- How to Choose the Right Ornaments
- Step-by-Step: How to Make A Frozen Inspired Ornament Wreath
- Step 1: Pick your wreath base
- Step 2: Cover the base if needed
- Step 3: Sort ornaments by size and finish
- Step 4: Plan your focal points
- Step 5: Attach the largest ornaments first
- Step 6: Add medium ornaments to build fullness
- Step 7: Fill small gaps with mini ornaments
- Step 8: Add snowflake and icy details
- Step 9: Make or attach a statement bow
- Step 10: Check balance and make adjustments
- Step 11: Add a strong hanger
- Tips for Making It Look Expensive
- Common Mistakes to Avoid
- Where to Display Your Frozen Inspired Ornament Wreath
- How to Store It After the Holidays
- Final Thoughts
- Extra Inspiration: Real-Life Experiences Making a Frozen Inspired Ornament Wreath
If your holiday decor dreams involve icy sparkle, snowy shimmer, and a front door that looks like winter itself got dressed up for a party, a Frozen inspired ornament wreath is your craft soulmate. It is festive, dramatic, and surprisingly doable, even if your usual crafting style is “I own scissors and a lot of confidence.” The beauty of this project is that it combines classic ornament-wreath techniques with a cool-toned winter palette that feels magical without being fussy.
This wreath is “Frozen inspired” in the best way: think frosted blues, silver ornaments, snowy whites, crystal-like textures, glittering snowflakes, and a bow glamorous enough to deserve its own fan club. You do not need advanced DIY skills, a professional glue gun holster, or the patience of a saint. You just need a good base, the right mix of ornaments, and a plan so your wreath looks intentional rather than like the ornament bin exploded on your dining table.
Below, you will learn how to make a Frozen inspired ornament wreath step by step, how to choose materials that hold up, and how to avoid the common mistakes that make ornament wreaths look patchy, wobbly, or one glitter puff away from chaos. Let’s make your door look like it belongs to a snow queen with excellent taste.
Why a Frozen Inspired Ornament Wreath Works So Well
A traditional ornament wreath is already eye-catching because it uses shine, texture, and repetition. A Frozen inspired version takes that same structure and swaps the usual red-and-green holiday palette for a cooler, more theatrical look. Blues create the icy base. Silver adds elegance. White softens the whole design. Iridescent accents give it that frosty, enchanted finish.
The result feels whimsical and polished at the same time. It works on a front door, above a mantel, in a playroom, in an entryway, or even as party decor for a winter birthday. It is also one of those crafts that looks impressively expensive while secretly being built from plastic ornaments, hot glue, and sheer determination.
What You’ll Need
Core supplies
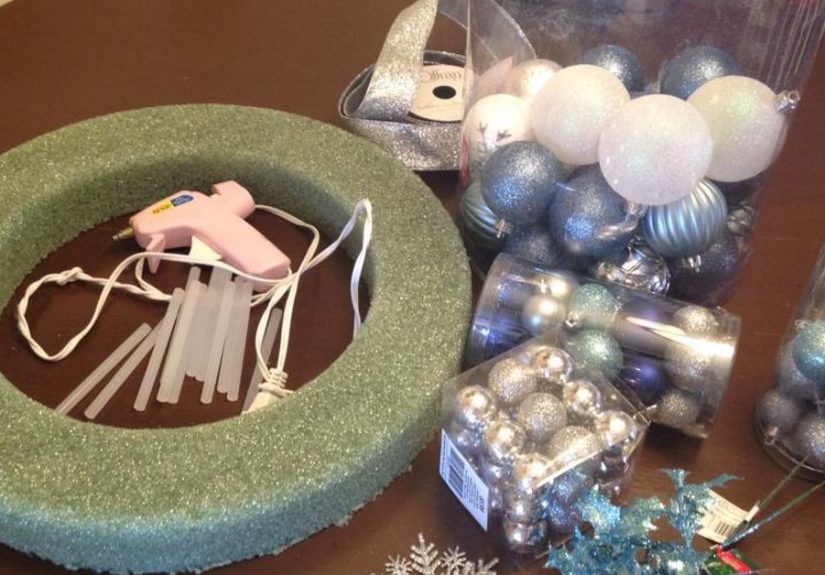
- One wreath form, either foam, wire, or a sturdy plastic ring
- Shatterproof ornaments in multiple sizes
- Hot glue gun and glue sticks
- Floral wire or ornament wire
- Ribbon for hanging and a statement bow
- Snowflake ornaments or picks
- Optional glitter branches, faux frosted berries, or icy floral stems
- Scissors and wire cutters
Best color palette for the Frozen look
- Icy blue
- Aqua or pale teal
- Silver
- White
- Iridescent or pearl finish accents
Use several ornament finishes instead of one. A good Frozen inspired wreath usually mixes shiny, matte, glittered, and faceted ornaments. That combination keeps the wreath from looking flat. If everything is equally shiny, the design can start to resemble a disco ball with seasonal anxiety.
How to Choose the Right Ornaments
Shatterproof ornaments are the smart pick here. They are lighter than glass, easier to work with, and much less stressful if the wreath is hanging on a front door, near kids, near pets, or near that one family member who opens doors like they are making a dramatic entrance on reality TV.
Buy ornaments in at least three sizes. Large ornaments create the visual structure. Medium ornaments build fullness. Small ornaments tuck into gaps and make the design look finished. A wreath made from one size alone can look stiff and repetitive. Mixing sizes gives the arrangement movement, which is exactly what you want for a lush, layered winter look.
If your ornaments have removable caps, reinforce them before you start. A tiny dot of glue under the cap can save you from the heartbreak of hearing a soft pop and watching an ornament slip out of place mid-project. That is not a craft moment. That is a trust issue.
Step-by-Step: How to Make A Frozen Inspired Ornament Wreath
Step 1: Pick your wreath base
A foam wreath form gives you a fuller, solid shape and is beginner-friendly. A wire form is lighter and can create a more open, airy look. Both can work beautifully. If you want a plush, luxurious wreath with minimal gaps, foam is usually easier. If you want something lighter for hanging, wire is a strong option.
Step 2: Cover the base if needed
If the wreath form might show through, wrap it first with ribbon, mesh, tinsel, or wide satin in a coordinating shade like white, silver, or pale blue. This creates a cleaner backdrop and helps disguise any tiny spaces between ornaments. Think of it as giving your wreath a good base layer, like primer for a wall or moisturizer before makeup.
Step 3: Sort ornaments by size and finish
Lay everything out before gluing. Separate large, medium, and small ornaments. Then group them by finish. This makes building the wreath much faster and helps you balance color around the ring. You do not want all the silver in one area and all the pale blue in another unless you are intentionally creating a gradient.
Step 4: Plan your focal points
Before attaching anything, decide where the main visual moments will go. That might be a large bow at the top, a snowflake cluster at one side, or a dramatic cascade of glittery picks at the bottom. Frozen inspired decor looks best when it has a little rhythm and asymmetry, not when every inch is crowded in exactly the same way.
Step 5: Attach the largest ornaments first
Start with your largest ornaments and space them evenly around the wreath. These pieces act like anchor points. Glue them directly to the wreath form, and for extra strength, connect neighboring ornaments to each other where they touch. This creates a more stable structure and helps the wreath hold together as a unified piece instead of a collection of baubles hoping for the best.
Step 6: Add medium ornaments to build fullness
Once the large ornaments are in place, fill the gaps with medium ones. Alternate colors and finishes so the wreath looks dynamic. For example, place a matte white ornament next to a shiny silver one, then add a pale blue glitter ornament nearby. That contrast is what gives the wreath its frosty depth.
Step 7: Fill small gaps with mini ornaments
Now use your smallest ornaments to hide the little holes that remain. This is the stage where the wreath starts to look polished. Tiny ornaments can also soften awkward spaces around snowflake picks or ribbon tails. If you can still see a lot of the wreath form, keep layering strategically rather than gluing at random.
Step 8: Add snowflake and icy details
Once the ornaments are in place, add the Frozen inspired personality. Tuck in glitter snowflakes, faux crystal stems, white berry picks, or frosted branches. Do not overdo it. A few carefully placed details will make the wreath feel magical. Too many, and it starts to look like winter decorations are staging a coup.
Step 9: Make or attach a statement bow
A bow instantly elevates the wreath and helps frame the design. Choose a wide ribbon with wired edges if possible, because it holds shape better and gives you fuller loops. Velvet, satin, organza, or glitter ribbon all work well for this look. For a softer winter effect, mix sheer white ribbon with silver-edged blue ribbon.
You can place the bow at the top for a classic wreath look or slightly off-center for something more modern. Use floral wire to secure it, then fluff the loops and trim the tails at an angle or fishtail shape.
Step 10: Check balance and make adjustments
Hang the wreath temporarily and step back. This is not the time to inspect it from three inches away like a craft detective. Look at it from several feet back. Are the colors balanced? Is one side visually heavier? Does the bow feel too small? Add one or two finishing pieces if needed, but stop before you slide into the classic DIY trap of “just one more thing” 19 times in a row.
Step 11: Add a strong hanger
Thread a ribbon loop or strong hanging wire through the back of the form. Make sure it is centered and secure. Ornament wreaths can be surprisingly heavy, especially if you got excited in the glitter aisle and made heroic choices. A sturdy hanger matters.
Tips for Making It Look Expensive
Mix finishes, not just colors
A wreath with matte, glossy, glittered, and faceted ornaments looks richer than one with identical finishes. That visual variety catches the light beautifully and creates the icy, layered look most people want.
Repeat accent details
If you use silver snowflakes, repeat them in at least three places. If you add iridescent ornaments, scatter them around the wreath rather than clustering them in one spot. Repetition makes the design feel deliberate.
Use fewer novelty pieces
One elegant snowflake ornament can look magical. Twelve can make the wreath feel like it is auditioning for a holiday parade. Use themed elements carefully so the wreath stays stylish.
Keep the palette tight
The most beautiful Frozen inspired wreaths usually stay within a cool range of blue, silver, and white. A random burst of red or gold can interrupt the snowy effect. Unless you are intentionally going for “royal winter with a plot twist,” keep it cool-toned.
Common Mistakes to Avoid
- Using only one ornament size: the wreath can look flat and sparse.
- Skipping cap reinforcement: loose ornament caps can fail later.
- Overcrowding one side: balance matters more than using every ornament you bought.
- Ignoring the background: a visible form can make the wreath look unfinished.
- Using delicate indoor materials outdoors: if hanging outside, keep the wreath in a covered area when possible.
Where to Display Your Frozen Inspired Ornament Wreath
This wreath works almost anywhere you want a burst of winter glamour. On a front door, it creates instant curb appeal. On an interior wall, it becomes holiday artwork. Above a fireplace, it can anchor the entire mantel display. In a child’s room or party space, it gives the area a playful, snow-castle feel without needing a full decorating overhaul.
If you hang it outdoors, a covered porch is ideal. That protects glitter, ribbon, and decorative details from weather and helps the wreath last longer through the season. If your home gets strong sun or moisture, bring the wreath inside during rough weather. Even the prettiest winter queen appreciates a little shelter.
How to Store It After the Holidays
Once the season ends, do not toss the wreath into a random storage bin like it offended you. Store it carefully so you can use it again next year. Hang it in a closet or on a rack, or place it in a wreath box or a sturdy container with tissue or other soft padding around fragile details. A clear plastic bag over the wreath can help keep dust off. This small amount of effort will save you from having to reglue half the ornaments next season while muttering about “past you.”
Final Thoughts
Learning how to make a Frozen inspired ornament wreath is really about combining structure with sparkle. Start with a strong base, build with large-to-small ornaments, keep the palette cool and cohesive, and finish with a bow that looks like it has excellent manners. The result is festive, personal, and far more memorable than a basic store-bought wreath.
Best of all, this project is easy to customize. You can make it glam, playful, elegant, kid-friendly, or sophisticated enough to impress the neighbors who always seem suspiciously good at holiday decorating. However you style it, the final wreath should feel like winter magic with a solid grip on design. And that, frankly, is a lovely thing to hang on a door.
Extra Inspiration: Real-Life Experiences Making a Frozen Inspired Ornament Wreath
The first time many people make a Frozen inspired ornament wreath, they imagine a quick, peaceful crafting session with holiday music in the background and a perfectly clean table. The reality is usually more entertaining. You begin with a tidy pile of blue and silver ornaments, then somehow end up surrounded by ribbon scraps, glitter dust, three glue strings attached to your sleeve, and a strong opinion about ornament sizing. Oddly enough, that is part of the charm.
One of the best experiences with this project is watching the wreath change from “plastic ornaments on a ring” into something that actually looks magical. Early on, it can seem underwhelming. You glue on a few large ornaments and think, well, this looks like a science experiment at the North Pole. Then the layers begin to build. Medium ornaments soften the structure. Mini ornaments tuck into empty spaces. Snowflakes go in. The bow gets added. Suddenly the whole thing clicks, and the wreath starts looking like something you would proudly photograph in flattering natural light.
This craft is also a surprisingly good lesson in patience. If you rush it, the wreath can end up lopsided or patchy. If you slow down, test the placement, and step back from time to time, you get a much more beautiful result. A lot of crafters say the most helpful habit is simply pausing to look at the wreath from across the room. It is amazing how quickly you can spot an empty area or a section with too much glitter once you stop hovering over it like an anxious art director.
Another common experience is discovering that color balance matters more than people expect. You may love the aqua ornaments so much that you use them everywhere, only to realize the wreath now looks more tropical mermaid than icy fairytale. Adding more white and silver usually fixes that immediately. The Frozen inspired look really shines when the cool shades feel layered and snowy instead of loud.
For families, this can become a memorable tradition. Kids can help sort ornaments by size or color, hand over snowflake pieces, or vote on the ribbon. Adults can handle the glue gun and the structural decisions. Everyone gets to feel involved, and the finished wreath often ends up carrying little memories that store-bought decor never has. Every time you hang it, you remember the debate over whether the giant silver bow was “dramatic” or “perfect,” which, of course, means it was perfect.
And perhaps the most relatable experience of all is the moment you finally hang the finished wreath and realize it looks far better than you expected. That is the magic of this project. It feels festive, personal, and a little theatrical in the best possible way. A Frozen inspired ornament wreath is not just holiday decor. It is proof that a handful of shiny ornaments, a winter color palette, and a bit of creative stubbornness can make your whole space feel more enchanting.




