Table of Contents >> Show >> Hide
- What Is the Fosbury Flop?
- Step 1: Master the J-Shaped Approach
- Step 2: Execute a Powerful One-Foot Takeoff
- Step 3: Clear the Bar and Land Safely
- Beginner Drills for the Fosbury Flop
- Training Tips to Jump Higher
- How Coaches Can Teach the Fosbury Flop
- Experience Section: Real-World Lessons from Learning the Fosbury Flop
- Conclusion
Learning how to high jump using the Fosbury Flop can feel a little strange at first. After all, most sports ask you to look where you are going. The Fosbury Flop politely ignores that idea, sends you over the bar backward, and somehow turns the whole thing into one of the most elegant movements in track and field. It looks dramatic, but it is not magic. It is a repeatable technique built on rhythm, speed, posture, takeoff timing, and trust in the landing mat.
The Fosbury Flop became famous after American high jumper Dick Fosbury used it to win Olympic gold in 1968. Before that, many jumpers used styles such as the scissors, western roll, and straddle. Today, the flop is the standard technique for competitive high jumpers because it allows athletes to clear the bar efficiently while managing the body’s center of mass. Translation: you do not need to throw your entire body straight up like a superhero leaving Earth. You need to use the curve, rotate correctly, and clear the bar in the right sequence.
This guide breaks the Fosbury Flop into three practical steps: the approach, the takeoff, and the bar clearance with landing. Whether you are a beginner, a high school athlete, a coach, or someone who just watched a high jump competition and thought, “Wait, how did they do that?” this article will help you understand the movement clearly and safely.
Important safety note: Practice the Fosbury Flop only with a proper high jump landing mat, safe standards, a suitable crossbar, and supervision from a coach or knowledgeable adult. Do not attempt this technique on grass, sand, a mattress, or your cousin’s suspiciously soft-looking couch. Your back deserves better.
What Is the Fosbury Flop?
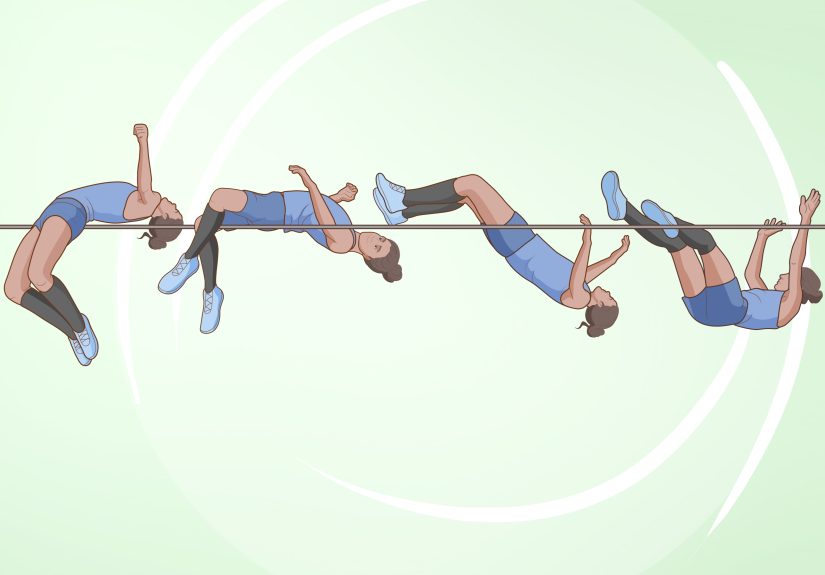
The Fosbury Flop is a high jump technique where the athlete approaches the bar on a curved path, takes off from one foot, turns the back toward the bar, arches over it, and lands on the upper back and shoulders. The movement may look like a backward dive, but it is actually a controlled jump with carefully timed rotation.
The genius of the technique is that the body does not have to travel as high as the bar in one solid block. When done correctly, the head, shoulders, hips, and legs clear the bar in sequence. The jumper arches the back so the hips rise while other parts of the body remain lower. This is why the Fosbury Flop is often described as a technique that helps the body’s center of mass pass efficiently around the bar rather than simply over it.
Still, the flop is not just “jump backward and hope gravity is in a good mood.” The best jumps are built before the athlete even leaves the ground. The approach creates speed and rotation. The takeoff converts that speed into vertical lift. The clearance and landing finish the job.
Step 1: Master the J-Shaped Approach
The approach is the engine of the Fosbury Flop. If the run-up is inconsistent, the jump becomes a guessing game, and guessing is not a training plan. Most high jumpers use a J-shaped approach, combining a straight run with a curved final section. This curve helps create the rotation needed to turn the back toward the bar during flight.
Find Your Takeoff Foot
Before setting your approach, identify your takeoff foot. This is the foot you naturally jump from. A simple test is to take a few relaxed steps and jump for height off one leg. The leg that feels stronger and more natural is usually your takeoff leg.
If you take off from your left foot, you usually approach from the right side of the bar and curve left. If you take off from your right foot, you usually approach from the left side and curve right. The takeoff foot is generally the foot farther away from the bar at the plant, while the inside knee drives upward to help create lift and rotation.
Build a Consistent Run-Up
A beginner may start with a shorter approach of five to seven steps. More advanced jumpers often use eight to twelve steps, depending on speed, strength, and consistency. The goal is not to sprint like you are being chased by a lawn mower. The goal is controlled acceleration. You want to arrive at takeoff fast enough to jump powerfully but balanced enough to direct force upward.
Start with the straight part of the J. This section builds rhythm and momentum. Your posture should be tall, your eyes should stay relaxed, and your arms should move naturally. As you enter the curve, your body should lean slightly inward, away from the bar. This inward lean is important because it helps set up the rotation that will turn your back toward the bar after takeoff.
Use Check Marks
High jumpers often use check marks on the runway to make the approach repeatable. A starting mark tells you where to begin. A mid-mark or curve mark helps confirm that you are entering the turn correctly. If your steps change every attempt, your takeoff point will move around like a shopping cart with one bad wheel.
To build your marks, walk or jog the approach several times without jumping. Notice where your feet naturally land. Then practice running the approach at controlled speed. Your final takeoff point should be far enough from the bar to allow you to rise and rotate, but not so far that you float into the mat without clearing the bar. Many beginners take off too close, causing them to crash into the bar, or too far away, causing them to run out of height before the hips clear.
Common Approach Mistakes
The first common mistake is running too fast. Speed matters, but uncontrolled speed ruins posture. If you cannot plant firmly and jump upward, you are not approaching; you are just arriving dramatically.
The second mistake is cutting the curve too sharply. A tight curve can make you lean excessively and lose balance. The curve should feel smooth and progressive. Think of a graceful turn, not a panic turn in a grocery aisle.
The third mistake is staring at the bar. Looking directly at the bar often pulls the shoulders forward and disrupts posture. Instead, focus on your path and takeoff area. The bar is important, yes, but it does not need a dramatic staring contest.
Step 2: Execute a Powerful One-Foot Takeoff
The takeoff is where the Fosbury Flop becomes a jump instead of a curved run with ambitious intentions. A strong takeoff converts horizontal speed into vertical lift while also creating the rotation needed to clear the bar backward.
Plant Tall and Strong
As you reach the final steps, stay tall. The takeoff foot should plant firmly on the ground, slightly ahead of the body, with the ankle, knee, hip, and torso aligned to handle force. The plant should be active and quick. You do not want to collapse into the takeoff leg; you want to strike the ground and rise.
The penultimate step, or second-to-last step, helps prepare the body for takeoff. It is usually slightly longer and allows the center of mass to lower naturally. The final step is quicker, setting up a strong upward push. This rhythm helps the jumper create lift without squatting deeply or losing speed.
Drive the Knee and Arms
At takeoff, drive the inside knee upward. This knee drive helps lift the body and contributes to rotation. Your arms should also drive upward with energy. Some athletes use a double-arm drive, while others use a single-arm action depending on their style and coaching. The key is that the arms should support upward momentum, not flap around like startled birds.
The takeoff should feel vertical, but not straight up in isolation. Because you are coming from a curve, your body will naturally rotate. Do not force yourself to twist aggressively in the air. The curve and takeoff mechanics should create the turn. If you over-rotate, you may land awkwardly or hit the bar with your legs.
Jump Up Before You Lay Back
One of the biggest beginner errors is leaning backward too early. The Fosbury Flop is not a backward fall. It is a jump upward followed by a controlled layout over the bar. If you throw your head back at takeoff, you may lose lift and flatten your jump.
Think “up first, then over.” Drive tall through the takeoff leg. Let the knee and arms rise. Allow the curve to rotate your body. Once your shoulders begin to pass the bar, then the arch becomes useful.
Common Takeoff Mistakes
A common mistake is planting too close to the bar. This leaves no room for the body to rise and rotate. The jumper often knocks the bar off with the shoulders or hips. Another mistake is taking off while leaning toward the bar. This usually sends the athlete into the bar rather than over it.
Some beginners also jump from two feet because it feels safer. In legal high jump technique, the athlete must take off from one foot. Practicing low-level drills can help build confidence so the single-leg takeoff feels natural.
Step 3: Clear the Bar and Land Safely
Once you leave the ground, your job is to clear the bar in sequence: head and shoulders first, then back and hips, then legs. Good clearance is less about wild flexibility and more about timing.
Turn Your Back to the Bar
As you rise, your body should rotate so your back faces the bar. Your head and shoulders cross first. Keep the movement controlled. The takeoff and curve should do most of the work. If you try to twist suddenly in the air, your jump may become messy and unpredictable.
As your shoulders clear, begin to arch your back. Lift the hips toward the sky. This arch is the famous shape people recognize in the Fosbury Flop. It allows the hips to clear while the head and legs are lower on either side of the bar.
Kick the Legs at the Right Time
After your hips pass the bar, snap or lift the legs upward to avoid brushing the bar with your heels or calves. Timing matters. If you kick too early, your hips may drop into the bar. If you kick too late, your legs may knock it off after the hard work is already done. Few things are more emotionally rude than clearing with your hips and losing the bar with your heels.
A helpful cue is: shoulders over, hips up, legs clear. Keep the sequence smooth. The goal is not to perform a dramatic backbend. The goal is to make the body long, efficient, and coordinated over the bar.
Land on the Upper Back and Shoulders
After clearance, land on the upper back and shoulders in the center of the mat. Keep the chin slightly tucked as you land so your head does not whip backward. The landing mat is there to absorb impact, but you still need to land with control.
Never practice the Fosbury Flop without a proper high jump pit. The technique depends on landing backward. A safe landing surface is not optional; it is part of the event. If the mat is too small, damaged, slippery, or poorly placed, stop and fix the setup before jumping.
Beginner Drills for the Fosbury Flop
Breaking the movement into drills helps beginners learn without feeling overwhelmed. The full jump combines speed, curve, takeoff, rotation, arch, and landing. That is a lot of moving parts, like trying to assemble furniture while it is running away from you.
Back Drops
Start on the mat without a bar. Stand with your back to the landing area, bend your knees slightly, and fall backward safely onto the upper back. This helps athletes trust the mat and learn the landing position. A coach should supervise this drill, especially with younger athletes.
Scissors Jumps
The scissors jump is often used as a beginner step before the full flop. It teaches athletes to approach, take off from one foot, and clear a low bar while staying more upright. Once the athlete is comfortable with single-leg takeoff and landing, the flop becomes easier to learn.
Pop-Up Jumps
Stand a few steps from the mat, approach slowly, take off from one foot, and pop upward onto the mat without worrying about a high bar. This drill teaches vertical lift and body control. The focus is on jumping up, not diving backward.
Curve Runs
Practice the J-shaped approach without jumping. Run the curve smoothly, keeping posture tall and the lean controlled. This drill improves rhythm and helps athletes understand how the curve creates rotation.
Training Tips to Jump Higher
Technique is the main ingredient, but physical preparation matters too. High jumpers benefit from sprint mechanics, single-leg strength, mobility, coordination, and elastic power. The best training plan develops the body without turning every practice into a survival documentary.
Improve Sprint Rhythm
A high jumper does not need the same maximum speed as a 100-meter sprinter, but approach speed is still important. Practice relaxed accelerations, tall running posture, and smooth curves. The faster you can approach while staying controlled, the more energy you can bring into takeoff.
Build Single-Leg Strength
Exercises such as step-ups, split squats, lunges, and controlled single-leg hops can support takeoff strength. The takeoff leg must absorb force quickly and redirect it upward. Strength training should be age-appropriate, technically sound, and supervised when weights are involved.
Train Jump Elasticity
Bounding, skipping, low hurdle hops, and pogo jumps can improve springiness. Start with low intensity and build gradually. Quality matters more than quantity. If every jump looks like a tired kangaroo negotiating a tax form, it is time to rest.
Practice Mobility
Hip mobility, thoracic spine mobility, and hamstring flexibility can help with efficient clearance. You do not need circus-level flexibility, but you do need enough mobility to arch, rotate, and kick the legs cleanly.
How Coaches Can Teach the Fosbury Flop
Coaches should introduce the Fosbury Flop in stages. Start with safety, confidence, and basic jumping skills. Then teach the approach, takeoff, and landing separately before combining them. Beginners often improve faster when the bar is low or replaced with a bungee cord because fear of hitting the bar can distort technique.
A coach should watch the approach first. Many clearance problems begin before takeoff. If the athlete is too close, too far, too fast, too slow, or leaning the wrong way, no amount of midair creativity will fix it. The runway tells the truth.
Useful coaching cues include “run tall,” “smooth curve,” “jump up,” “drive the knee,” “hips to the sky,” and “kick late.” Keep cues short. An athlete in motion cannot process a full podcast episode during the final two steps.
Experience Section: Real-World Lessons from Learning the Fosbury Flop
One of the most common experiences when learning the Fosbury Flop is the awkward first attempt. Many beginners run toward the bar, remember they are supposed to turn backward, panic slightly, and produce a movement that looks less like high jump and more like someone trying to avoid a bee. This is normal. The flop asks the body to trust a backward landing, and trust takes repetition.
A useful early lesson is that confidence usually comes from the mat, not the bar. Athletes who spend time practicing back drops, pop-ups, and low jumps often progress faster because they stop worrying about the landing. Once the landing feels safe, the brain has more space to focus on the approach and takeoff. Without that confidence, beginners often twist too soon, slow down at the last second, or jump sideways into the bar.
Another real-world lesson is that the approach is everything. New jumpers often want to practice the dramatic partthe arch over the barbecause that is what looks impressive in photos. But experienced jumpers know that a beautiful clearance usually begins with boring consistency. Same start mark. Same rhythm. Same curve. Same takeoff point. The jump becomes more reliable when the run-up becomes repeatable.
Many athletes also discover that jumping higher does not always mean trying harder. In fact, trying too hard can create tension. A tense approach becomes choppy. A choppy approach ruins the plant. A poor plant steals lift. Suddenly the bar falls, and everyone blames the clearance when the real villain was the run-up. Smooth speed usually beats frantic speed.
Another helpful experience is learning to delay the arch. Beginners often throw the head back immediately because they think that is what creates the flop. In reality, that early backward throw can flatten the jump and drop the hips. Better jumpers learn to rise first. They drive upward, let the shoulders clear, then lift the hips and finish with the legs. The arch is a result of good timing, not a dramatic pose.
Small improvements can feel surprisingly big in high jump. Moving the start mark back by a shoe length, widening the curve slightly, or improving the knee drive can change the entire jump. This is why keeping a training notebook can help. Write down your approach length, takeoff point, bar height, and what each successful jump felt like. Over time, patterns appear. Maybe you jump better when your first three steps are relaxed. Maybe your curve gets too tight when you are nervous. Maybe your best attempts happen when you think “up” instead of “back.” These details matter.
Finally, the Fosbury Flop teaches patience. Progress does not always arrive as a personal record. Sometimes progress is a cleaner takeoff. Sometimes it is landing in the middle of the mat. Sometimes it is clearing a low bungee with perfect rhythm. These are wins. The bar height is only one measurement of improvement. Technique, confidence, rhythm, and safety count too.
The best experience any beginner can have is a practice where the movement starts to feel less mysterious. The curve makes sense. The takeoff feels tall. The body turns without panic. The landing feels safe. That is when the Fosbury Flop changes from “Why am I going backward?” to “Oh, this actually works.” And yes, it is a very satisfying moment.
Conclusion
The Fosbury Flop is one of the most important techniques in track and field because it combines speed, physics, timing, and confidence into one fluid jump. To learn it well, focus on three steps: build a consistent J-shaped approach, execute a powerful one-foot takeoff, and clear the bar with a controlled arch and safe landing.
Beginners should start slowly, use proper equipment, and practice under supervision. Do not rush to raise the bar. First, make the movement repeatable. A smooth approach, tall takeoff, and well-timed clearance will do more for your high jump than wild effort ever will. The bar rewards patience, precision, and rhythm. It is not impressed by chaos, even enthusiastic chaos.
With steady practice, the Fosbury Flop becomes less intimidating and more natural. You learn to trust the curve, trust the takeoff, and trust the mat. And when everything finally clicks, clearing the bar feels less like falling backward and more like flying with a plan.





