Table of Contents >> Show >> Hide
- Día de los Muertos 101 (The Respectful, Fast Version)
- What You’ll Need
- Step 1: Choose the Right Pumpkin Shape
- Step 2: Prep Like a Pro (So Paint Actually Sticks)
- Step 3: Paint the Base (Hello, Sugar Skull Vibes)
- Step 4: Sketch the Classic Sugar Skull Layout
- Step 5: Outline First, Then Fill (The Cleanest Method)
- Step 6: Add the Signature Sugar Skull Details
- Step 7: Go 3D With Embellishments (Optional but Stunning)
- Step 8: Seal It (So Your Masterpiece Doesn’t Smudge)
- Step 9: Display It Like It Matters (Because It Does)
- Design Ideas for Different Skill Levels
- Troubleshooting (Because Paint Has Opinions)
- Extra Tips for Keeping It Meaningful and Respectful
- Experiences That Make a Sugar Skull Pumpkin Even Better (500+ Words)
- Conclusion
If you love the bright, joyful look of calaveras (sugar skulls) but also love the ease of pumpkin decorating,
congratulationsyou’ve found the perfect crossover episode. A sugar skull pumpkin is a no-carve project that can look
wildly detailed without requiring a single horror-movie carving moment (or a single emergency Band-Aid).
The key is to decorate with intention: Día de los Muertos (Day of the Dead) is a celebration of life, memory, and family.
The goal isn’t “spooky.” It’s “vibrant, meaningful, and a little bit magical.” Let’s make a pumpkin that looks like a
sugar skull, honors the holiday’s spirit, and survives long enough for you to show it off.
Día de los Muertos 101 (The Respectful, Fast Version)
Día de los Muertos is traditionally observed on November 1 and 2, and it’s centered on remembrancewelcoming the memories
of loved ones through stories, foods, photos, and symbolism. You’ll often see colorful altars (ofrendas), marigolds
(cempasúchil), candles, papel picado (decorative paper banners), and skull imagery used in a lighthearted way:
not to frighten people, but to show that love doesn’t disappear just because someone’s gone.
Your sugar skull pumpkin can simply be decorative, but you can also make it more meaningful with colors, flowers, or
details that represent someone you’re honoring (or your own heritage and traditions). When in doubt, aim for celebratory
and colorfulnot creepy.
What You’ll Need
Pumpkin options
- Real pumpkin: best for a classic look, but it won’t last forever.
- Craft pumpkin (foam or plastic): lasts for years and takes paint like a champ.
Supplies for decorating
- Acrylic craft paint (white, black, and bright colors like pink, turquoise, yellow, purple)
- Paintbrushes (wide flat, small round detail, and a liner brush for thin lines)
- Paint pen(s) or permanent marker (great for outlines and crisp details)
- Pencil + eraser (for sketching your design)
- Paper towels, water cup, palette/plate
- Optional: glitter paint, metallic paint (gold/silver), rhinestones, sequins, faux flowers
- Optional: hot glue gun (adult help recommended), craft glue, double-sided tape
- Clear sealer (spray or brush-on; choose indoor/outdoor based on where it’ll sit)
- LED tea light or mini fairy lights if you want a glow (skip real candles)
Step 1: Choose the Right Pumpkin Shape
Sugar skull designs look best on pumpkins that have a smoother surface and a round-ish “face.” Pick one with fewer deep
ridges so your linework doesn’t get wobbly. If you’re using a real pumpkin, choose one that feels firm and heavy for its
sizesoft spots are basically a countdown clock.
Design hack: Turn the pumpkin so the flattest side faces front. That’s your canvas. The stem can become a
“topknot” area where you add flowers, a bow, or a mini marigold crown.
Step 2: Prep Like a Pro (So Paint Actually Sticks)
If you’re using a real pumpkin
- Wipe it down with a damp cloth to remove dirt.
- Dry it completely (paint hates moisture).
- If it’s glossy, lightly buff with a dry scrubby sponge so paint grips better.
If you’re using a foam or plastic craft pumpkin
- Wipe off dust.
- If it’s very slick, a light sanding helps (just enough to remove shine).
- Optional: apply a quick primer coat for the smoothest finish.
Either way, consider applying a thin base sealer/primer layer before paint for a cleaner final lookespecially if you’re
going for super crisp white.
Step 3: Paint the Base (Hello, Sugar Skull Vibes)
Most sugar skulls start with a pale base. Paint your pumpkin with white acrylic (or off-white/cream for a
softer, vintage feel). Use 1–2 coats, letting each coat dry fully.
Time-saving tip: If you hate brushstrokes, use a makeup sponge or dense foam brush to dab paint on in thin
layers. It’s oddly satisfyinglike painting, but with less drama.
Step 4: Sketch the Classic Sugar Skull Layout
The secret to “wow, you’re talented” is structure. Lightly sketch your design in pencil before you commit with paint.
Here’s a reliable sugar skull map that fits most pumpkins:
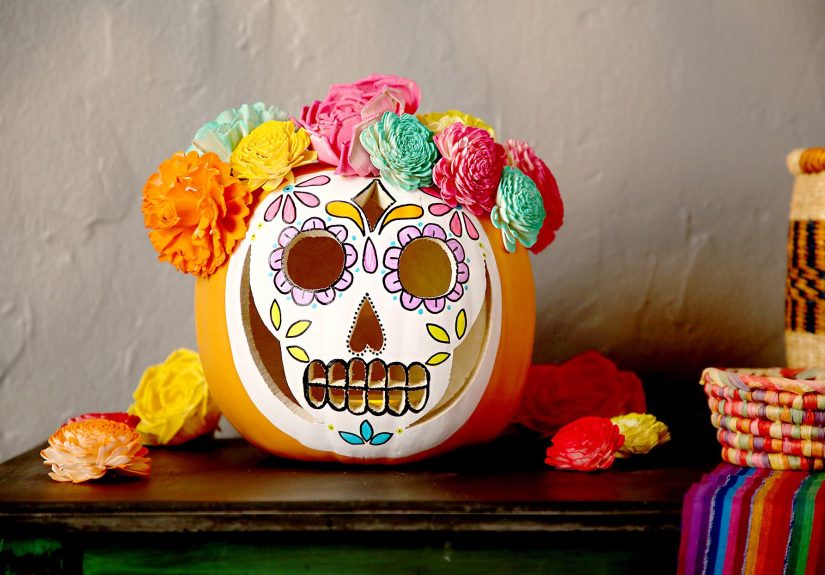
- Eye sockets: two large circles/ovals, often with floral shapes around them
- Nose: an upside-down heart or small triangle
- Mouth: a simple line with “stitched” teeth marks
- Forehead: a central motif (flower, swirl, cross, or a framed space for a name)
- Cheeks + chin: dots, petals, curls, or lace-like patterns
Make it look symmetrical without losing your mind
Stand back every couple of minutes. If one eye is higher than the other, you’ll notice it forever. (Your guests may not,
but your brain absolutely will.) A quick trick is to lightly draw a vertical center line and place features evenly on
both sides.
Step 5: Outline First, Then Fill (The Cleanest Method)
Use a thin brush with black paint or a black paint pen to outline the main shapes. Outlines act like “guardrails,” keeping
your bright colors from wandering off like a toddler with finger paint.
Once outlined, fill shapes with color: bright pinks, blues, purples, yellows, and greens. If you want a more traditional,
high-contrast look, keep the base white and let color details do the heavy lifting.
Classic color placements that always work
- Eye flowers: hot pink + orange + yellow (marigold-inspired)
- Swirls and filigree: turquoise or purple for contrast
- Dot accents: white dots over color, or color dots over black outlines
- Metallic highlights: gold on the forehead motif or around the eyes
Step 6: Add the Signature Sugar Skull Details
1) Flower eyes (the iconic move)
Turn each eye into a simple flower: paint petals around the eye socket, add a contrasting center, then outline for crispness.
If painting petals feels tricky, do scalloped edges insteadlike a wavy circle. It reads as floral from three feet away,
which is the distance most people will admire it from anyway.
2) Dots, dots, and more dots
Sugar skull designs often feature dot-work. Use the end of a paintbrush, a cotton swab, or a dotting tool to create perfect
circles. Cluster dots along cheek curves, around the eyes, and bordering the mouth area.
3) The mouth (cute, not creepy)
Draw a gentle smile line across the lower half and add short vertical lines for teeth. Keep it clean and decorative rather
than jagged or scary. This is “celebration of life” energy, not “haunted corn maze” energy.
4) Forehead focal point
Add a centerpiece: a flower, a framed heart, a sunburst, or a swirl crest. If you’re honoring someone, you can include a
name in a respectful wayespecially if the pumpkin is part of an ofrenda-inspired display with a photo, marigolds, and a
favorite food or item that represents them.
Step 7: Go 3D With Embellishments (Optional but Stunning)
If you want your pumpkin to look like it belongs in a parade (or at least in your best Instagram lighting), add texture.
Choose one or two of these so it looks curated, not like a craft store exploded:
- Rhinestones: place them around the eyes or along dot borders
- Faux flowers: glue a marigold-colored cluster near the stem like a crown
- Glitter accents: highlight petals, swirls, or the forehead motif
- Papel picado-inspired trim: wrap a band of decorative paper around the base (keep it away from moisture)
- Ribbon or lace: add a collar-like band near the bottom for a “dressed up” finish
Glue note: Hot glue holds best for heavier pieces (flowers, large gems). Craft glue works for lightweight
sequins and paper trim. If a decoration keeps sliding, it’s not being dramaticit’s reacting to a curved surface. Use a
tiny “glue mound” as a perch.
Step 8: Seal It (So Your Masterpiece Doesn’t Smudge)
After everything is fully dry, seal your pumpkin. This is especially important if you used paint pens, glitter, or layered
colors. Choose a finish:
- Matte sealer: modern and artsy
- Satin sealer: a soft glow that flatters most designs
- Gloss sealer: bold and shinygreat for vibrant colors
If the pumpkin will sit outdoors, use an outdoor-rated sealer and keep it shaded when possible. Heat speeds up decay for
real pumpkins and can soften adhesives on craft pumpkins.
Step 9: Display It Like It Matters (Because It Does)
A sugar skull pumpkin looks amazing alone, but it looks intentional with a simple display:
- Place it on a tray with marigold-colored flowers (real or faux).
- Add a small strand of warm LED fairy lights nearby for glow.
- Include a mini banner inspired by papel picado (paper flags) behind it.
- If you’re building an ofrenda-inspired vignette, add a photo, a glass of water, and a favorite treat (as appropriate to your tradition).
Safety tip: Use LED lights instead of candlesreal flame and pumpkins are a fast track to “why does it smell
like science class in here?”
Design Ideas for Different Skill Levels
Beginner
- White base + black outlines + dot borders + one or two bold flowers
- Use paint pens for clean lines (they’re basically cheat codes)
Intermediate
- Layered petals around eyes
- Two-tone swirls with small highlights
- Metallic accents and a floral crown
Advanced
- Gradient shading on petals
- “Lace” filigree patterns across cheeks and forehead
- Mixed media: gems + painted details + paper trim
Troubleshooting (Because Paint Has Opinions)
My paint is streaky
Thin coats win. Let each layer dry and add another coat instead of trying to fix it while wet (that’s how mud happens).
My lines look shaky
Use a paint pen, rest your hand on the table, and rotate the pumpkin instead of twisting your wrist into a pretzel.
Also: outlines look better after you thicken them slightlytiny wobbles disappear.
My decorations keep falling off
Clean the surface, let paint cure, then use stronger adhesive (hot glue for heavier items). Curves need patience and a
little extra glue “support.”
Extra Tips for Keeping It Meaningful and Respectful
- Choose celebratory motifs: flowers, hearts, swirls, and bright colors align with the holiday’s spirit.
- Avoid horror styling: no dripping “blood” effects or scary monster facessave that for Halloween themes.
- Be mindful with names and symbolism: if you add a name, do it thoughtfully (especially if you’re referencing a real loved one).
- Learn a little as you craft: even a basic understanding of ofrendas, marigolds, and calaveras helps your decor feel intentional rather than costume-like.
Experiences That Make a Sugar Skull Pumpkin Even Better (500+ Words)
Decorating a sugar skull pumpkin hits different when it becomes more than a craft and turns into an experience. For a lot
of people, the best part isn’t the final photo (though yes, you should absolutely take one in good lighting). It’s the
small moments that happen while you’re painting: the music playing in the background, the accidental paint dot on your
finger that somehow ends up on your cheek, the debate over whether the eye flowers should be pink-and-orange or
turquoise-and-yellow, and the very serious discussion about glitterspecifically, whether glitter is a “cute accent” or a
“forever lifestyle.”
One of the most common (and genuinely lovely) ways people use this project is as a family or community craft night around
early November. Everyone starts with the same basic stepswhite base coat, eye shapes, nose, mouththen the pumpkins
quickly develop personalities. Someone always goes super traditional with marigold-inspired colors and neat dot borders.
Someone else leans bold and modern with metallic paint and big geometric patterns. And there’s usually one person who
calmly says, “I’m keeping mine simple,” and then two hours later has created a lace-level masterpiece that makes everyone
rethink their life choices (in a good way).
Another meaningful approach is pairing the pumpkin with a small ofrenda-inspired display. This doesn’t have to be elaborate
or feel like you’re trying to recreate a museum exhibit in your living room. It can be as simple as placing the pumpkin
near a framed photo, a glass of water, and a few marigold-colored flowers (real or faux). Some people add a favorite snack
or item that reminds them of a loved onesomething that sparks a story. The pumpkin becomes part of the setting rather than
just a decoration. Even if you’re not following a specific family tradition, the act of choosing symbols thoughtfully
changes the vibe from “craft project” to “craft with heart.”
If you’re doing this in a classroom, library, or community center, it can also be a gentle way to practice cultural respect:
learn what common symbols mean, talk about why skull imagery isn’t meant to be scary in this context, and encourage everyone
to make designs that feel celebratory. People often find that once they understand the symbolismlike marigolds representing
guidance and remembrancethe color choices start to feel intentional. Suddenly, “I picked orange because it’s cute” becomes
“I picked orange because it’s connected to the flowers I keep seeing in Día de los Muertos displays.” Same paint, deeper
meaning.
There’s also a practical joy in this project: it’s forgiving. If a swirl goes crooked, you can turn it into a leaf. If a
dot smears, add three more dots and call it a border. If your teeth marks are uneven, congratulationsyou’ve created a
stylized grin with character. And when you step back at the end, your pumpkin looks complex because sugar skull designs are
built on repetition: dots, petals, curls, outlines. The pattern does the heavy lifting.
Finally, there’s the “after” experience: seeing it glow at night with LEDs nearby, watching guests do the slow lean-in to
admire the details, and hearing someone say, “Wait… you painted that?” That moment is the craft equivalent of a
standing ovationquiet, surprised, and extremely satisfying. And if you’re using a foam pumpkin, you get to relive the
experience next year, with fewer supplies and even more confidence. Your future self will be very impressed with you.
Conclusion
Decorating a sugar skull pumpkin for Día de los Muertos is a bright, no-carve way to celebrate color, artistry, and the
power of remembrance. Start with a clean base, sketch a simple calavera layout, build bold outlines, then layer in flowers,
dots, swirls, and meaningful details. Finish with a protective sealer and a thoughtful displaymarigold-inspired accents,
papel picado vibes, and soft LED light can make your pumpkin look truly special.
The best designs aren’t just “pretty.” They feel intentional. Keep it celebratory, keep it colorful, and let your pumpkin
tell a storywhether it’s about family, tradition, or simply the joy of making something beautiful by hand.





