Table of Contents >> Show >> Hide
- Why Choose Brick Garden Edging?
- Best Places to Use a Brick Garden Border
- Brick Edging Design Options
- Tools and Materials You Will Need
- How to Plan Your DIY Brick Garden Border
- Step-by-Step: How to Install Brick Garden Edging
- Tips for Curved Brick Garden Borders
- Common Mistakes to Avoid
- How to Maintain Brick Garden Edging
- Design Ideas for a Better-Looking Brick Border
- Cost Considerations
- Real DIY Experiences: Lessons From Installing Brick Garden Borders
- Conclusion
- SEO Tags
A DIY brick garden border is one of those rare weekend projects that makes your yard look more polished without asking you to sell a kidney at the garden center. Bricks are classic, durable, easy to find, and forgiving enough for beginners. Even better, they can turn a wobbly flower bed, messy lawn edge, or mulch escape zone into something that looks intentionallike you planned it all along and did not simply get tired of chasing bark chips across the driveway.
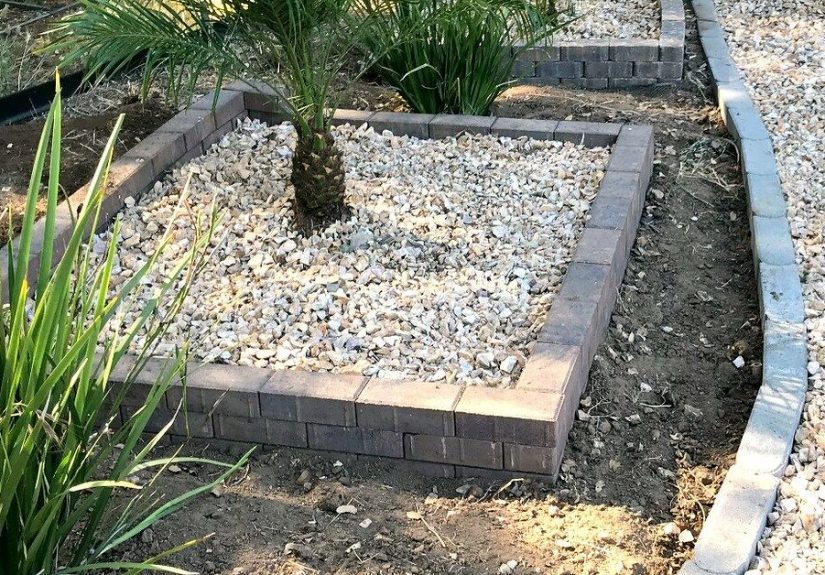
Brick garden edging does more than look charming. It helps separate lawn from planting beds, keeps mulch and soil where they belong, creates a clean mowing line, and gives your landscape structure. Whether you want a traditional red brick border around a flower bed, a rustic salvaged-brick edge beside a vegetable garden, or a neat paver-style border along a walkway, the basic process is simple: plan the shape, dig a trench, prepare a stable base, set the bricks, level them, and backfill.
This guide walks through the tools, materials, layouts, installation steps, design ideas, maintenance tips, and real-world lessons that make a brick garden border look sharp and stay put. Put on your gloves. Your garden is about to get eyebrows.
Why Choose Brick Garden Edging?
Brick is popular for garden borders because it blends beauty with function. Unlike thin plastic edging that may warp, crack, or pop loose over time, brick has weight. That weight helps it stay in place when installed correctly. It also brings a warm, timeless look that works with cottage gardens, modern homes, farmhouse landscapes, and traditional front yards.
A brick border can be installed flat, upright, angled, stacked, or set in a gentle curve. You can use new landscape bricks for a uniform look or reclaimed bricks for a weathered, storybook feel. If your garden has roses, herbs, hydrangeas, boxwood, hostas, tomatoes, or ornamental grasses, brick edging can frame them like a picture without stealing the show.
Main Benefits of DIY Brick Edging
- Cleaner garden beds: Brick creates a visible barrier between lawn, mulch, soil, gravel, and plants.
- Better curb appeal: A crisp border can make even a simple flower bed look finished.
- Durability: Brick handles sun, rain, foot traffic, and regular yard work well.
- Flexible design: It can be formal, rustic, curved, straight, raised, or flush with the lawn.
- DIY-friendly installation: Most small brick edging projects can be completed over a weekend.
Best Places to Use a Brick Garden Border
Before you buy materials, decide where the brick edging will do the most good. A border is not just decoration; it should solve a landscape problem. Is the lawn creeping into the flower bed? Is mulch spilling onto the sidewalk? Is the vegetable garden looking like it gave up during a thunderstorm? Brick can help.
Great locations for DIY brick garden edging include front walkway beds, foundation plantings, tree rings, herb gardens, vegetable beds, mailbox gardens, patio edges, and borders between lawn and gravel. If you have a curved bed, bricks can follow the shape beautifully when spaced and angled carefully. If you prefer a formal look, a straight line of level bricks gives the landscape a clean architectural edge.
Brick Edging Design Options
The layout you choose affects both appearance and function. Some styles are better for mowing, while others create a taller visual border. Here are the most common DIY brick garden border styles.
Flat Brick Border
In a flat brick border, bricks are laid horizontally in the trench, usually with the top surface nearly flush with the lawn or soil. This style is excellent along grass because a mower wheel can often ride along the brick edge, reducing the need for trimming. It is also one of the easiest options for beginners.
Upright Brick Edging
Upright brick edging sets each brick vertically, creating a taller border. This works well around flower beds where you want mulch contained and plants visually framed. The look is more pronounced than flat edging, but it may require a deeper trench and more careful leveling.
Angled or Sawtooth Brick Border
For a decorative border with personality, set bricks diagonally at an angle so they form a sawtooth pattern. This style is charming in cottage gardens and around informal beds. It uses more visible brick height, so make sure the bricks are seated firmly and backfilled well.
Stacked Brick Garden Edge
A stacked brick border uses two or more rows of bricks. It can create a small raised edge, but it needs more stability than a single course. For taller stacked borders, consider using landscape adhesive, mortar, or a proper base, especially if the edging will hold back soil.
Tools and Materials You Will Need
You do not need a contractor’s trailer full of equipment to install a brick garden border. For most home projects, a few basic tools will do the job. The exact materials depend on your design, soil, and whether you want a permanent or adjustable edge.
Basic Supplies
- Landscape bricks, clay bricks, or concrete pavers
- Garden hose, rope, stakes, or mason’s line for layout
- Marking spray or flour for outlining the border
- Flat spade, trenching shovel, or garden edger
- Tape measure
- Level or torpedo level
- Rubber mallet
- Hand tamper or scrap board for compacting soil
- Landscape sand or paver sand
- Gravel or crushed stone for wetter areas
- Broom for sweeping sand into joints
- Work gloves and safety glasses
If you need to cut bricks for curves or tight corners, use a masonry chisel and hammer for small jobs or a masonry saw for cleaner cuts. Always wear eye protection when cutting brick. Tiny flying chips are not part of the garden aesthetic.
How to Plan Your DIY Brick Garden Border
Good brick edging starts before the first shovel hits the ground. Planning the border helps prevent crooked lines, awkward curves, drainage problems, and the classic DIY moment where you realize you are twelve bricks short and the store is already closed.
Measure the Border Length
Lay a garden hose or rope along the proposed border. This lets you test curves before committing. Once the shape looks right, measure the length. Then measure the length of one brick in the orientation you plan to use. Divide the total border length by the brick length to estimate how many bricks you need. Add 5 to 10 percent extra for cuts, breakage, curves, and future repairs.
Check Drainage
Brick edging should not trap water against your house, sidewalk, or plant crowns. If the border is near a foundation or hardscape, make sure the surrounding grade still drains away from structures. In wet or clay-heavy soil, add a thin layer of gravel under the sand base to help stabilize the edge.
Choose the Right Height
For lawn edges, flush or slightly raised brick is usually best because it makes mowing easier. For mulch beds, a slightly higher edge can help contain loose material. For vegetable gardens, consider a border that is tall enough to define the bed but not so tall that it blocks water from moving naturally through the soil.
Step-by-Step: How to Install Brick Garden Edging
Now for the fun part: turning a line in the dirt into a handsome brick border. The process below works for most basic DIY brick garden edging projects.
Step 1: Mark the Layout
Use a garden hose for curves or stakes and mason’s line for straight borders. Take a few minutes to view the layout from different angles: the porch, the sidewalk, the driveway, and the kitchen window. A border that looks straight from one direction can look like a sleepy snake from another.
Once you like the shape, mark the line with landscape marking spray, flour, or the edge of a spade. For double-width borders, mark both sides of the trench so you know exactly where to dig.
Step 2: Dig the Trench
Dig a trench along the marked line. The trench should be wide enough for the brick plus a little working room. For flat brick edging, a trench about 2 to 4 inches deep may be enough, depending on the brick thickness and how high you want the finished edge. For upright bricks, dig deeper so at least part of each brick sits below grade for stability.
Keep the trench bottom as flat and consistent as possible. Remove roots, clods, stones, and loose soil. A clean trench is the difference between a border that looks professional and one that looks like it was installed during a squirrel emergency.
Step 3: Compact the Soil
Use a hand tamper, the end of a 2×4 board, or the flat side of a tool to compact the trench bottom. Compaction matters because loose soil settles after rain. When the base sinks unevenly, the bricks tilt, dip, and create a bumpy edge.
Step 4: Add a Sand Base
Add a 1- to 2-inch layer of landscape sand or paver sand to the trench. Spread it evenly, then tamp it lightly. Sand gives the bricks a level, adjustable bed and helps reduce frost heaving and uneven settling. In areas with poor drainage, place a thin gravel layer under the sand before setting the bricks.
Step 5: Set the Bricks
Place the bricks into the trench one by one. For straight lines, keep the bricks tight and aligned with the string line. For curves, fan the bricks slightly so they follow the shape smoothly. If a curve creates large gaps, mark and cut a few bricks to fit rather than forcing awkward spacing.
Use a rubber mallet to tap each brick into place. Check the top and side alignment with a level as you go. It is much easier to fix one brick now than to fix forty bricks later while muttering at your past self.
Step 6: Backfill the Edges
Once the bricks are level and aligned, backfill both sides with soil, sand, or gravel depending on the design. Press the backfill firmly against the bricks to lock them in place. If you are edging a mulched bed, pull mulch back from the installation area first, then replace it after the border is stable.
Step 7: Sweep Sand Into the Joints
For flat brick edging or borders with small gaps, sweep dry sand into the joints. Mist lightly with water to help settle the sand, then add more if needed. This helps reduce movement and gives the border a cleaner finish.
Tips for Curved Brick Garden Borders
Curved borders look natural and graceful, but they require patience. The easiest method is to lay the bricks along the curve before digging the full trench. This preview shows where gaps will appear and whether cuts are needed.
For gentle curves, slightly fan the bricks. For tighter curves, mark wedge-shaped cuts so the bricks fit cleanly. Avoid huge triangular gaps between bricks because grass, weeds, and mulch will happily move into those spaces like they signed a lease.
Common Mistakes to Avoid
Brick garden edging is simple, but small mistakes can shorten its life. Avoid these common problems:
- Skipping the base: Bricks placed directly on loose soil are more likely to sink and shift.
- Digging an uneven trench: A wavy trench creates a wavy border.
- Ignoring drainage: Poor drainage can cause settling, erosion, and soggy planting beds.
- Leaving wide gaps: Large gaps invite grass and weeds to creep through.
- Using damaged bricks in key spots: Cracked bricks are fine for rustic charm, but not where stability matters.
- Forgetting safety gear: Gloves and eye protection are essential when cutting or handling brick.
How to Maintain Brick Garden Edging
A well-installed brick border needs only occasional maintenance. Once or twice a year, walk the edge and check for sunken bricks, loose joints, weed growth, or soil washing away. Lift and reset any uneven bricks before the problem spreads.
Keep grass trimmed along the outer edge. A flush brick border makes mowing easier, but some grass may still creep into cracks. Pull weeds early, refill joints with sand when needed, and refresh mulch so it sits below the top of the brick instead of burying the border completely.
If you live in a freeze-thaw climate, check the edging after winter. Soil movement can lift or tilt individual bricks. The good news is that dry-laid brick edging is repair-friendly. You can lift a brick, add or remove sand, tap it level, and move on with your day.
Design Ideas for a Better-Looking Brick Border
Small design choices can make your DIY brick garden border look more expensive. Match the brick color to your home, walkway, patio, or chimney for a cohesive look. Use reclaimed brick for cottage charm, charcoal pavers for modern contrast, or classic red brick for timeless curb appeal.
For a formal garden, install bricks in a straight, flat line with tight joints. For a relaxed backyard, use a curved border around mixed perennials and ornamental grasses. Around a tree, keep the border wide enough that mulch does not pile against the trunk. Around vegetable beds, choose a simple flat border that gives you a clean walking and mowing edge.
Cost Considerations
The cost of a DIY brick garden border depends on the type of brick, border length, base material, and whether you already own tools. New landscape bricks and pavers cost more than salvaged bricks, but they are consistent in size and easier to level. Reclaimed bricks can be cheaper and full of character, but you may need to sort through them for usable pieces.
To save money, start with one high-impact area, such as the front walkway or main flower bed. A short, well-installed brick edge often looks better than a long, rushed border. Gardens are not impressed by speed. They prefer commitment, compost, and the occasional dramatic hat.
Real DIY Experiences: Lessons From Installing Brick Garden Borders
The first lesson many homeowners learn when installing DIY brick garden edging is that the layout matters more than expected. A garden hose is your best friend during planning because it lets you test the shape before digging. On paper, a perfect half-circle around a flower bed may look elegant. In the yard, it may awkwardly bump into the walkway or make mowing harder. Walking around the layout before digging saves time, sweat, and the emotional damage of undoing your own trench.
Another real-world lesson is that soil rarely behaves like the cheerful diagrams in project guides. Sandy soil may collapse at the trench edges. Clay soil may come out in heavy chunks that cling to the shovel like peanut butter with ambition. Rocky soil may require extra patience and possibly a few conversations with the universe. The best approach is to slow down and make the trench clean and consistent. A neat trench gives the brick border a better chance of staying level.
Many DIYers also discover that a small level is worth using constantly. It can feel fussy to check every few bricks, but the border will show every shortcut. One brick sits a little high, the next sits a little low, and suddenly the edge looks like a tiny roller coaster for ants. Tapping each brick with a rubber mallet and adjusting the sand base as you go creates a smoother, more professional result.
Curves are another place where experience pays off. Beginners often try to force full bricks around a tight curve, leaving large gaps. Those gaps collect weeds, mulch, and regret. A better method is to lay the bricks on top of the ground first, study the curve, and decide where cuts are needed. Even a few cut bricks can make a curved brick garden border look intentional instead of improvised.
Backfilling is easy to underestimate. After the bricks are placed, they need support from both sides. Press soil or sand firmly along the edges so the bricks cannot wobble. If the border separates lawn from mulch, keep mulch slightly below the top of the brick. This shows off the border and helps prevent mulch from spilling over after heavy rain.
Finally, maintenance is part of the experience. A brick garden edge is durable, but it is not magical. Grass may try to creep into joints. Rain may wash soil away in a low spot. A brick may settle after winter. The advantage is that brick is easy to fix. Pull up the problem brick, adjust the base, reset it, and keep going. That repair-friendly nature is one of the biggest reasons brick remains such a smart DIY edging material.
The best part of building a brick garden border is the immediate satisfaction. One day you have a bed with fuzzy edges and runaway mulch. The next day you have a crisp, tidy frame that makes the entire garden look loved. It is a project with visible results, practical benefits, and just enough physical labor to justify lemonade afterward.
Conclusion
A DIY brick garden border and edging project is a practical, affordable way to upgrade your landscape. With careful planning, a compacted trench, a stable sand base, and patient leveling, bricks can create a clean edge that lasts for years. Whether you choose a flat mowing strip, an upright border, a decorative angled edge, or a curved flower bed frame, the key is preparation. Do the groundwork well, and the finished border will look polished instead of patched together.
Brick edging is not just about making the garden pretty, although it absolutely does that. It helps organize outdoor spaces, control mulch, slow grass creep, and define planting areas. Best of all, it is a project most homeowners can handle with basic tools, a free weekend, and a willingness to get a little dirt on their shoes.





