Table of Contents >> Show >> Hide
- Why This Cherry Pie Recipe Works
- Ingredients You Need
- How to Make Cherry Pie with a Lattice Crust
- How to Make a Better Lattice Crust Every Time
- Expert Tips for the Best Homemade Cherry Pie
- Common Mistakes and How to Avoid Them
- Serving Ideas, Storage, and Make-Ahead Tips
- Frequently Asked Questions
- The Real Experience of Baking Cherry Pie with a Lattice Crust
- Conclusion
There are desserts that politely wait in the corner, and then there is cherry pie with a lattice crustruby-red, glossy, buttery, and fully aware that it is the main character. This is the kind of pie that looks impressive on the table, smells like a small-town bakery, and makes people suddenly forget all social boundaries and ask, “So… when can we cut it?”
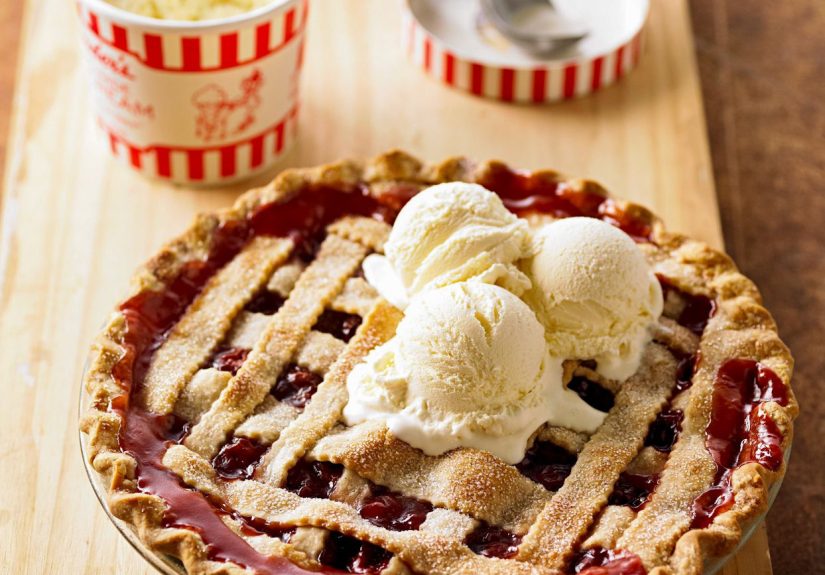
If you have been searching for a homemade cherry pie recipe that feels classic but not fussy, you are in the right kitchen. This version gives you a flaky, golden crust, a bright cherry filling that actually tastes like fruit instead of red sugar syrup, and a lattice top that looks beautiful without requiring a pastry degree. It is the kind of dessert that works for summer cookouts, holiday dinners, birthdays, and random Tuesdays when life clearly calls for pie.
This recipe is built for real home bakers. It includes a sturdy all-butter crust, simple steps for weaving a lattice pie crust, smart tips for avoiding a runny filling, and practical tricks for baking the pie until the center bubbles like it means it. The result is a sliceable, juicy, deeply satisfying pie with sweet-tart flavor, crisp edges, and just enough drama to make dessert feel special.
Why This Cherry Pie Recipe Works
A good cherry pie with a lattice crust recipe has to do three things well: keep the crust flaky, keep the filling thick enough to slice, and keep the cherry flavor front and center. This recipe does all three.
First, the crust uses very cold butter and minimal handling, which helps create those gorgeous layers everyone wants but few people want to overthink. Second, the filling uses cornstarch, lemon juice, and the right amount of sugar so the cherries stay bright instead of flat or syrupy. Third, the lattice top is not just pretty. It also helps steam escape, which keeps the fruit from turning the whole pie into a bubbling lava lake.
In other words, this pie is not here to disappoint. It is here to be photographed, admired, and eaten with vanilla ice cream before anyone remembers they were “too full.”
Ingredients You Need
For the Pie Crust
- 2 1/2 cups all-purpose flour
- 1 tablespoon granulated sugar
- 1 teaspoon salt
- 1 cup unsalted butter, very cold and cut into cubes
- 6 to 8 tablespoons ice water
- 1 teaspoon apple cider vinegar or lemon juice, optional but helpful for tenderness
For the Cherry Filling
- 5 cups pitted cherries, fresh or frozen and thawed
- 3/4 cup granulated sugar for sweet cherries, or up to 1 cup for tart cherries
- 1/4 cup cornstarch
- 1 tablespoon lemon juice
- 1/4 teaspoon almond extract
- 1/4 teaspoon salt
- 1 tablespoon unsalted butter, cut into small pieces
For Finishing
- 1 egg
- 1 tablespoon water or milk
- 1 tablespoon coarse sugar or granulated sugar
One quick note: if you use frozen cherries, thaw and drain them first. Cherries are juicy little overachievers, and too much extra liquid can sabotage even the prettiest pie.
How to Make Cherry Pie with a Lattice Crust
Step 1: Make the Dough
In a large bowl, whisk together the flour, sugar, and salt. Add the cold butter and cut it into the flour with a pastry cutter or your fingertips until the mixture looks shaggy with pea-size and bean-size bits of butter. That uneven texture is a good thing. It is the difference between flaky crust and sad cracker energy.
Stir the vinegar into the ice water. Add the water a tablespoon at a time, mixing gently until the dough just holds together when pressed. Divide the dough into two disks, flatten them, wrap them, and chill for at least 1 hour.
Step 2: Prepare the Cherry Filling
In a large bowl, toss the cherries with sugar, cornstarch, lemon juice, almond extract, and salt. Let the mixture sit for about 10 to 15 minutes. This gives the sugar time to begin drawing out juices and helps the filling bake up evenly. The lemon juice brightens the fruit, while almond extract quietly makes the cherries taste even more cherry-like. It is a small ingredient with a big personality.
Step 3: Roll Out the Bottom Crust
Preheat your oven to 400°F. Place a rack in the lower third of the oven. Roll one disk of dough into a circle about 12 to 13 inches wide and fit it into a 9-inch pie plate. Do not stretch the dough to make it fit. Stretching now means shrinking later, and pie has enough emotional complexity already.
Trim the overhang to about 1 inch and refrigerate the lined pie plate while you work on the top crust.
Step 4: Create the Lattice Strips
Roll the second disk into a similar-sized circle. Cut it into 8 to 10 strips, about 3/4 to 1 inch wide. Wider strips are easier to weave and give the pie that classic, bakery-style look. If the dough feels soft, slide the strips onto a parchment-lined tray and chill them for 10 minutes. Cold dough is easier to handle and far less likely to behave like a sticky toddler.
Step 5: Fill the Pie
Spoon the cherry filling into the chilled bottom crust, including any thickened juices in the bowl. Dot the top with the small pieces of butter. This adds richness and helps the filling taste rounder and fuller.
Step 6: Weave the Lattice Top
Lay half the strips across the pie in one direction, leaving a little space between each one. Fold back every other strip halfway. Place one strip across the center in the opposite direction. Unfold the folded strips over it. Then fold back the other alternating strips and lay down the next cross strip. Repeat until the lattice is complete.
Trim the strips, tuck the ends under the bottom crust edge, and crimp to seal. The pie should now look like it belongs on a windowsill in a movie where someone is about to make an excellent life decision.
Step 7: Add Egg Wash and Bake
Beat the egg with water or milk, then brush it over the lattice and edges. Sprinkle with sugar. Set the pie on a parchment-lined baking sheet to catch drips, because cherry pie likes to bubble enthusiastically when it is doing its job.
Bake for 20 minutes at 400°F, then reduce the oven temperature to 375°F and continue baking for 35 to 45 minutes more. If the crust browns too quickly, loosely tent it with foil. The pie is done when the crust is deeply golden and the filling is bubbling in the center, not just around the edges.
Step 8: Cool Completely
This part is hard, but necessary. Let the pie cool for at least 3 hours before slicing. A hot pie smells incredible, but a too-soon slice usually turns into cherry soup with pastry islands. Cooling gives the filling time to set so you can cut clean, beautiful wedges.
How to Make a Better Lattice Crust Every Time
Many bakers assume a lattice crust recipe is difficult, but it is really more about temperature than talent. Keep the dough cold, cut even strips, and do not rush the weaving. If the strips soften too much, chill them again. Pie dough is not offended by a short break.
It also helps to start in the middle and work outward. That keeps the pattern centered and prevents a lopsided top. If perfect weaving is not happening, do not panic. A rustic lattice still looks gorgeous once it is baked, brushed with egg wash, and sparkling with sugar. Cherry pie is very forgiving, especially once people start eating it.
Expert Tips for the Best Homemade Cherry Pie
- Use cold ingredients: Cold butter and chilled dough help create a flaky crust.
- Choose the right cherries: Sweet cherries give a softer, rounder flavor. Tart cherries bring classic pie-shop zing. Both work beautifully.
- Do not skip the lemon juice: It brightens the filling and keeps the sweetness balanced.
- Almond extract is optional but powerful: A tiny amount gives the filling warmth and depth.
- Bake on a sheet pan: This catches overflow and makes moving the pie easier.
- Wait for center bubbling: That is the best visual cue that the starch has activated and the filling will set properly.
- Cool longer than you think: Pie rewards patience. Annoyingly, but reliably.
Common Mistakes and How to Avoid Them
Runny Filling
This usually happens when the pie is underbaked or sliced too soon. Make sure the filling bubbles in the middle and let the pie cool completely.
Soggy Bottom Crust
Use a metal or glass pie plate, bake in the lower third of the oven, and avoid adding excess liquid from undrained frozen cherries.
Tough Crust
That often comes from overworking the dough or adding too much water. Mix only until the dough comes together.
Overbrowned Edges
If the crust edges darken too fast, cover them loosely with foil during the second half of baking.
Serving Ideas, Storage, and Make-Ahead Tips
Serve this fresh cherry pie filling masterpiece at room temperature or slightly warm. Vanilla ice cream is the obvious and correct choice, but whipped cream also works beautifully. A spoonful of crème fraîche is excellent if you want something slightly tangy and a little fancy.
To store, cover the pie loosely and keep it at room temperature for up to 2 days, or refrigerate it for up to 4 days. For longer storage, wrap slices well and freeze them. Reheat in a low oven to bring the crust back to life.
You can also make the dough ahead of time and refrigerate it for up to 2 days. The fully baked pie can be made a day in advance, which is very convenient when your oven is already working overtime during a holiday.
Frequently Asked Questions
Can I use canned cherries?
Yes, but fresh or frozen cherries usually give a better texture and more natural flavor. If using canned cherries, reduce the added sugar and be careful with extra liquid.
What is the best thickener for cherry pie?
Cornstarch is a great choice because it creates a glossy filling and is easy to use. Tapioca also works well, especially for very juicy fruit.
Do I have to make a lattice top?
No. A full top crust with vents works too. But a lattice crust gives the pie that classic look and helps steam escape.
Can I make this recipe with sweet cherries?
Absolutely. Just use a little less sugar than you would for tart cherries, and taste the filling before assembling the pie.
The Real Experience of Baking Cherry Pie with a Lattice Crust
There is something wonderfully specific about making a cherry pie with a lattice crust. It is not just another dessert recipe. It is an event. The experience usually begins with optimism, followed by several cherries rolling off the cutting board, one moment of flour on your shirt, and a strong internal speech about why pitting fruit should count as upper-body exercise.
Then the kitchen starts to change. The butter softens just enough to work with, the dough begins to come together, and suddenly you are in that deeply satisfying zone where baking feels less like a task and more like a small domestic victory. Rolling out pie dough has a funny way of making people feel capable. Even when the circle is not really a circle anymore and has drifted into “vaguely Midwestern state” territory, it still feels like progress.
The filling has its own personality. Cherries look glamorous in a bowl. They are shiny, dramatic, and just tart enough to make you feel like this pie is going to have depth. Add sugar, lemon juice, and a touch of almond extract, and the smell alone starts making the room feel cozy. It is one of those aromas that says something good is definitely happening, even if the sink is full of bowls and your countertop resembles a flour storm.
And then comes the lattice. This is the part that scares people, but it is also the part they remember. The first strip goes down confidently. The second one is still fine. By the third, there is often a pause, a squint, and a brief negotiation with geometry. But once the pattern starts to form, it becomes oddly calming. Fold back, place a strip, unfold, repeat. It is less like engineering and more like weaving a tiny edible blanket for fruit.
When the pie goes into the oven, the waiting begins. The dough slowly turns golden. The filling starts to bubble through the openings. The sugar on top catches the light. This is the stage where people wander into the kitchen pretending they are just “checking on something,” when really they are following the smell like cartoon characters floating toward a windowsill.
Cooling the pie is the final test of character. Every home baker knows the temptation of cutting in early. The pie is right there. It looks ready. It smells ready. It has emotionally prepared everyone for dessert. But patience matters. Letting the pie cool is what turns a beautiful bake into a clean, sliceable one. It is the culinary version of letting wet nail polish dry: annoying, wise, and absolutely necessary.
And when you finally cut that first slice, all the little moments of effort make sense. The crust flakes. The filling holds. The cherries taste bright, rich, and unmistakably homemade. The lattice does exactly what it was supposed to do, both visually and practically. It is not just pie at that point. It is proof that a classic dessert can still feel exciting, comforting, and a little bit theatrical in the best possible way.
Conclusion
If you want a dessert that looks impressive, tastes even better, and delivers that perfect balance of buttery crust and bright fruit, this cherry pie with a lattice crust recipe deserves a permanent place in your baking lineup. It is classic without being boring, beautiful without being impossible, and flavorful without relying on shortcuts that flatten the fruit.
Whether you bake it for a summer gathering, a holiday table, or a weekend project that ends with ice cream and silence because everyone is too busy chewing, this homemade cherry pie is worth it. Keep the dough cold, bake until the center bubbles, cool it longer than feels reasonable, and trust the process. The pie will handle the rest.





