Table of Contents >> Show >> Hide
- What Are Italian Rainbow Cookies?
- Why This Is the Best Italian Rainbow Cookies Recipe
- Ingredients for Italian Rainbow Cookies
- How To Make Italian Rainbow Cookies
- Pro Tips for Better Italian Rainbow Cookies
- Common Mistakes and How To Avoid Them
- Storage and Make-Ahead Tips
- Variations You Can Try
- Why Homemade Italian Rainbow Cookies Are Worth It
- Experiences From the Rainbow Cookie Trenches
- Final Thoughts
Note: This HTML includes the full article body only, and the SEO tags appear at the end in JSON format for easy publishing.
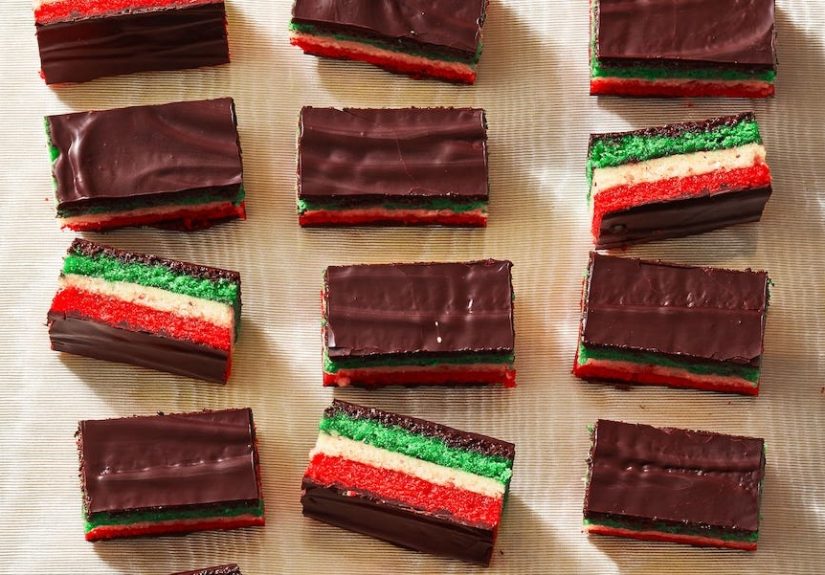
Italian rainbow cookies are the overachievers of the bakery case. They are colorful, glossy, a little dramatic, and somehow manage to be both delicate and rich at the same time. If a brownie and a petit four had a very stylish Italian-American cousin, this would be it. Despite the name, these are not classic crisp cookies. They are more like thin layers of almond cake stacked with jam, cloaked in chocolate, and sliced into neat little bars that disappear from the dessert tray with suspicious speed.
If you have ever wondered how to make Italian rainbow cookies at home without turning your kitchen into a confectionery crime scene, you are in the right place. This recipe-style guide walks you through the ingredients, the method, the common mistakes, and the small details that separate “pretty good” from “why did I not make a double batch?” The result is a homemade version that tastes deeply almondy, has clear colorful layers, and slices beautifully.
What Are Italian Rainbow Cookies?
Italian rainbow cookies are also called seven-layer cookies, tricolor cookies, Venetian cookies, or Italian flag cookies. The colors usually mimic red, white, and green, and the flavor profile is built around almond paste, jam, and chocolate. In many American bakeries, especially in the Northeast, they are a holiday staple. And yes, the “seven layers” name is a little cheeky: three cake layers, two jam layers, and two chocolate coatings. Math has rarely been this delicious.
They are beloved because they hit several dessert cravings at once. You get nutty richness from almond paste, brightness from raspberry or apricot jam, and a smooth bittersweet chocolate finish that keeps the whole thing from becoming sugary chaos. Good rainbow cookies taste balanced, not loud. Bright to look at, yes. Bright enough to make your teeth buzz, no.
Why This Is the Best Italian Rainbow Cookies Recipe
This version works because it respects the classic structure while making smart home-kitchen choices. Instead of chasing bakery mystery, it leans into technique. The batter is whipped enough to stay tender, the layers are baked just until set, the jam is spread thinly so the bars hold together instead of sliding around, and the stack gets chilled under light weight so the slices come out tidy.
- Almond paste brings the signature flavor. This is the soul of the cookie. If the almond flavor is weak, the whole dessert feels like it forgot its lines.
- Separated eggs keep the layers light. Whipped egg whites help the cakes stay soft without becoming heavy.
- Two jams create better flavor. Raspberry adds brightness, while apricot gives warmth and a classic bakery vibe.
- Bittersweet chocolate keeps things balanced. Milk chocolate can make the bars too sweet and a little flat.
- Chilling under weight improves the texture. It compresses the layers so they slice cleanly and taste more unified.
Ingredients for Italian Rainbow Cookies
For the cake layers:
- 8 ounces almond paste, chilled and broken into small pieces
- 1 cup unsalted butter, softened
- 1 cup granulated sugar, divided
- 4 large eggs, separated
- 1 teaspoon almond extract
- 1/2 teaspoon vanilla extract
- 2 cups all-purpose flour
- 1/2 teaspoon kosher salt
- Red gel food coloring
- Green gel food coloring
For the filling and topping:
- 1/2 cup seedless raspberry jam
- 1/2 cup apricot jam
- 8 ounces bittersweet or semisweet chocolate, finely chopped
- 1 teaspoon neutral oil, optional, for a smoother chocolate finish
For the pans: nonstick spray, parchment paper, and a little patience. The patience is not optional, unfortunately.
How To Make Italian Rainbow Cookies
1. Prepare the pans and oven
Heat your oven to 350 degrees Fahrenheit. Line three 9-by-13-inch pans, quarter-sheet pans, or one pan used in batches with parchment. Lightly grease the parchment so the thin cake layers release easily. These layers are delicate, so set yourself up for success before the batter arrives.
2. Whip the egg whites
Beat the egg whites until foamy, then gradually add about 1/4 cup of the sugar. Continue beating until stiff, glossy peaks form. Set the bowl aside. This step gives the finished cookies lift, which matters because almond paste can make the batter dense.
3. Make the almond batter
In a separate bowl, beat the almond paste with the remaining sugar and softened butter until the mixture looks as smooth as possible. It may start out a little lumpy, which is normal. Keep going. Add the egg yolks one at a time, then mix in the almond extract and vanilla. Stir in the flour and salt until just combined.
4. Fold in the whites
Gently fold the whipped egg whites into the almond batter in two or three additions. The goal is to keep as much air as possible while still creating an even batter. Do not stir like you are mad at it.
5. Color the layers
Divide the batter evenly into three bowls. Leave one plain, tint one red, and tint one green. Use gel coloring instead of liquid if possible because it gives better color without loosening the batter. Spread each portion into a prepared pan in a very thin, even layer.
6. Bake just until set
Bake each pan for 8 to 12 minutes, depending on thickness and your oven. The tops should be set and no longer shiny, but you do not want much browning. Overbaking is the fastest route to dry rainbow cookies, and dry rainbow cookies are a minor kitchen heartbreak.
7. Cool and assemble
Let the layers cool completely. Place the green layer on a flat surface or tray lined with parchment. Warm the jams briefly so they spread easily, then stir them together or keep them separate if you want more contrast. Spread a thin layer of jam over the green cake, top with the plain layer, spread more jam, then add the red layer.
8. Wrap, weigh, and chill
Wrap the layered slab well in plastic wrap. Place a pan or cutting board on top and weigh it down with a few cans or a heavy skillet. Chill for at least 4 hours, but overnight is even better. This step compresses the layers and helps the flavors settle in together. It is not glamorous, but it is important.
9. Coat with chocolate
Melt half the chocolate gently in the microwave or over a double boiler. Stir in the optional oil if you want a smoother finish. Spread a thin layer over the top of the chilled cake. Refrigerate until set, then flip the slab carefully and coat the other side with the remaining chocolate. If you like the classic bakery look, drag the tines of a fork lightly through the chocolate before it sets.
10. Trim and slice
Once the chocolate is firm, trim the edges for neat sides. Use a warm sharp knife or a serrated knife wiped clean between cuts. Slice into small rectangles or squares. Rainbow cookies are rich, so smaller pieces are not a sign of stinginess. They are a sign of wisdom.
Pro Tips for Better Italian Rainbow Cookies
Use almond paste, not marzipan
These are not the same thing. Almond paste is less sweet and better for baking. Marzipan is sweeter and firmer, which can throw off both flavor and texture.
Spread the batter thinly and evenly
The layers should be delicate. A small offset spatula is your best friend here. If one section is thick and another is paper-thin, the stack may bake unevenly and look crooked once sliced.
Do not overdo the jam
A thin layer is enough. Too much jam can make the layers slide or squeeze out when weighted. You want a tidy stripe of fruit, not a traffic accident.
Let the chocolate set before cutting
If the chocolate is too soft, it will smear. If it is rock hard straight from a very cold freezer, it may crack. Cool but sliceable is the sweet spot.
Warm the knife for clean edges
Dip the blade in hot water, wipe it dry, and cut. Repeat as needed. It is a small step that makes the finished bars look impressively polished.
Common Mistakes and How To Avoid Them
Mistake 1: Dry layers. This usually means the cakes baked too long. Pull them when they are just set.
Mistake 2: Lumpy almond batter. Start with softened butter and chilled almond paste cut into tiny pieces. Beat thoroughly before adding other ingredients.
Mistake 3: Messy slices. Chill the assembled slab long enough, let the chocolate set properly, and clean the knife between cuts.
Mistake 4: Cookies that taste too sweet. Use bittersweet chocolate and seedless jams with good fruit flavor. This dessert should feel rich, not syrupy.
Mistake 5: Pale, sad colors. Gel coloring works better than liquid, and a thin batter layer always looks brighter after baking and stacking.
Storage and Make-Ahead Tips
Italian rainbow cookies are excellent make-ahead treats. In fact, they often taste better after resting because the almond cake, jam, and chocolate settle into one another. Store them in an airtight container with parchment between layers. They keep well in the refrigerator for about a week or two, depending on your ingredients and kitchen conditions. They also freeze beautifully. Freeze the sliced cookies in layers with parchment, then thaw briefly before serving.
If you are baking for Christmas, a party, or a cookie box, make them a day or two ahead. Your future self will feel wildly competent.
Variations You Can Try
- Classic raspberry: Use only seedless raspberry jam for a brighter tang.
- Apricot-forward: Use only apricot preserves for a more traditional bakery feel.
- Holiday spin: Change the colors to suit Christmas, Valentine’s Day, or baby showers if you are feeling extra.
- Chocolate upgrade: Add a whisper of espresso powder to the melted chocolate for more depth.
- Citrus lift: Add a little lemon or orange zest to the batter for a fresher finish.
Why Homemade Italian Rainbow Cookies Are Worth It
Bakery rainbow cookies can be wonderful, but they can also be dry, overly sweet, or suspiciously heavy on food coloring. Homemade Italian rainbow cookies let you control the almond flavor, the quality of the jam, and the chocolate balance. You can make them softer, neater, fruitier, or more bittersweet depending on your taste. You also get the pleasure of cutting into that finished slab and seeing the clean stripes inside, which is one of the more satisfying moments available in a normal kitchen.
They are a little project, yes. Nobody sane calls these a five-minute dessert. But the method is straightforward, and the payoff is real. This is the kind of recipe that makes people assume you have a secret bakery apprenticeship in your past.
Experiences From the Rainbow Cookie Trenches
The first time you make Italian rainbow cookies, you usually learn one very humbling truth: these little bars may look cute, but they have opinions. The batter wants to stick to the offset spatula. The almond paste acts like it has never met butter before. The chocolate sets fast when you wanted slow, and slow when you wanted fast. And yet, somewhere between the red layer and the final slice, the recipe stops feeling fussy and starts feeling almost ceremonial.
One of the best parts of making rainbow cookies is how the kitchen changes mood as you go. At the beginning, it feels technical. You are separating eggs, lining pans, checking the texture of almond paste, making sure the food coloring does not go rogue. Then the layers bake, and the smell changes everything. Suddenly the room smells buttery, nutty, and a little nostalgic, even if you did not grow up eating these. That almond aroma has a way of making the whole process feel like a tradition, whether it is your first batch or your fiftieth.
There is also something oddly satisfying about the assembly. You spread a thin layer of jam, line up the next cake, press gently, and watch the stack come together. It feels neat and architectural, like edible tile work. Then comes the funny part: weighing the whole thing down with cans, a skillet, or a stack of cookbooks. It is one of the only dessert recipes that asks you to basically tuck your cake in and tell it to think about its choices overnight.
By the next day, the transformation is obvious. The layers feel tighter, cleaner, and more serious. This is when many bakers become emotionally invested. You melt the chocolate, smooth it over the top, wait, flip the slab, and coat the other side. It sounds simple, but it feels like the dessert equivalent of putting a tailored jacket on someone. Suddenly the whole thing looks polished.
The slicing is where the reward really hits. The first trimmed edge is a tiny thrill. The colors appear, the jam lines look tidy, and the chocolate gives the bars that bakery-case confidence. If you have ever made something that looked much better than you expected, you know the feeling. You stand there holding the knife, pretending you are just checking the edges, while quietly admiring yourself.
Serving them is its own experience too. People rarely take one rainbow cookie and move on with their day. They pause. They look at the layers. They ask whether you really made them. Then they bite in and get that combination of almond cake, bright jam, and snappy chocolate, and the conversation usually turns into, “Wait, these are homemade?” It is the kind of recipe that creates a tiny moment at the table. Not a fireworks moment. More like a very pleased silence followed by immediate reaching for another piece.
That is why these cookies stay popular. They are festive without being flimsy, nostalgic without being boring, and impressive without requiring a culinary degree. Once you make them well, they become the dessert people quietly hope you will bring again. Which is flattering, of course, until you realize you are now officially the rainbow cookie person.
Final Thoughts
If you want a dessert that looks like it came from a classic Italian-American bakery but tastes fresher and more balanced, this is the one. The best Italian rainbow cookies recipe is not about unnecessary fuss. It is about thin almond cake layers, bright jam, smooth chocolate, and a little time in the refrigerator to let everything come together properly. Make them once, and you will understand why these tiny layered bars have such a loyal following.
They are festive, rich, and just theatrical enough to make a dessert tray feel special. In other words, they are exactly the kind of cookie that deserves a little extra effort and a very good cup of coffee.





