Table of Contents >> Show >> Hide
- Why the bucket-and-table-leg trick works (and why it’s weirdly irresistible)
- What you’ll build: pick your “neighbor-smile” style
- Materials list (simple, affordable, and extremely customizable)
- Build options: choose your path
- Step-by-step: stick the table leg in the bucket like a pro (and not like a raccoon with power tools)
- Step 1: Prep and protect the table leg for outdoor life
- Step 2: Prep the bucket (and decide if it’s a planter)
- Step 3: Center the leg (because a leaning pole looks less “whimsy” and more “tired pirate ship”)
- Step 4: Anchor the table leg securely
- Method 1: Concrete set (most stable)
- Method 2: Mechanical bracket + gravel (lighter, easier to redo)
- Step 5: Make it look adorable on purpose
- Step 6 (Planter version): Add drainage barrier + potting mix + plants
- Container gardening basics (so your bucket planter doesn’t become a tiny tragedy)
- Weatherproofing: how to keep your table leg from turning into a sponge
- Placement ideas that maximize smiles (and minimize complaints)
- Troubleshooting (because DIY is 10% building and 90% adjusting)
- Safety notes (quick, practical, and worth it)
- Conclusion: a tiny project with big curb-appeal energy
- Real-World Moments: of “This Is Why People Love It”
There are two kinds of front yards: the kind that says “I pay my HOA dues on time,” and the kind that says “I own a drill and I’m not afraid to use it.”
Today, we’re aiming for a third category: “I’m delightfully unhinged in the most charming way.”
The project is exactly what it sounds like: you take a decorative table leg (yes, the turned-wood kind you can grab off the shelf), plant it upright in a bucket,
and turn the whole thing into whimsical outdoor decor that makes people grin as they walk or drive by.
It’s part yard art, part mini landmark, and part “Wait… why do I love this so much?”
Why the bucket-and-table-leg trick works (and why it’s weirdly irresistible)
From a curb-appeal perspective, this DIY is a small miracle. It’s tall enough to catch attention, simple enough to read in passing,
and customizable enough to match any vibefarmhouse, cottagecore, modern, spooky-season, or “my kids named this pole Gerald.”
- Vertical elements make small spaces feel designed (not accidental).
- Unexpected materials trigger curiositypeople look twice, then smile.
- Seasonal swap potential means it never gets stale: flowers in spring, mini pumpkins in fall, twinkle lights in winter.
- Low commitment: it’s not permanent hardscaping, but it still looks intentional.
What you’ll build: pick your “neighbor-smile” style
Your table leg becomes the “stem” or “post,” and the bucket becomes the baseeither a planter, a weighted pedestal, or both.
Here are a few proven crowd-pleasers:
1) The “Welcome!” signpost that doesn’t take itself too seriously
Attach a small sign to the leg: “Hi,” “Welcome,” “Y’all,” or “Please don’t let the cat out.” Add a tiny solar lantern on top for nighttime charm.
2) A bucket planter with a dramatic centerpiece pole
The bucket holds flowers or trailing plants, while the leg supports a topperlike a birdhouse, a mini wind spinner, or a house number plaque.
3) The seasonal totem
Think of it as a rotating stage. In October: a small wooden pumpkin. In December: a bow and mini wreath.
In summer: a painted sun face that is somehow both adorable and slightly judgmental.
4) The “giant flower” illusion
Paint the leg green like a stem and mount an oversized flower cutout at the top. It’s cheerful, a little goofy, and surprisingly photogenic.
5) The “yard chuckle” conversation starter
Add a tiny mailbox labeled “Neighborhood Gossip,” or a sign that says “You look nice today.” People will absolutely tell you this made their day.
Materials list (simple, affordable, and extremely customizable)
- 1 decorative wooden table leg (the turned style looks great)
- 1 bucket (5-gallon plastic, galvanized metal, or a decorative planter bucket)
- Fast-setting concrete mix or gravel/sand for weight (depending on your version)
- Drill + drill bits (including a masonry bit if your bucket is thick or tricky)
- Exterior screws + a small bracket/plate (optional but helpful)
- Exterior primer + exterior paint (or spray paint rated for outdoor use)
- Outdoor-rated clear coat (spar urethane / spar varnish style finish is a popular choice)
- Landscape fabric, mesh, or even a coffee filter (if you’re making a planter)
- Potting mix (not garden soil) + plant(s) + mulch/top dressing (optional)
- Decor: stencil, vinyl numbers, ribbon, small sign, solar light, etc.
Build options: choose your path
There are two main routes. Both end in happiness. One ends in dirt under your fingernails, the other ends in concrete dust on your shoes.
Choose based on whether you want this to be a planter or a pure decor base.
Option A: Planter base (bucket holds plants)
Best if you want flowers or greenery around the pole. You’ll need drainage holes and proper potting mix.
Option B: Weighted decor base (bucket is basically a portable pedestal)
Best if you want maximum stability with minimal plant maintenance. You’ll likely fill the bucket with concrete (or at least gravel).
Step-by-step: stick the table leg in the bucket like a pro (and not like a raccoon with power tools)
Step 1: Prep and protect the table leg for outdoor life
- Sand lightly to remove factory sheen and help paint/finish bond.
- Seal the end grain (the bottom cut end) especially wellthis is where water loves to sneak in.
- Prime + paint if you want color, then topcoat with an outdoor-rated clear finish for durability.
- Let it cure fully (not just “dry to the touch”). Outdoors is harsh, and impatience shows up as peeling later.
Step 2: Prep the bucket (and decide if it’s a planter)
If you’re making a planter: drill drainage holes in the bottomseveral small holes are usually better than one sad hole doing all the work.
If it’s a decor base: you can skip drainage holes, because the inside is getting filled and sealed anyway.
Step 3: Center the leg (because a leaning pole looks less “whimsy” and more “tired pirate ship”)
Mark the center of the bucket bottom. If your table leg has a mounting plate or flat top, decide whether the “pretty end” goes up or down.
Most people put the decorative end up so it looks finished and intentional.
Step 4: Anchor the table leg securely
Choose one of these anchoring methods:
Method 1: Concrete set (most stable)
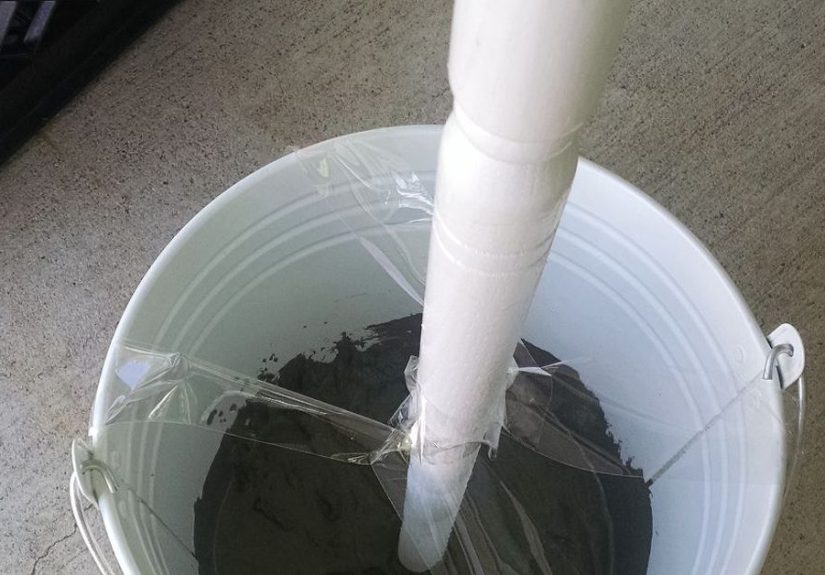
- Place the leg in the bucket, centered and upright. Brace it with scrap wood, clamps, or a simple taped “X” across the top.
- Mix concrete per the bag instructions (aim for a workable consistencythick oatmeal, not soup).
- Pour into the bucket while checking the leg for plumb (vertical). Adjust quickly before the mix starts to set.
- Optional but smart: tap the bucket sides to release air pockets.
- Let it set undisturbed. Once cured, you’ve basically created a portable yard-art foundation.
Tip: An 80-lb bag of concrete mix will nearly fill a 5-gallon bucket. You can also fill partway with gravel first to save mix and add weight.
Method 2: Mechanical bracket + gravel (lighter, easier to redo)
- Screw a small metal bracket or mending plate to the bucket bottom (inside), then attach the leg to the bracket.
- Fill the bucket with gravel, sand, or a combination for weight.
- If you want a cleaner top, add a thin layer of pavers or a “cap” board around the leg.
This method is great if you like to change your mind a lot (which, honestly, is a personality trait and a lifestyle).
Step 5: Make it look adorable on purpose
Paint the bucket to match your house trim, add a stencil, or go bold with a checkerboard pattern.
Add house numbers, a “hello” sign, or a tiny solar lantern. The goal is “intentional charm,” not “mystery object left behind after a yard sale.”
Step 6 (Planter version): Add drainage barrier + potting mix + plants
- Cover drainage holes with a small piece of landscape fabric, mesh, or a coffee filter to keep soil from escaping.
- Fill with high-quality potting mix (not garden soil).
- Plant your flowers or herbs, then top-dress with mulch or small stones for a finished look.
- Water deeply and let excess drainno “swamp bucket,” please.
Container gardening basics (so your bucket planter doesn’t become a tiny tragedy)
If your bucket includes plants, the “cute” part depends heavily on the “healthy” part.
A few principles keep container plants thriving:
- Drainage matters: roots need air as much as water. Without drainage, root rot becomes an unwanted houseguest.
- Use potting mix: it’s designed to be lighter and better draining than garden soil, which can compact in containers.
- Don’t rely on rocks at the bottom: the real win is drainage holes and the right mix, not a gravel myth that refuses to die.
- Water smart: containers dry out faster in heat and wind, so check moisture regularlyespecially in summer.
- Match plants by needs: group plants that like similar sun and water schedules.
Weatherproofing: how to keep your table leg from turning into a sponge
Outdoors is basically a reality TV show called “Survivor: Wood Edition.”
Sun, rain, temperature swings, and sprinklers will test your build. Here’s how to win:
- Seal end grain: the bottom cut end of the leg is where moisture enters fastestcoat it thoroughly.
- Choose an exterior-rated topcoat: finishes marketed for outdoor use often include added UV resistance and flexibility.
- Keep wood out of standing water: if the leg sits in a planter, consider a small plastic sleeve or a raised mount so it’s not constantly wet.
- Use corrosion-resistant fasteners: exterior screws help prevent rust stains on your pretty paint job.
Placement ideas that maximize smiles (and minimize complaints)
Where you put it matters. The sweet spot is visible enough to delight passersby, but not placed where it blocks walkways, sight lines, or the mail carrier’s will to live.
- Near the front walkway as a “hello” marker
- By the driveway entrance as a house-number totem
- In a garden bed as a vertical focal point among lower plants
- On a porch corner with a solar light topper for evening charm
Troubleshooting (because DIY is 10% building and 90% adjusting)
If it wobbles
Add weight (more gravel or concrete), widen the base (larger bucket or outer planter), or brace the leg inside with a small wood block before filling.
Also double-check that the leg is actually centered.
If the paint peels
That’s usually a prep issue: glossy wood without sanding, skipping primer, or rushing cure time. Sand back the loose areas, re-prime, repaint, and topcoat.
If your planter gets waterlogged
Add more drainage holes, switch to a better potting mix, and make sure the bucket isn’t sitting flat on the ground where holes get blocked.
Pot feet or risers can help.
If algae shows up on the bucket
It happens in shaded, damp spots. A mild scrub and a sunnier location can help. Also check overwatering.
Safety notes (quick, practical, and worth it)
- Wear eye protection when drilling.
- Use a dust mask when sanding or mixing concrete.
- Gloves are your friendconcrete is rough on skin.
- Let finishes cure fully before placing outdoors, especially in humid weather.
Conclusion: a tiny project with big curb-appeal energy
This table-leg-in-a-bucket DIY is proof that you don’t need a huge budget or a landscape architect to create something memorable.
With a few smart stepssolid anchoring, good outdoor protection, and a fun designyou’ll end up with whimsical garden art that makes neighbors smile
and quietly signals: “Yes, creativity lives here.”
Real-World Moments: of “This Is Why People Love It”
DIY projects can be technically “successful” and still feel kind of… blah. This one tends to do the opposite: it’s simple, but it sparks real reactions.
People who try a bucket-and-table-leg yard post often describe the same funny pattern. First, you build it thinking it’s just a cute weekend craft.
Then you put it out front, step back, and realize it somehow makes your house look friendlierlike it’s waving at pedestrians without being pushy.
One of the most common experiences is the double-take smile. Someone walks by, notices the tall little “totem,” slows down,
and you can practically see their brain go: “Is that a… table leg?” followed immediately by, “Okay, that’s adorable.”
It’s not a billboard. It’s not trying too hard. It’s just a small surprise that breaks the monotony of shrubs and siding.
Another thing people report is how it becomes a seasonal tradition. Once you have the base, swapping the topper is dangerously satisfying.
A simple “Hello Spring” sign turns into mini flag changes, ribbon updates, and holiday add-ons. Suddenly you’re the person with the little yard post that
changes outfits. (And yes, you will start keeping a small bin of “bucket-leg accessories.” You will also pretend you don’t.)
If you choose the planter version, there’s a practical perk too: it can make watering and plant care feel more rewarding because the whole display looks “done.”
Instead of a lonely pot sitting there, you’ve got a composed moment: flowers below, vertical interest above, and a clear focal point.
Even simple plantslike trailing petunias or hardy herbslook more intentional when they’re framed by a playful structure.
People also notice the conversation-starting effect. Neighbors who normally do the polite wave-only routine will comment:
“I love your bucket thing!” or “Where did you get that post?” or “Are you changing it for fall?”
It’s a small social bridgesomething cheerful and low-stakes to talk about that isn’t weather complaints or the price of eggs.
And finally, there’s the quiet satisfaction of making something that’s both silly and well-built. You’re not just decoratingyou’re engineering a tiny landmark.
When the leg stays straight through wind and rain, and the paint still looks good weeks later, it feels like winning a friendly battle against the outdoors.
The end result is equal parts humor and craftsmanship, and that combination is exactly why it makes people smile when they pass your house.





