Table of Contents >> Show >> Hide
- Before You Start: Pick the Border Style That Matches Your Yard (and Your Patience)
- Tools and Materials
- Step-by-Step: How to Build a Curved Brick Garden Border
- 1) Design the curve (the “hose test”)
- 2) Dry-lay bricks along the line to “preview” your curve
- 3) Estimate how many bricks you’ll need
- 4) Mark the final line and set a “finished height” goal
- 5) Dig a trench with consistent depth and straight-ish sides
- 6) Build a stable base (this is where long-lasting borders are born)
- 7) Set bricks in the trench and keep your curve smooth
- 8) Handling tight curves without turning your yard into a math problem
- 9) Lock it in: fill gaps, tamp, and re-check height
- 10) Backfill both sides and shape the finished grade
- Design Notes: What Makes a Curved Brick Border Look “Professional”
- Common Problems and How to Fix Them
- Cost and Time: A Practical Reality Check
- Experiences and Lessons from Real Builds (a.k.a. What DIYers Wish They Knew Earlier)
- Conclusion
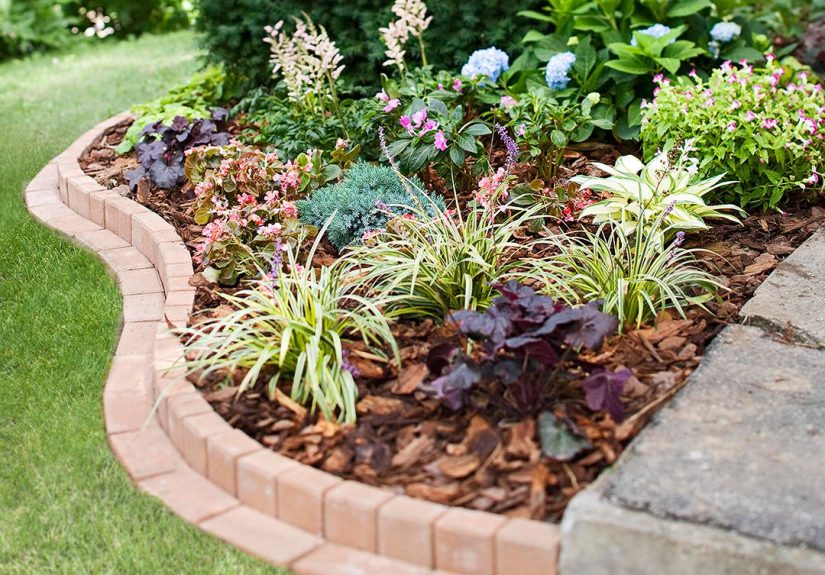
A curved brick garden border is the landscaping equivalent of a good haircut: it makes everything look sharper,
more intentional, and like you definitely have your life together (even if the garage says otherwise).
Done right, brick edging creates a clean line between lawn and beds, keeps mulch where it belongs, and makes mowing
less of a “guess and pray” situation.
This guide walks you through a durable, DIY-friendly method for building a smooth curved brick garden border
from shaping a graceful curve to setting a stable base, handling tight turns, and finishing so it stays tidy
through weather and foot traffic. We’ll also talk design choices (because curves are not all created equal),
common mistakes, and what experienced DIYers say they wish they’d known before brick #1.
Before You Start: Pick the Border Style That Matches Your Yard (and Your Patience)
“Curved brick border” can mean a few different builds. The best option depends on your soil, climate,
and whether you want your border to be mostly decorative or to behave like a mini retaining wall.
Three popular ways to set bricks
-
Flush “mowing strip” edging (most common): Bricks sit nearly level with the grass.
It looks crisp, and your mower glides along without chewing up bed edges. -
Slightly raised edging: The top of the brick sits about 1/2–1 inch above grade.
This helps keep mulch in and makes the border more visible (and less likely to be buried over time). -
Standing/vertical bricks: Bricks are set on edge like little soldiers. This looks classic
but needs a more stable trench and careful backfill so the bricks don’t lean like they’re tired.
For most garden beds, a flush or slightly raised border on a compacted base is the sweet spot:
durable, forgiving, and friendly to curves.
Tools and Materials
Tools
- Work gloves, eye protection (and a dust mask if cutting bricks)
- Garden hose or rope (for layout), marking paint (optional but handy)
- Shovel and/or flat spade; hand trowel
- Rubber mallet
- Hand tamper (or plate compactor for large runs)
- Level (a long level plus a torpedo level helps on curves)
- Measuring tape
- Stiff broom/brush for sweeping sand
-
For tight curves: masonry chisel and hammer, brick set, or a saw with a masonry/diamond blade
(follow tool instructions carefully)
Materials
- Clay pavers or brick pavers rated for outdoor, freeze-thaw conditions if applicable
- Paver base (crushed stone/aggregate) for stability and drainage (recommended)
- Leveling/bedding sand (coarse concrete sand is common for bedding)
- Joint sand or polymeric sand (for gaps, depending on design)
- Topsoil/mulch for the bed side; optional landscape fabric (use thoughtfully)
Safety and sanity note: Before digging, check for underground utilities and follow local guidance.
If you’re ever unsure, it’s worth slowing downrepairs are always harder than planning.
Step-by-Step: How to Build a Curved Brick Garden Border
1) Design the curve (the “hose test”)
Curves look best when they’re deliberate and repeatablethink “gentle river bend,” not “startled snake.”
Lay a garden hose (or rope) along the edge of the bed and adjust it until the line feels natural from multiple angles.
Walk the curve. Stand where people will usually view it (driveway, sidewalk, patio). Tweak until it looks right.
Pro tip: Avoid super-tight wiggles unless you’re okay with extra cutting. Bricks like curves,
but they prefer them with a little breathing room.
2) Dry-lay bricks along the line to “preview” your curve
Place bricks on the ground along your layout line. This does two things:
it helps you visualize spacing and shows where curves get tight enough to require adjustments.
Keep bricks close together but not jammed; small, consistent gaps are easier to fill later than random wide gaps.
How curves behave: On gentle curves, you can “fan” bricks slightly.
On tighter curves, you’ll often get small triangular gaps on the inside edge. That’s normaland solvable.
3) Estimate how many bricks you’ll need
Measure the total length of your border (a rope laid along the curve works well). Then divide by the “face width”
of the brick orientation you’re using (flat, standing, etc.). Add at least 10% for cuts, breakage,
and future repairs.
Example: If your border is 20 feet long (240 inches) and you’re placing bricks so each brick accounts
for about 8 inches of length, you’ll need roughly 240 ÷ 8 = 30 bricks. Add 10%: about 33 bricks.
(Always check your brick’s actual dimensionspavers vary.)
4) Mark the final line and set a “finished height” goal
Once you’re happy with the shape, mark it. You can use marking paint, or simply press the hose into the grass
and cut along it with a spade.
Decide where the top of the bricks will sit:
- Flush with grass: clean mowing edge, very subtle look
- 1/2–1 inch proud: more visible, better mulch control, helps if things settle over time
5) Dig a trench with consistent depth and straight-ish sides
Your trench should be wide enough to fit the brick plus a little working room (especially if you’ll be backfilling
both sides). The depth depends on your style and soil.
A solid rule for edging is: brick thickness + 1 inch bedding layer + 2–3 inches base (more base in soft soil
or freeze-thaw climates). If you’re building a flush edge, you want the finished top to align with your chosen grade.
As you dig, remove grass roots and organic material. Organic layers break down and cause settlingyour border will
slowly “wave” like it’s trying to get attention.
6) Build a stable base (this is where long-lasting borders are born)
If you skip the base, the border may look great for exactly one season… and then slowly drift out of alignment like
a shopping cart with a bad wheel.
-
Compact the subgrade: Tamp the trench bottom so it’s firm and even.
If the soil is very loose, moisten lightly (not muddy) and tamp again. -
Add paver base: Spread crushed stone/aggregate in thin lifts (layers), tamping as you go,
until you have roughly 2–3 inches of compacted base for typical beds. Use more base in soft soil or regions with
freeze-thaw cycles. -
Add bedding sand: Add a 1-inch layer of sand (up to about 1 1/2 inches if needed), then screed
it smooth and level. A consistent bedding layer helps bricks sit evenly without rocking.
Drainage matters: If the area holds water, consider slightly deepening the base and using a well-draining
aggregate. Borders fail faster when water sits in the trench and freezes, expands, and nudges bricks out of place.
7) Set bricks in the trench and keep your curve smooth
Start at a visible “anchor” area (like near a patio or walkway) and work toward less noticeable spots. Press each brick
into the bedding sand, then tap with a rubber mallet to set it. Check alignment frequently with a level.
On curves, don’t fight the curve. Let bricks rotate slightly so the line stays smooth. Stand back every few feet and
look along the borderyour eyes catch wobbles faster than any measuring tape.
8) Handling tight curves without turning your yard into a math problem
Tight curves are where many DIY borders go off the rails (or off the hose line). You have three good options:
-
Option A: Widen the curve (easiest). If your design allows, soften the curve so bricks fan out
without creating big triangular gaps. -
Option B: Use smaller units (easy + elegant). Smaller pavers/brick halves make curves smoother
with fewer gaps. -
Option C: Cut “keystone” bricks (cleanest finish). For triangular gaps that appear in tight curves,
mark a brick to fit the gap and cut it so it “keys” into place.
If you choose keystone cuts, mark the overlap points carefully, transfer the marks to the brick face, and cut along the lines.
Always follow tool safety guidance; masonry dust is not a souvenir you want to take home.
9) Lock it in: fill gaps, tamp, and re-check height
Once bricks are placed, fill gaps and joints:
-
For tight joints: sweep fine joint sand or polymeric sand into gaps.
Polymeric sand can help resist washout and weeds, but follow the product directions for wetting and curing. -
For wider decorative joints: some people use small gravel or stone dust, especially when aiming
for a more rustic look.
After sweeping sand into joints, tap bricks again with a mallet to settle them and pull more sand into the gaps.
Repeat until joints stay filled. Brush off excess so it doesn’t crust on the brick faces.
10) Backfill both sides and shape the finished grade
Backfill the lawn side with soil so the grass edge is supported and easy to mow along. Backfill the bed side with soil,
then add mulch. A gentle slope up into the bed looks clean and reduces mulch spillover.
If you’re mulching, a typical finished mulch layer is around 2–3 inches. Too thin and weeds party.
Too thick and plants can struggle (and mulch may creep over your shiny new bricks like it owns the place).
Design Notes: What Makes a Curved Brick Border Look “Professional”
Consistency beats perfection
A border can be slightly out-of-level and still look great if it’s consistent. What looks messy is random up-and-down
variation. Use your level often, but also use your eyes: sight down the line every few feet.
Choose a “reveal” and stick to it
Decide whether bricks will be flush or slightly raised, then maintain that height throughout. Mixed heights look accidental,
and not in a charming “storybook cottage” way.
Plan for maintenance
If you want a mower-friendly edge, flush bricks are great. If you want better mulch control, a slight reveal helps.
Either way, leave yourself access for weeding and edging.
Common Problems and How to Fix Them
The border is wavy
- Cause: uneven trench depth, inconsistent base compaction, or settling
-
Fix: lift the problem section, re-tamp the base, add or remove bedding sand,
and reset the bricks. (Annoying, yes. Effective, also yes.)
Bricks tip or lean
- Cause: insufficient embedment, weak backfill support, or soft soil
- Fix: deepen the trench slightly, add compacted base, and backfill firmly on both sides
Weeds show up between bricks
- Cause: wind-blown seeds + moisture + sunlight = tiny unwanted roommates
-
Fix: keep joints filled, consider polymeric sand for tighter joints, and spot-weed early
before roots establish.
Mulch spills onto the lawn
- Cause: border too low or bed grade slopes toward the lawn
- Fix: adjust bed-side grade, consider a slightly higher brick reveal, and re-mulch neatly
Cost and Time: A Practical Reality Check
Most DIY curved brick borders can be completed over a weekend for a typical garden bed, especially if you’re not cutting many bricks.
The “time sink” is almost always trenching and base prep. But that’s also what makes the border lastso think of it as
investing sweat equity in your future free time.
Experiences and Lessons from Real Builds (a.k.a. What DIYers Wish They Knew Earlier)
The internet loves a “finished photo,” but the real magic is what happens between “nice curve!” and “why is this brick
suddenly taller than its neighbors?” Here are the most common real-world lessons people report after building curved brick borders
the kind of practical stuff you only learn after you’ve reset the same three bricks four times.
Lesson 1: The curve looks different when you stand up
Many first-time builders lay out a curve while crouching, then stand up and realize the line looks oddly lumpy from eye level.
A great habit is to adjust the hose line, then step back 10–15 feet and look again. Do it from at least two angles
(front walk and driveway, for example). Curves that look smooth close-up can look like a “zig-zag pretending to be a curve” at distance.
The fix is usually simple: make the curve slightly broader and remove sudden direction changes.
Lesson 2: Most “brick problems” are actually “base problems”
When a border settles, tips, or goes wavy, people often blame the brick. But bricks are basically the messengers.
The real culprit is usually inconsistent trench depth or uneven compaction.
DIYers who tamp carefully (and add base in small layers) almost always report a sturdier, longer-lasting result.
One small trick: after you tamp the base, set a few bricks in place and walk along them gentlyif anything rocks,
you’ve found a low spot before it becomes a permanent personality trait of your border.
Lesson 3: Tight curves are a design decision, not a requirement
People often feel “locked in” to a tight curve because that’s how the bed currently looks. But you can reshape a bed edge slightly
while still keeping the bed’s size and purpose. In practice, DIYers who soften the curve report less cutting,
cleaner joints, and a more professional look. If a tight curve is important (like wrapping around a tree), smaller bricks or
brick halves can make the curve look smoother without turning you into a full-time masonry apprentice.
Lesson 4: Cutting bricks is easier when you cut fewer bricks
When people do need to cut, they often try to cut every brick in a tight curve. That’s a lot of work and can make the curve look
overly “engineered.” A more relaxed approach many DIYers prefer: cut only the “keystone” bricks needed to close the biggest triangular
gaps, and let smaller gaps be filled with jointing material. This balances clean appearance with reasonable effortand keeps your Saturday
from becoming “The Day I Learned 400 New Words.”
Lesson 5: The finishing steps matter more than you think
A border may look done once the bricks are set, but experienced builders swear the true “lock-in” is the finish:
sweeping joint material in thoroughly, tapping bricks again, topping up joints, and then backfilling firmly on both sides.
People who skip the second round of joint filling often notice the joints settle after the first rain.
On the flip side, those who take 20 extra minutes to re-sweep and re-tamp usually get a border that stays crisp longer
and resists weed intrusion better.
The overall theme from real builds is surprisingly comforting: you don’t need perfectionyou need consistency, a stable base,
and a curve you actually like when you’re standing up with a coffee, admiring your yard like a very proud suburban monarch.
Conclusion
Building a curved brick garden border is one of those projects that looks fancy but is absolutely doable with careful layout
and solid base prep. If you remember just three things, make them these: shape the curve before you dig,
build a stable base, and finish joints/backfill thoroughly. Do that, and your border will stay neat,
keep mulch in place, and make mowing easierwhile quietly upgrading your whole landscape like it just got a glow-up.