Table of Contents >> Show >> Hide
- First: Choose the Right Cut (Because Pork Is Not One-Size-Fits-All)
- How to Shop for Pork Like You Know What You’re Doing
- The Secret Weapon: A Thermometer (Because Time Lies)
- Seasoning Roast Pork: Big Flavor Without a Complicated Life
- Prep Steps That Make a Noticeable Difference
- How to Cook Perfect Roast Pork: Two Foolproof Paths
- How to Get Crispy Crackling (Without Crying Into Your Roasting Pan)
- Carving and Serving: Make Your Roast Look Intentional
- Troubleshooting: Fix the Usual Roast Pork Problems
- Conclusion: Your Perfect Roast Pork Formula
- Roast Pork “Experience Notes” from Real Kitchens (So Yours Goes Smoother)
Roast pork is one of the great kitchen magic tricks: you start with a plain-looking slab of meat, apply a little science and a little swagger, and end up with a dinner that makes people speak in compliments instead of full sentences.
But “roast pork” is also a sneaky phrase. A pork loin roast is lean and wants gentle treatment. A pork shoulder roast is fatty and practically begs for an all-day spa. Add skin-on crackling to the mix and suddenly your oven is auditioning for a role in an action movie.
This guide breaks it all downhow to choose the right cut, how to season it for maximum flavor, and how to cook it so it lands on the table juicy, tender, and confidently not-dry.
First: Choose the Right Cut (Because Pork Is Not One-Size-Fits-All)
Pork Loin Roast: Best for Sliceable, “Classic” Roast Pork
Use it when: you want neat slices, quick-ish cook time, and a roast that pairs beautifully with apples, mustard, herbs, or a pan sauce that makes you feel fancy.
- Texture: lean, mild, tender when cooked correctly
- Watch-out: overcooks easily (it goes from juicy to “why is this so… educational?” fast)
- Shopping tip: look for a little marbling and, if possible, a decent fat capfat is flavor insurance
Pork Tenderloin: Great, But Not the Same as “Roast Pork”
Tenderloin is long, narrow, and very leanmore like the pork equivalent of a steak than a big roast. You can roast it, but it’s a different experience: quick cook time, very easy to dry out, and best when served slightly blushing and sliced.
Pork Shoulder (Boston Butt or Picnic): Best for Fall-Apart Tender Pork
Use it when: you want deep flavor, forgiving cooking, and a roast that can be sliced or shredded depending on how far you take it.
- Texture: rich, juicy, collagen-y (translation: becomes incredibly tender with time)
- Best cooking style: low and slow
- Bonus: shoulder is one of the most forgiving cutsgreat for building confidence
Fresh Ham (Uncured Leg): Best for Big Gatherings
This is the whole hind leg (not cured like holiday ham). It’s impressive, feeds a crowd, and tastes incrediblebut it’s a larger project. If you’re cooking for a party and want a “wow” centerpiece that isn’t turkey, fresh ham is a strong play.
Skin-On Cuts (for Crackling): Your Ticket to Crispy Glory
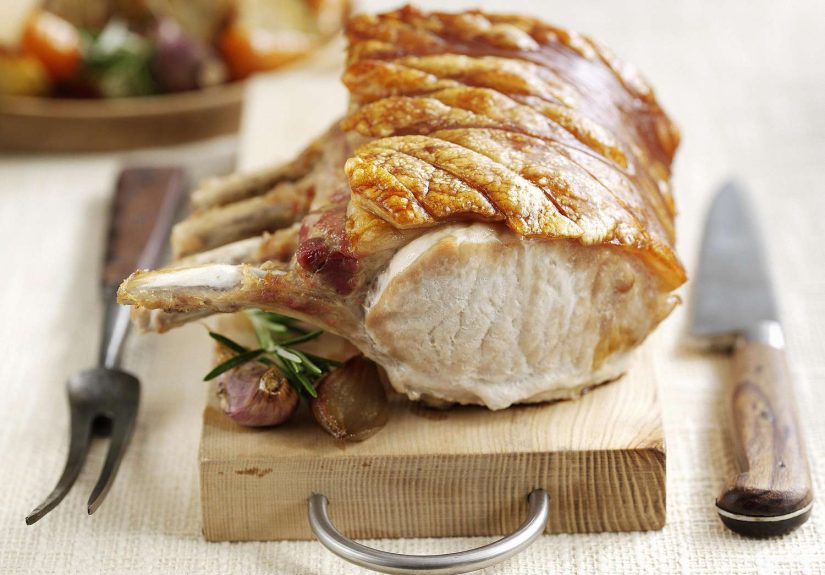
If your dream includes that blistered, shattering pork crackling, you’ll want a cut with skin onoften picnic shoulder, belly, or certain loin roasts depending on what your butcher carries. Crackling is less about luck and more about dryness + salt + high heat at the right moment.
How to Shop for Pork Like You Know What You’re Doing
Look for Color, Texture, and Marbling
- Color: pork should be pink to pale red (not gray, not neon).
- Texture: firm, not slimy, not wet-looking in a suspicious way.
- Marbling: thin streaks of fat inside the meat help keep it juicy and flavorful.
Bone-In vs. Boneless
Bone-in: often a bit more flavorful and can cook slightly more evenly (bone acts like a gentle heat buffer). It can also look dramatic on a platter, which is never a bad thing.
Boneless: easier to carve and often more uniform. Great choice for weeknights and for anyone who enjoys fewer surprises.
Check the Label for “Enhanced” or “Solution Added”
Some pork is “enhanced,” meaning it’s been injected with a salt solution for moisture. This can be convenient, but it affects seasoning: if the label mentions a solution or added sodium, go lighter on salt and taste your pan juices before salting sauces.
The Secret Weapon: A Thermometer (Because Time Lies)
If you only take one thing from this article, make it this: cook roast pork to temperature, not to minutes-per-pound.
- Whole cuts (loin, tenderloin, fresh ham): cook to 145°F, then rest.
- Ground pork: cook to 160°F.
- Shoulder for shredding: keep going until it’s in the 195°F–203°F neighborhood for that pull-apart texture.
Why the range? Because “done” is two things: safety (minimum temp) and texture (how tender you want it). Shoulder can be safe earlier, but it isn’t truly luxurious until the connective tissue melts.
Seasoning Roast Pork: Big Flavor Without a Complicated Life
Dry Brine = Juicier Meat + Better Browning
A dry brine is simply salting the pork ahead of time and letting it rest uncovered in the fridge. This helps the meat hold onto moisture and makes the surface driermeaning it browns better.
- For loin/tenderloin: 8–24 hours is great (even 45–60 minutes helps).
- For bigger roasts (shoulder/fresh ham): 24–48 hours is even better if you can manage it.
Basic dry brine ratio: Season all sides with kosher salt until it looks evenly dusted (not buried). Add black pepper and any of the following:
- garlic powder or grated garlic
- rosemary, thyme, sage
- smoked paprika
- mustard powder
- brown sugar (especially good on shoulder)
- lemon or orange zest for brightness
Want Crackling? Dry the Skin Like It Owes You Money
For crispy skin, moisture is the enemy. Pat the skin dry, score it (more on that soon), then leave the roast uncovered in the fridge overnight if possible. Salt helps pull out moisture. Dry air does the rest.
Prep Steps That Make a Noticeable Difference
1) Tie It (Especially Loin)
Butcher’s twine helps a roast cook more evenly. A loin roast can be slightly uneven in thickness; tying keeps it compact so you don’t end up with “one end perfect, one end apologizing.”
2) Score the Fat (and Skin, If You Have It)
Use a sharp knife to make shallow cuts in a crosshatch pattern.
- Fat cap: score about 1/4-inch deepdon’t slice into the meat.
- Skin-on: score the skin deeper than the fat, but still avoid the meat. This gives rendered fat a place to escape and helps the skin blister into crackling.
3) Let It Warm Slightly (Briefly)
Taking the chill off helps cooking go more evenly. Set the roast out just long enough to lose the refrigerator edgethen get it cooking. (You don’t need it to become “room temperature roommates” with your countertop.)
How to Cook Perfect Roast Pork: Two Foolproof Paths
Path A: Sliceable Roast (Pork Loin Roast)
Best for: juicy slices, weeknight-worthy elegance, “this looks harder than it was.”
Step-by-step
- Preheat the oven: 350°F to 375°F.
- Sear for flavor (optional but excellent): In an oven-safe skillet, sear the roast in a little oil over medium-high heat until browned on all sides (about 2–3 minutes per side).
- Add aromatics (optional): Toss garlic cloves, onion wedges, or apples into the pan around the roast.
- Roast: Put it in the oven and cook until the thickest part hits 145°F.
- Rest: Tent loosely with foil and rest 10–15 minutes.
- Slice: Cut against the grain into 1/2-inch slices.
Timing guide (use as a starting estimate): Many loin roasts take roughly 20–25 minutes per pound in the 350°F–375°F range, but your oven, your pan, and your roast shape will all have opinions. The thermometer gets the final vote.
Quick pan sauce (high reward, low effort)
After removing the roast, pour off excess fat, then:
- add 1/2 cup broth (or apple cider),
- scrape up browned bits,
- stir in 1–2 teaspoons Dijon,
- finish with a pat of butter or a splash of cream.
Path B: Fall-Apart Roast (Pork Shoulder)
Best for: deeply flavorful pork that’s sliceable at first, shred-able if you keep going, and almost impossible to ruin.
Step-by-step
- Preheat the oven: 275°F to 325°F (lower is slower and gentler).
- Season generously: Shoulder is big and bold; it needs big and bold seasoning.
- Optional sear: Brown it on all sides for extra flavor.
- Roast covered, then uncovered: Start covered (foil or a lid) for moisture; uncover for the last 30–60 minutes to deepen browning.
- Cook to tenderness: For sliceable-but-tender, aim around 180°F+. For pulled pork texture, aim for 195°F–203°F.
- Rest: Rest 20–45 minutes. (Yes, really. The roast earned it.)
Doneness clue: When a shoulder is truly ready for shredding, it feels less like “meat resisting” and more like “meat politely getting out of the way.” A bone-in shoulder may have a bone that wiggles free easilynature’s doneness pop-up timer.
How to Get Crispy Crackling (Without Crying Into Your Roasting Pan)
The 3 Rules of Crackling
- Dry skin: Pat it dry, then refrigerate uncovered overnight if possible.
- Salt: Salt draws out moisture and helps blister the skin.
- Heat: High heat at the right time creates the bubbly, crisp texture.
A Reliable Crackling Method
- Score the skin: Shallow cuts, evenly spaced.
- Dry-brine uncovered: Salt the skin and chill uncovered overnight.
- Start hot: Roast at 450°F for 20–30 minutes to kick-start blistering.
- Finish moderate: Lower to 325°F–350°F and cook until the meat reaches your target temperature.
- If needed, re-crisp: If the meat is done but the skin isn’t crackling, you can blast it again brieflywatch closely so it doesn’t burn.
Important: Crackling fails are usually moisture-related. If the skin looks wet while roasting, it’s basically steaming, not crisping. Dry fridge time is the difference between “crispy” and “sadly chewy.”
Carving and Serving: Make Your Roast Look Intentional
Slice Against the Grain
Muscle fibers run in lines. Cutting across them shortens the fibers, which makes each bite feel more tender. This matters most for loin and fresh ham.
Rest Before You Slice
Resting isn’t a trend; it’s physics. During the rest, juices redistribute and the roast becomes easier to slice neatly.
Serve With Something That Loves Pork Back
- Sweet-tangy: apple compote, cranberry relish, citrus glaze
- Sharp and creamy: mustard cream sauce, horseradish
- Herby and bright: chimichurri, salsa verde
- Roasty sides: potatoes, carrots, Brussels sprouts
Troubleshooting: Fix the Usual Roast Pork Problems
“My pork is dry.”
- You likely cooked a lean cut too far past 145°F.
- Next time: dry brine + thermometer + pull earlier + rest.
- Tonight: slice thin and serve with a sauce (mustard pan sauce, gravy, or even warmed broth with butter).
“It’s tough, not tender.”
- If it’s shoulder: it probably needs more time. Collagen hasn’t fully broken down yet.
- Keep roasting until it’s tender (often closer to 195°F–203°F for shredding).
“My crackling didn’t crackle.”
- Skin wasn’t dry enough or oven didn’t get hot enough at the right moment.
- Next time: uncovered fridge rest + very dry skin + hot start.
“The outside is done, but the middle isn’t.”
- Oven temp may be too high for the roast size, or the roast shape is uneven.
- Next time: tie the roast and consider a slightly lower oven temp for more even cooking.
Conclusion: Your Perfect Roast Pork Formula
Perfect roast pork isn’t about secret ingredients or owning a $300 pan blessed by culinary monks. It’s about choosing the right cut for the job, salting ahead of time when you can, and cooking to the correct internal temperature.
If you want sliceable and quick: pork loin + dry brine + roast to 145°F + rest.
If you want tender and forgiving: pork shoulder + low-and-slow + cook until the texture is dreamy.
If you want crackling: dry skin + salt + strategic high heat.
Do those things, and roast pork stops being a gamble and starts being a reliable way to make your kitchen smell like you have your life together (even if you ate cereal for lunch).
Roast Pork “Experience Notes” from Real Kitchens (So Yours Goes Smoother)
Most people’s roast pork journey has a few predictable chapterslike a sitcom, but with more garlic. Here are the common “experiences” home cooks run into, plus what they tend to learn from them.
Experience #1: The “Minutes-Per-Pound Betrayal.” You follow a cooking chart, set a timer, and confidently pull your roast… only to realize the middle is underdone or the edges are overcooked. It’s frustrating, but it’s also the moment you discover the cooking truth: ovens vary, pans vary, roasts vary, and time is only a guess. The win that comes from this is bigonce you start relying on a thermometer, roast pork becomes dramatically less stressful. Instead of staring through the oven door like you’re watching a suspense film, you check the temperature and make calm, rational decisions (or at least calmer ones).
Experience #2: The “Dry Loin” Lesson. Many cooks have one early pork loin roast that comes out a little dryusually because they aimed for an old-school “well done” temperature. The next time, they pull it closer to 145°F and let it rest, and suddenly pork tastes like pork is supposed to taste: juicy, tender, and worth the effort. This is also where people often fall in love with dry brining. Salting ahead feels like cheating because it’s so easy, but it’s one of the simplest ways to improve flavor and texture without changing your whole routine.
Experience #3: The Crackling Heartbreak (and Redemption). The first time someone tries for crispy crackling, it often turns out… chewy. Not terrible, just not that glorious shatter you imagined. The usual culprit is moisture: skin that wasn’t dried enough, or salt that didn’t have time to do its job. Then comes the redemption arc: an overnight uncovered rest in the fridge, a truly thorough pat-down with paper towels, and a hot blast at the start (or end) of roasting. When it works, it feels like you unlocked a new achievement. People start “casually” mentioning it at dinner like they didn’t practice in secret.
Experience #4: The Shoulder That “Isn’t Done” Even Though It’s Hot. Pork shoulder teaches the difference between temperature and tenderness. A shoulder can be technically cooked but still feel firm and slice-resistant because the connective tissue hasn’t fully broken down. Many cooks learn that the solution isn’t panicit’s time. Low and slow is less about being fancy and more about letting collagen turn into that rich, silky texture that makes shoulder so satisfying. Once you experience a shoulder roast that’s truly tender, you start planning leftovers on purpose: tacos, sandwiches, fried rice, pastasuddenly your fridge feels like a gift.
Experience #5: The “Resting Is Real” Conversion. There’s a moment when a cook slices too early and watches juices run across the cutting board like a tiny, delicious tragedy. The next time, they rest the roast, slice it, and notice the difference: cleaner slices, juicier bites, better texture. That’s when resting stops feeling optional and starts feeling like part of the recipe. (Also, resting time is perfect for finishing sides or whisking together a quick sauceso it’s not “waiting,” it’s “strategic multitasking.”)
The best part of these experiences is that they don’t require fancy equipment or culinary school. They’re simply the normal learning curve of roasting pork. Once you’ve had a couple of roasts under your beltand you start cooking by temperature, not by hopeyou’ll find that “perfect roast pork” isn’t rare. It’s repeatable.




