Table of Contents >> Show >> Hide
- What Are Text Animations in PowerPoint?
- How to Add a Basic Text Animation
- How to Animate Bullet Points One Line at a Time
- Fine-Tuning Animations with the Animation Pane
- How to Add Multiple Animations to the Same Text
- Copying Animations with Animation Painter
- Best Practices: Make Animations Look Professional, Not Distracting
- Real-World Examples of Effective Text Animations
- Troubleshooting Common Animation Problems
- Hands-On Experiences: What You Learn After Animating Dozens of Decks
- Final Thoughts
If you’ve ever watched a slide deck where every bullet point dramatically flew in from a different corner of the screen, you already know:
text animations in Microsoft PowerPoint can either make your presentation shine… or make your audience seasick.
Used well, PowerPoint text animations help you control pacing, highlight key ideas, and keep people focused on what matters. Used poorly, they’re
like glitter in a fan factoryeverywhere, distracting, and hard to clean up. This guide walks you through exactly how to add text animations in
Microsoft PowerPoint, how to control them with the Animation Pane, and how to avoid the classic “Vegas slide” mistake.
What Are Text Animations in PowerPoint?
In PowerPoint, text animations are visual effects that control how your words appear, move, and disappear on a slide. Microsoft
groups animations into four main categories: Entrance, Emphasis, Exit, and Motion Paths.
- Entrance: Controls how text appears on the slide (for example, Appear, Fade, Fly In).
- Emphasis: Makes text already on the slide do something attention-grabbing, like Pulse or Spin.
- Exit: Controls how text leaves the slide (such as Fade Out or Fly Out).
- Motion Paths: Allows you to move text along a line or custom path, guiding the viewer’s eyes to specific areas.
For most everyday business, school, or workshop slides, you’ll live mainly in the Entrance and maybe a touch of Emphasis and Exit. Motion paths
are great when you want to narrate a process or show a step-by-step progression.
How to Add a Basic Text Animation
Let’s start with the core workflow. The steps are very similar across recent versions of PowerPoint (Microsoft 365, PowerPoint 2019, 2021, and
newer).
Step 1: Select the Text You Want to Animate
On your slide, click the text box that contains the text you want to animate. PowerPoint treats the entire text box as a single
object, so any animation you apply is attached to that box.
Step 2: Go to the Animations Tab
At the top of the window, select the Animations tab. This is mission control for all animation settings. You’ll see:
- An animation gallery (Appear, Fade, Fly In, etc.).
- The Add Animation button.
- The Animation Pane button.
- Timing options like Start, Duration, and Delay.
Step 3: Choose an Animation Effect
With your text box selected, click one of the preset options in the animation gallery. Entrance effects (like Appear, Fade, Fly In) are usually
the most useful and least annoying. PowerPoint previews the animation automatically when you click it.
If you don’t see what you like, click More at the bottom of the gallery to access extra effects.
Step 4: Customize with Effect Options
Many animations include extra settings under Effect Options. For example:
- Fly In: Choose a direction (from bottom, top, left, right).
- Wipe: Choose whether the text wipes in from left to right, bottom to top, etc.
- Zoom: Decide how the text scales onto the slide.
These small tweaks make your animation feel intentional instead of random. For instance, if your bullet points are aligned on the left, having
them Fly In from Left can feel natural, as if they’re sliding in from the margin.
How to Animate Bullet Points One Line at a Time
One of the most powerful ways to use text animations is to reveal bullet points one line at a time as you speak, instead of
dumping an entire list on the screen.
PowerPoint has a handy setting called By Paragraph that lets each bullet appear separately.
- Select the text box that contains your bullet list.
- On the Animations tab, choose an Entrance effect, such as Appear, Fade, or Fly In.
- Click Effect Options.
- Choose By Paragraph instead of All at Once.
Now, each bullet point will appear one by oneusually on mouse clicks, unless you change the timing settings. This is perfect when you want to:
- Make sure the audience listens to what you’re saying now, not reading ahead.
- Build suspense (yes, even in a quarterly business review).
- Walk through a process or list step-by-step.
Fine-Tuning Animations with the Animation Pane
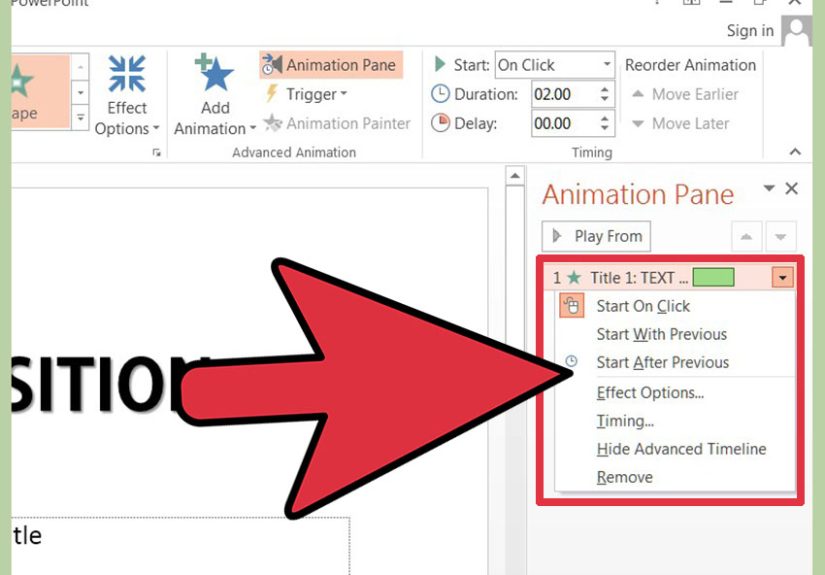
Once you start using more than a couple of animations, the Animation Pane becomes your best friend. It shows you a list of all
animations on the slide and lets you tweak the order, timing, and triggers.
How to Open the Animation Pane
- Click the Animations tab.
- In the Advanced Animation group, click Animation Pane.
A pane will open on the right side of your screen, listing each animation effect in order. Each item is usually numbered (1, 2, 3…) to match the
labels you see directly on your slide.
Reordering and Grouping Animations
From the Animation Pane, you can:
- Drag animations up or down to change the order in which they play.
- Use Move Earlier or Move Later on the ribbon to reorder.
- Select multiple effects and adjust them together (great when animating several bullet lists consistently).
If your slide feels chaotic, the Animation Pane is where you go to restore order and sanity.
Controlling When Animations Start
Each animation can start in one of three ways:
- On Click: Plays when you click the mouse. Good for pacing your talking points.
- With Previous: Plays at the same time as the previous animation or slide transition.
- After Previous: Plays automatically right after the previous animation finishes.
You can also adjust Duration (how long the animation takes) and Delay (how long PowerPoint waits before
starting the effect). This is how you get those smooth “bullet appears, then a subtle emphasis highlight” sequences without frantic clicking.
How to Add Multiple Animations to the Same Text
Sometimes you want text to do more than one thingmaybe it fades in, then later fades out, or appears and then briefly pulses for emphasis.
That’s where Add Animation comes in.
- Select the text box you want to animate.
- On the Animations tab, choose the first effect (e.g., Fade Entrance).
- With the text box still selected, click Add Animation (do NOT just pick another effect from the main gallery or it will replace the first one).
- Choose a second effect (for example, an Exit effect or an Emphasis effect like Pulse).
In the Animation Pane, you’ll see multiple entries for the same text box. You can adjust their order, start options, and timing independently.
This is useful for:
- Having text appear, stay on screen while you talk, then exit cleanly.
- Adding a subtle emphasis “pulse” when you reach a critical point in your narrative.
- Choreographing a sequence where different lines of text move along motion paths at different moments.
Copying Animations with Animation Painter
Once you’ve crafted the perfect animation on one text box, you don’t need to rebuild it from scratch on others. Use Animation Painter
to copy animation settings.
- Select the animated text box whose effects you like.
- On the Animations tab, click Animation Painter.
- Click another text box to apply the same animation sequence.
It’s like format painter, but instead of copying fonts and colors, you’re copying animation behavior. Your slides will instantly look more consistent.
Best Practices: Make Animations Look Professional, Not Distracting
Animation is powerful, but the goal is to support your storynot to audition for a cartoon studio. Presentation experts recommend focusing on
clarity and subtlety.
- Keep it simple: Stick to a small set of effects (like Fade and Appear) throughout the presentation.
- Be consistent: Use the same animation style for similar objectse.g., all bullet lists use the same Entrance effect.
- Use animation to add meaning: Reveal only the point you’re talking about. Use emphasis animations to draw attention to
crucial data or key phrases. - Don’t overdo the timing: Avoid very slow or very fast animations. They should feel smooth, not sluggish or jittery.
- Limit motion paths: Save complex movements for special cases where motion genuinely helps explain something.
- Always preview: Run through your slide show to see how animations feel when presented at full speed.
Real-World Examples of Effective Text Animations
Here are a few ways PowerPoint text animations shine in everyday scenarios:
-
Project updates: Use a simple Fade entrance on bullets, by paragraph, to walk your team through milestones one at
a time. - Training sessions: Build definitions or instructions step-by-step so learners can follow along without information overload.
-
Sales pitches: Emphasize the key benefit with a gentle Pulse or Bold emphasis animation to visually reinforce
your main promise. -
Data storytelling: Combine text animations with chart animations, revealing labels and key takeaways right when a chart finishes
animating into place.
Troubleshooting Common Animation Problems
Even experienced PowerPoint users occasionally run into “Why is my text doing that?” moments. Here are some quick fixes:
-
All bullets appear at once: Check Effect Options and ensure By Paragraph is selected for
lists. - New animations keep replacing old ones: Use Add Animation, not the main gallery, when adding a second or third effect.
- Animations feel out of order: Open the Animation Pane and reorder effects by dragging or using Move Earlier / Move Later.
-
Too many clicks during the presentation: Change some items from On Click to With Previous or
After Previous so several elements animate together or automatically. -
Animations not playing in Slide Show: Make sure you’re in Slide Show mode; animations do not fully play in
normal editing view.
Hands-On Experiences: What You Learn After Animating Dozens of Decks
After you’ve built a few dozen animated PowerPoint deckswhether for work, school, or that one friend who insists on animating every wordyou start
to pick up patterns about what actually works in the real world.
The first lesson is that your audience’s attention span is limited. When you’re new to text animations, it’s tempting to try
everything: bounce, swivel, zoom, boomerang, and a motion path that looks like a roller coaster. In practice, what people appreciate most is
clarity. A clean Fade entrance that reveals one bullet at a time often beats a flashy combination of effects.
The second lesson is that timing matters as much as the effect itself. If a bullet appears too early, your audience reads ahead.
If it appears too late, you end up talking to a blank slide while everyone waits. Many presenters have found that setting short, consistent
delays (for example, 0.25–0.5 seconds) and using On Click or After Previous thoughtfully creates a rhythm that feels natural.
You’re essentially choreographing a conversation between your slides and your speech.
Third, you quickly discover the value of animation patterns. Instead of deciding randomly on each slide, you choose a “house style”:
maybe all section titles Fade in, all bullet lists Appear by paragraph, and any “key message” text box gets a subtle Pulse
when you want to emphasize it. When you reuse this pattern across multiple decks, your presentations feel polished and cohesive. It also saves
timefewer micro-decisions means faster slide building.
Another real-world insight: test your animations on the actual presentation hardware. What looks smooth on your powerful laptop
can lag slightly on an older conference room PC or a shared meeting room computer. Complex motion paths and long lists of layered animations
are more likely to stutter. Many presenters adapt by simplifying effects for big events and focusing on entrance and emphasis, which tend to
render more reliably.
Collaboration brings its own lessons. When multiple people work on the same deck, it’s easy for someone to accidentally ungroup objects or
replace carefully tuned animations with their own choices. That’s why teams often agree on simple guidelines: stick to a small set of approved
effects, avoid motion paths unless necessary, and use Animation Painter to keep styles consistent. A quick run-through of the
Animation Pane before presenting helps catch any surprises.
Finally, there’s the personal comfort factor. If you feel nervous in front of an audience, animations can either help or hurt. They help when
they act like a scripteach click reveals the next point you want to talk about. They hurt when there are so many timed animations that you feel
like you’re chasing the slide instead of leading the room. After some experience, most presenters lean toward a “less but better” philosophy:
a few well-timed text animations that match your speaking style and give you confidence, instead of a complex sequence that you’re afraid to
disrupt.
In short, the real-world experience of adding text animations in Microsoft PowerPoint boils down to this: start simple, build a consistent pattern,
test your deck, and let the animations serve your messagenot overshadow it. When you do that, your slides stop feeling like static billboards
and start feeling like a conversation.
Final Thoughts
Learning how to add text animations in Microsoft PowerPoint isn’t about memorizing every effect in the gallery. It’s about using a small set of
toolsEntrance, Emphasis, Exit, and Motion Pathsplus the Animation Pane and a few smart timing choices to guide your audience through your story.
Start with basic effects like Fade and Appear, reveal bullet points by paragraph, fine-tune timing, and keep your animations
consistent across slides. Do that, and your deck will feel polished, professional, and just animated enough to keep people engagedwithout making
anyone reach for motion-sickness tablets.