Table of Contents >> Show >> Hide
- Step 1: Plan Like a Beekeeper (Not Like a Person Who Buys Hobbies at Midnight)
- Step 2: Pick the Perfect Hive Spot (Your Bees Want Comfort, Not Chaos)
- Step 3: Buy the Right Gear (Because “Winging It” Is Already the Bees’ Job)
- Step 4: Get Bees and Install Them the Smart Way
- Step 5: Keep Your Hive Healthy (And Your Neighbors Happy)
- Beginner Troubleshooting: “Is This Normal?” (Often Yes, Sometimes No)
- Real-Life Lessons From New Backyard Beekeepers (The Part Nobody Warns You About)
- Conclusion: Your Backyard Can Be a Bee-Friendly Success Story
Starting a backyard beehive is a little like adopting a tiny, winged farm. They’re productive, opinionated, and will absolutely let you know if you forgot
to refill the water. The good news? You don’t need a huge property or a pioneer spirit to become a beekeeperyou need a smart setup, a calm plan, and a
willingness to learn as you go.
This guide breaks it down into 5 simple steps that actually work in real American backyardswhether you live in the suburbs, a rural
neighborhood, or a city with an HOA that side-eyes anything more exciting than a bird feeder. We’ll keep it practical, safety-first, and beginner-friendly,
with a few laughs along the way (because bees do not care if you’re having a bad hair day).
Quick safety note: If you have a history of severe allergic reactions to insect stings, talk with a healthcare professional before keeping bees. If you’re under 18, do this with a parent/guardianbees are awesome, but they aren’t a “surprise project.”
Step 1: Plan Like a Beekeeper (Not Like a Person Who Buys Hobbies at Midnight)
Before you buy a hive, you’re going to buy yourself a little peace of mind: a plan. New beekeepers tend to fail for one of two reasons:
they start too late (spring arrives and they’re still “researching”), or they start too randomly (they bought bees before
they had a place to put them). Let’s dodge both.
1) Check your local rules (yes, really)
Beekeeping regulations vary by city, county, and state. Some places allow backyard hives with simple guidelines (like setbacks from property lines, a water
source, or a flyway barrier), while others require registration through state agriculture programs or inspections. If you have an HOA, read the fine print.
“No livestock” sometimes includes bees, and sometimes… doesn’t. It’s better to know now than to have your first honey harvest replaced with a strongly worded letter.
2) Budget your startup costs and time
Backyard beekeeping can be affordable, but it’s not free. A typical first-year setup often includes:
- Hive equipment (boxes, frames, foundation, bottom board, inner cover, outer cover)
- Protective gear (at minimum: veil; often: gloves and jacket/suit)
- Tools (hive tool, smoker, brush)
- Bees (a nucleus colony “nuc” or a package)
- Feeding/management basics (a feeder, sugar for syrup, and a plan for mite monitoring)
Time-wise, think in short, regular check-ins rather than marathon sessions. During active season, many beginners inspect every 7–14 days (more often early on
when learning). You’ll also spend time reading, watching local weather, and casually pointing at flowers like a person who has become 40% pollination.
3) Get education and a mentor before your bees arrive
The fastest shortcut in beekeeping is other beekeepers. Join a local beekeeping association, take a beginner class, or find a mentor who can answer the
questions you don’t even know how to Google yet (like, “Is that normal?”which you will say often). Mentors also help you identify problems early: queen issues,
diseases, swarming risk, and the big onemites.
Step 2: Pick the Perfect Hive Spot (Your Bees Want Comfort, Not Chaos)
Where you place your hive matters more than most beginners expect. A good location makes management easier, reduces conflicts with neighbors, and helps the colony
grow strong. A bad location creates stress for you and the beesand stressed bees are basically tiny flying complaint forms.
What the “ideal” backyard hive site looks like
- Morning sun to get the bees flying earlier and drying out overnight moisture
- Some wind protection (fence, hedge, or natural barrier) so the hive isn’t blasted like a windsock
- Dry, level ground with good drainage (avoid low soggy spots)
- Easy access for you (you will not want to carry boxes of honey uphill in July)
- Clear flight path that doesn’t aim directly at a walkway, patio, or neighbor’s favorite sitting spot
Use a “flyway barrier” to keep peace with neighbors
If you’re in a tight neighborhood, a simple trick is to encourage bees to fly up and out over people’s heads. A fence or dense shrubs placed in front of the
hive entrance can help push the flight path upward quickly. This reduces the chance of bees bumping into humans, dogs, mail carriers, and anyone who was just
trying to take out the trash without being judged by insects.
Provide water (so your bees don’t “adopt” your neighbor’s pool)
Bees need water for cooling the hive and thinning honey stores. Many reputable extension programs recommend keeping a water source close to the hive so bees
“learn” it early and stop scouting your neighbor’s birdbath or swimming pool. Use a shallow container with landing spots (rocks, corks, pebbles, floats), because
bees can drown in open water.
Example water setup: A plant saucer or shallow tub placed near the hive, filled with water and a layer of pebbles. Refresh it regularly so it
doesn’t turn into a mosquito hotel.
How many hives should you start with?
Many beginners start with one hive to keep costs manageable. Some beekeepers recommend starting with two hives because it
makes comparisons easier (brood pattern, strength, queen performance). Either can work. If you start with one, a mentor becomes even more helpful because you can’t
compare your hive to a “healthy baseline” next door.
Step 3: Buy the Right Gear (Because “Winging It” Is Already the Bees’ Job)
The right equipment keeps you safe, keeps the bees calmer, and prevents your first inspection from looking like slapstick comedyexcept the bees didn’t consent to being in your sketch.
The goal is not to buy every gadget in the catalog. The goal is to buy what you’ll actually use.
The most beginner-friendly hive style
In the U.S., the most common starter setup is the Langstroth hive (stacked boxes with removable frames). It’s widely supported, parts are easy
to find, and most mentors and local clubs know it well. That means help is available when you need it.
Starter checklist: what you need (and what can wait)
Must-haves:
- Hive components: bottom board, brood box(es), frames, foundation, inner cover, outer cover
- Entrance reducer (helps a new colony defend itself)
- Hive stand (keeps the hive off damp ground and makes inspections easier on your back)
- Protective gear: at minimum a veil; many beginners prefer a jacket or suit
- Hive tool (for prying boxes/frames stuck with propolis)
- Smoker (used properly, it helps keep bees calmer during inspections)
Nice-to-have soon:
- Feeder (especially helpful during installation or nectar shortages)
- Bee brush (gentle frame clearinguse with care)
- Simple record system (notebook, phone notes, or an app)
- Mite monitoring kit (you’ll want a consistent method early in the season)
Can wait until you know your style:
- Honey extracting equipment (many first-year colonies shouldn’t be harvested heavily)
- Fancy specialty tools and novelty hive gadgets
- Multiple hive styles “to experiment” (save experiments for year two)
Smoker safety (tiny campfire rules apply)
A smoker is useful, but it’s also literal fire. Use cool, clean-burning fuel, keep it away from dry grass and decks, and have a safe place to set it down.
Many beginners prefer to light it on a non-flammable surface and keep a water source nearby. Your goal: calm bees, not accidental backyard drama.
Step 4: Get Bees and Install Them the Smart Way
You’ve got a location. You’ve got equipment. Now comes the part where you acquire thousands of roommates who do not pay rent but will improve your garden’s
pollination and occasionally make honey. Fair trade.
Choose your bees: package vs. nuc
Most backyard beginners choose between:
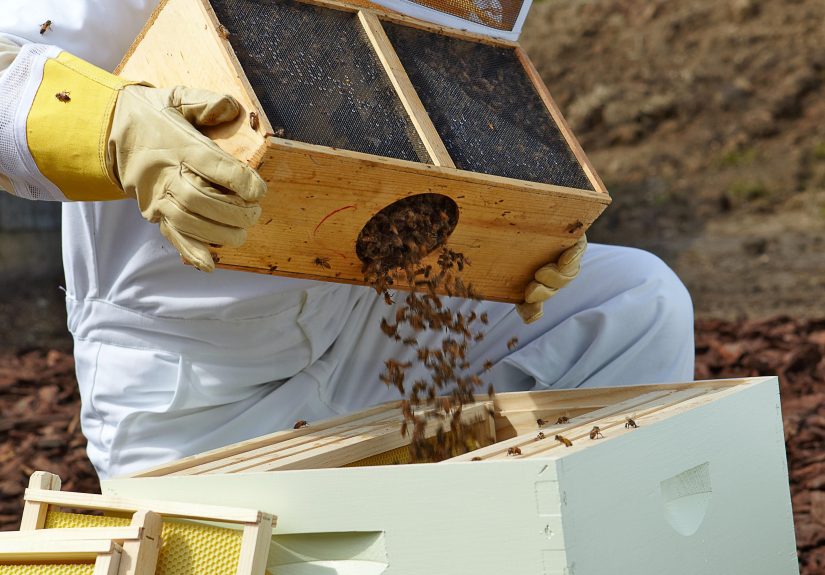
- Package bees: a screened box of worker bees with a queen in a cage. Often less expensive, but they need to build comb and organize from scratch.
- Nucleus colony (nuc): a small established colony on frames with brood, food stores, and a laying queen. Often easier for beginners because it’s already functioning like a mini-hive.
If your goal is “smoothest beginner experience,” a nuc often wins because it starts with brood and structure. Packages can do great too, but they may require
more feeding support early and careful monitoring while they build up.
Buy from reputable local sources when possible
Local bee suppliers and beekeeping clubs are often your best bet because their bees are adapted to your regional climate patterns and seasonal timing. They can also
tell you what to expect in your area: nectar flows, dearth periods, and common pests.
Installation day: keep it calm and simple
Installation varies depending on whether you have a nuc or a package, but the principles are the same:
- Install during mild weather (avoid cold rain or extreme heat if you can)
- Work smoothlyno sudden banging, no frantic waving
- Protect the queenshe’s the VIP and the colony’s future
- Feed if neededespecially if local forage is limited or the colony is building comb
Example timeline: Many U.S. beekeepers install bees in spring when conditions support growth. After installation, you typically check within the
first week or two to confirm the queen is laying and the colony is building. The goal is not to “do a full teardown inspection” every time; it’s to verify progress
and catch problems early.
Don’t skip feeding decisions (they’re not a moral test)
Some beginners worry that feeding sugar syrup is “cheating.” It’s not. Feeding is a management toolcommonly used when bees are building comb, during poor weather,
or in nectar dearth periods. If your local bloom isn’t strong yet, feeding can help the colony establish without stress.
Step 5: Keep Your Hive Healthy (And Your Neighbors Happy)
Starting is exciting. Maintaining is where beekeepers are made. Your job isn’t to micromanage bees; it’s to support a healthy colony and prevent
common problems from becoming expensive disasters.
Do consistent, not constant, inspections
During active season, many backyard beekeepers inspect about every 7–14 days. You’re typically looking for:
- Eggs and brood pattern (signs the queen is present and laying well)
- Food stores (nectar/honey and pollen)
- Space (are they crowded and thinking about swarming?)
- Pests and disease signs (especially mites)
Make Varroa mite monitoring non-negotiable
Varroa mites are one of the biggest drivers of colony loss in managed honey bee colonies. Many U.S. bee health organizations and extension resources emphasize
that you should monitor mite levels rather than guessing. Common methods include alcohol wash, soapy wash, and sugar shake. The details of thresholds
and treatment options can vary by region and season, so learn what your local program recommends and keep records.
The “simple” version: test regularly, track results, and act when needed. Waiting until the hive “looks bad” is usually waiting too long.
Reduce swarming risk with space and timing
Swarming is a natural way for colonies to reproduce, and it often happens when the hive is crowded and the colony is booming. Prevention strategies commonly focus on:
- Ensuring the colony has enough space (adding boxes/frames when appropriate)
- Watching for swarm cells during high-growth periods
- Keeping inspections consistent in spring and early summer
If a swarm does happen, don’t panic. Swarms can look dramatic, but they’re often focused on relocating rather than defending a hive. Your local beekeeping club may
even have a swarm call list.
Practice “good neighbor beekeeping”
Being a good neighbor with bees is mostly about thoughtful management:
- Provide water so bees don’t visit pools and birdbaths
- Manage flight paths with barriers if space is tight
- Keep gentle geneticsif a hive becomes overly defensive, consult a mentor about re-queening
- Communicatea quick, friendly heads-up can prevent misunderstandings
Harvest honey responsibly (sometimes the first-year “harvest” is learning)
Many first-year colonies are still building comb, raising brood, and storing enough food to survive seasonal changes. Depending on your region and colony strength,
you may harvest little or none the first yearand that can be the right call. A healthy, overwintered colony is worth far more than a few early jars.
Beginner Troubleshooting: “Is This Normal?” (Often Yes, Sometimes No)
Problem: Bees are hanging outside the hive in a “beard”
Often normal in warm weatherbearding helps ventilate the hive. Confirm they have water nearby and that the hive isn’t in full blazing afternoon sun with no airflow.
Problem: My bees are cranky
Defensive behavior can happen for lots of reasons: weather, nectar dearth, disturbances (mowers and vibrations), pests, or genetics. Avoid working hives on cold,
rainy, or very windy days. Keep your movements calm. If defensiveness persists, ask a mentor to evaluate the colonysometimes re-queening helps.
Problem: I’m overwhelmed by all the opinions
Welcome to beekeeping, where two beekeepers can watch the same hive and give three opinions. Anchor yourself to local extension guidance, your mentor, and your
own records. Consistency beats internet rabbit holes.
Real-Life Lessons From New Backyard Beekeepers (The Part Nobody Warns You About)
You asked for “simple steps,” and we deliveredbut real beekeeping comes with real-life plot twists. Below are the kinds of experiences beginners commonly report
after their first season. Think of this as the “director’s commentary” track: the stuff you learn when the bees stop being theoretical and start being, well… bees.
1) Your bees will pick a favorite water sourceand they’ll have opinions.
New beekeepers often discover that water matters as much as flowers. If you don’t provide a reliable, close water source early, scout bees may recruit the whole
colony to the most convenient option available. Sometimes that’s your shallow dish with pebbles. Sometimes it’s your neighbor’s sparkling pool that looks like a
luxury resort to an insect. Once bees establish a habit, it can take time to redirect themso the “set up water on day one” advice is not a cute suggestion.
2) The first inspection feels like defusing a tiny buzzing bomband then it gets easier.
Many beginners start out nervous: too much smoke, not enough smoke, gloves that make your hands feel like oven mitts, and a constant internal monologue of
“please don’t be mad.” The surprise is that your confidence often grows quickly. After a few inspections, you recognize patterns: what healthy brood looks like,
how bees behave when they’re calm, and how to move frames without pinching bees. You stop jumping at every buzz and start working with the colony’s rhythm.
3) Bees glue everything together because they’re tiny home-improvement contractors.
The first time you try to lift a box and it won’t budge, you’ll learn about propolisthe sticky “bee glue” used to seal drafts and fortify the hive.
This is why a hive tool becomes your best friend. Beginners commonly report that once they accept propolis as a lifestyle choice (not a personal attack), they
stop fighting it and start using good technique: prying slowly, loosening corners, and keeping equipment aligned.
4) Your best season is the one where you keep records.
The beekeepers who feel the most in control aren’t always the ones who inspect the mostthey’re the ones who write things down. Notes like “added second brood box,”
“saw eggs,” “fed syrup,” “mite test result,” and “temperament calm” help you connect cause and effect. Without records, you’re basically trying to remember a
mystery novel you read while juggling groceries. With records, you can spot trends and make better decisions.
5) Mites are the reality check you don’t get to skip.
New beekeepers sometimes hope mites won’t be “their problem,” especially if the hive looks active and busy. But many experienced programs emphasize that mites can
build quietly until the colony suddenly declines. Beginners who develop the habit of regular mite monitoring tend to feel more empoweredeven when results aren’t
perfectbecause they’re making decisions based on data, not vibes.
6) You’ll become weirdly invested in the weather and the bloom schedule.
Backyard beekeepers often report that they start noticing seasonal shifts more intensely: when the neighborhood trees bloom, when clover appears, when the yard
goes quiet during a nectar dearth, and when a warm spell triggers sudden hive growth. You’ll also learn that a week of rain can change everythingfeeding decisions,
inspection timing, and the colony’s mood. It’s not just “keeping bees.” It’s learning the calendar of your local ecosystem.
7) The most satisfying “harvest” is often the moment you realize your bees are thriving.
Yes, honey is wonderful. But many new beekeepers say the biggest win is opening the hive and seeing solid brood, steady food stores, calm behavior, and strong comb
building. That’s the moment it clicks: you’re not just owning a hiveyou’re managing a living community successfully. Honey tastes even better when it’s built on
healthy hive habits.
Conclusion: Your Backyard Can Be a Bee-Friendly Success Story
Starting a beehive in your backyard isn’t about perfectionit’s about thoughtful basics done consistently. Plan ahead, pick a smart location, buy the right
beginner gear, install bees carefully, and commit to health management (especially mite monitoring). Add water, space, and neighbor-friendly flight paths, and
you’ll set yourself up for a colony that’s productive, calm, and genuinely fun to keep.
And when something unexpected happensas it willremember: beekeeping is a skill, not a personality test. Learn, adjust, ask for help, and keep going. The bees
have been figuring things out for millions of years. You can handle your first season.




