Table of Contents >> Show >> Hide
- Before You Decorate: Quick Mum Basics That Make Displays Last
- Design Moves That Make Mums Look Expensive (Even If They Were Not)
- 17 Outdoor Decorating Ideas Using Fall Mums
- Create a “Stair-Step Mum Mountain”
- Flank the Front Door With Matching Statement Pots
- Layer Mums With Pumpkins (The “Autumn Power Couple”)
- Use Hay Bales as Instant Plant Pedestals
- Build a Rustic Crate “Mum Wall”
- Make a Porch Corner Harvest Vignette
- Refresh Window Boxes With Mums + Trailers
- Try Hanging Baskets for Vertical Fall Color
- Dress Up the Mailbox or Gate Post
- Create a Mum “Runway” Along a Walkway
- Use a Tiered Plant Stand (or a Ladder) for a Mini Mum Gallery
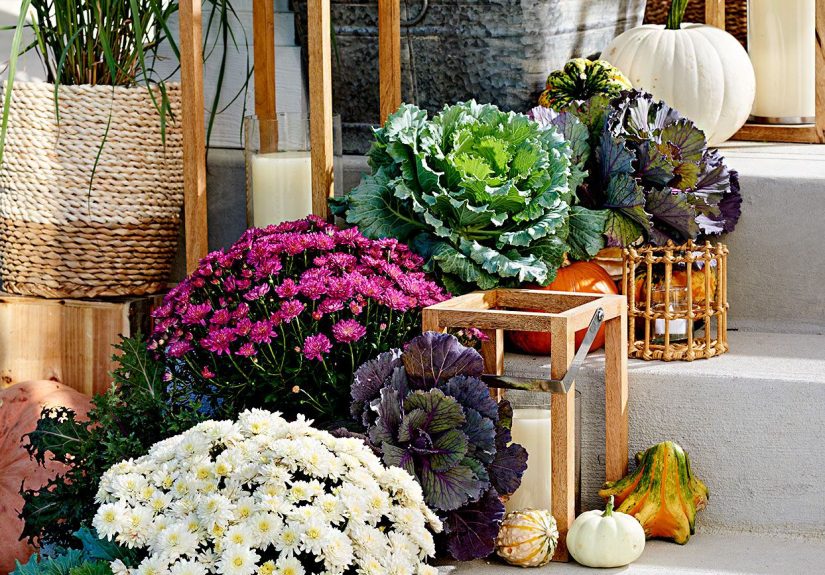
- Mix Mums With Ornamental Kale for Texture
- Add Ornamental Grasses for Height and Movement
- Make a Patio Centerpiece in a Galvanized Tub
- Turn Your Outdoor Dining Table Into a Fall Display
- Use Lanterns and Warm Lighting to “Glow Up” Your Mums
- Plan a “Second Act” So Your Decor Doesn’t End on Trash Day
- Common Mistakes That Make Outdoor Mum Decor Fizzle Fast
- Extra: Real-Life “What You’ll Notice” Experiences When Decorating With Fall Mums Outdoors (About )
- Conclusion: Your Porch’s Fastest Fall Upgrade
If autumn had a mascot, it would be a mum. They’re cheerful, they’re fluffy, and they show up right when your porch starts looking like it forgot to dress for the season. The best part? Decorating with fall mums outdoors is basically “instant curb appeal” with roots.
Whether you’ve got a grand wraparound porch or a front step the size of a pizza box, mums can make your outdoor space feel warm, welcoming, and intentionally seasonallike you planned it, not like you panic-bought plants five minutes before guests arrived.
This guide brings you 17 creative, practical, and photo-ready ways to style mums outsideplus real-life tips to keep them looking good longer (because nobody wants “crispy mum regret” by mid-October).
Before You Decorate: Quick Mum Basics That Make Displays Last
Great outdoor mum decor starts with keeping the plants happy. A few small choices can turn a one-week display into a “wow, these are still going?” situation.
Pick the right mums (and the right moment)
- Choose plants with lots of tight buds, not mostly-open blooms. Bud-heavy mums typically last longer once you bring them home. (More “slow-burn romance,” less “one-night bloom.”)
- Plan for full sun: most mums want about 6 hours of sunlight for the best bloom show.
- Think drainage like it’s your job. Mums love moist soil, but soggy roots are a fast track to sadness.
Water like a pro (not like a sprinkler)
- Check moisture with a finger test: water when the top feels dry, then water thoroughly.
- In warm early-fall weather, potted mums can need frequent wateringsometimes more than once a day.
- When possible, water at the base and earlier in the day to help foliage dry (a helpful habit for reducing disease issues).
Deadhead for the “freshly styled” look
Pinch or snip off spent blooms and tired leaves so the plant keeps looking full and tidy. It’s the plant version of brushing your hair before a photo.
Use microclimates to your advantage
Porches, eaves, corners near walls, and sheltered entryways can protect mums from wind and light frosts. Grouping pots also helps, especially on chilly nights.
Design Moves That Make Mums Look Expensive (Even If They Were Not)
- Repeat colors (2–3 main mum colors) to create a cohesive look.
- Vary height (ground + step + stand) for instant “designer porch” energy.
- Mix textures (ornamental kale, grasses, gourds, lanterns) so it’s not just “flower blobs.”
- Use odd numbers in clusters (3 or 5 pots) for a more natural, styled arrangement.
17 Outdoor Decorating Ideas Using Fall Mums
-
Create a “Stair-Step Mum Mountain”
Line steps with mums in staggered heightssmall pots on top steps, medium in the middle, big and fluffy at ground level. Add one trailing plant (like ivy) at the edge so it spills over like it’s casually expensive.
Example palette: deep burgundy + golden yellow + creamy white for a classic fall mix.
-
Flank the Front Door With Matching Statement Pots
Two identical planters (urns, tall pots, even large baskets) instantly make an entry feel “finished.” Pick one mum color for each side for symmetry, then add a second texturelike ornamental grassto give height and movement.
Tip: Put pots on risers or hidden bricks if your door area floods; mums hate wet feet.
-
Layer Mums With Pumpkins (The “Autumn Power Couple”)
Cluster mums with pumpkins in different sizes. Place the largest pumpkins near the back, smaller ones toward the front, and tuck mini gourds between pots like confetti that doesn’t get vacuumed.
Style idea: White mums + white pumpkins + one deep green gourd = chic, not kitsch.
-
Use Hay Bales as Instant Plant Pedestals
Hay bales give height fast. Place one bale on each side of the porch, top with a mum pot and a pumpkin stack. Add a lantern at the base so it looks intentional, not like you’re starting a tiny farm.
Reality check: Hay can drop seeds and get messykeep it on a mat or tray for easier cleanup.
-
Build a Rustic Crate “Mum Wall”
Stack wooden crates (or sturdy boxes) in a stepped pattern. Set mums inside at different levels and add a few small pumpkins on ledges. The result looks curated, like a boutique fall display… minus the boutique pricing.
Safety tip: Secure stacked crates so they don’t wobble in wind.
-
Make a Porch Corner Harvest Vignette
Choose one corner and go all in: one chair, one cozy throw, one lantern, and three mum pots at different heights. Add a basket of gourds at the base. Corner vignettes are perfect for small porches because they feel designed without blocking the walkway.
Pro move: Keep one “breathing space” (empty floor area) so it doesn’t look crowded.
-
Refresh Window Boxes With Mums + Trailers
If you have a window box, swap tired summer plants for compact mums plus a trailing accent (ivy, creeping jenny, or sweet potato vine in warmer areas). Mums provide the color “punch,” trailing plants soften the edges.
Best for: Smaller mum varieties that won’t flop out of the box.
-
Try Hanging Baskets for Vertical Fall Color
Yes, fall hanging baskets are a thing. Use hardy mums as the “mounded” center and pair with cold-tolerant companions like pansies. It’s an easy way to add color without using floor space.
Reminder: Hanging baskets dry out fastercheck moisture often.
-
Dress Up the Mailbox or Gate Post
A small planter at the base of a mailbox or gate post looks charming and makes the whole yard feel styled. Use one mum in a bold color (like rusty orange) and add a small pumpkin tucked beside it.
Bonus: This is also a great spot for solar path lights nearby.
-
Create a Mum “Runway” Along a Walkway
Line the walkway with matching pots every few feet. You don’t need a tontwo pots near the sidewalk + two near the steps can create a “path” effect. Keep it simple: one pot style, one mum color.
Best look: Deep red mums against natural stone or brick.
-
Use a Tiered Plant Stand (or a Ladder) for a Mini Mum Gallery
Plant stands and ladders give you height variation without stacking random objects like a porch raccoon. Place smaller mums on higher tiers, larger mums at the bottom, and scatter mini pumpkins on empty tiers.
Tip: Add one leafy plant (like kale) for contrast so it’s not all flowers.
-
Mix Mums With Ornamental Kale for Texture
Ornamental kale/cabbage brings ruffled, cool-weather drama that pairs perfectly with mums. Use kale as a “filler” around the base of a mum in a larger container for a lush, layered look.
Color combo: Purple kale + yellow mums = high contrast, very fall.
-
Add Ornamental Grasses for Height and Movement
Grasses make arrangements look airy and designed. Place a grass in the back of a pot, a mum in the middle, and a trailing plant at the front. Suddenly you have a “container recipe” instead of a lonely mum sitting there like it got stood up.
-
Make a Patio Centerpiece in a Galvanized Tub
For decks and patios, group small mum pots in a large galvanized tub or wide planter. Add pinecones, mini gourds, and one lantern beside it. This works especially well near outdoor seating areas or a fire pit.
Easy maintenance: Keep mums in their nursery pots inside the tub so you can remove them to water.
-
Turn Your Outdoor Dining Table Into a Fall Display
Line the center of the table with small mum pots (or one long planter) and weave in faux leaves or mini pumpkins. It’s festive without being “giant turkey centerpiece.”
Real-world advice: Keep the display low so people can see each other while eating.
-
Use Lanterns and Warm Lighting to “Glow Up” Your Mums
Mums look extra cozy under warm light. Add battery candles in lanterns, string lights along the railing, or a single spotlight aimed at your main mum cluster. The blooms look fuller at night, and your porch becomes a fall movie set.
Style tip: Use black or aged brass lanterns for a classic look.
-
Plan a “Second Act” So Your Decor Doesn’t End on Trash Day
If you bought hardy garden mums, you may be able to plant them in the ground for a chance at returning next year (timing and climate matter). If keeping them in containers, protect roots from hard freezes by moving pots to a sheltered location or overwintering in a protected spot like an unheated garage, depending on your region.
Decor win: Choose containers you’ll reuse, then swap in winter greens when mums fade.
Common Mistakes That Make Outdoor Mum Decor Fizzle Fast
- Letting them dry out: mums in pots can wilt quickly; consistent moisture is key.
- Using pots with no drainage: pretty cachepots are fine, but keep the plant in a draining nursery pot inside.
- Placing them in too much shade: fewer blooms and a leggier shape; aim for about 6 hours of sun.
- Ignoring changing fall light: longer shadows can turn “sunny” into “meh” as the season progresses.
- Not deadheading: spent blooms make the whole display look tired faster.
Extra: Real-Life “What You’ll Notice” Experiences When Decorating With Fall Mums Outdoors (About )
Decorating with mums looks effortless in photos. In real life, it’s still easybut there are a few “ohhh, that’s how it works” moments you’ll probably experience the first time you do it. Consider this your friendly heads-up from the school of autumn curb appeal.
1) Mums are thirsty in a way that feels personal. On warm early-fall days, potted mums can dry out faster than you’d expectespecially if they’re on concrete, in a windy spot, or in small nursery pots. The leaves may droop dramatically (they’re theatrical like that), then perk back up once watered. The lesson you learn quickly: a beautiful porch display needs a quick daily check, not a weekly hope-and-prayer routine.
2) Your “sunny porch” might not be sunny anymore. Fall light changes. Trees start casting longer shadows, and the sun angle shifts. A spot that blasted sun in July can become surprisingly shady in October. If your mums start looking less bloom-happy, try sliding pots a few feet to a brighter area. Sometimes the fix is literally just moving the plant like two porch tiles over.
3) Rain can make blooms look messyso placement matters. A hard rain can flatten flowers, splatter dirt, and turn your pristine display into “wet dog, but floral.” If you can, tuck mums under an eave or use them closer to a wall where they’re slightly protected. Water at the base helps too, because wet foliage overnight can invite problems.
4) Height is the difference between “nice” and “wow.” This is the biggest styling revelation: putting everything on the ground makes it look like you just unloaded a garden center cart. The moment you elevate even one poton a step, a crate, a bale, a standthe whole scene gains depth. Your brain reads it as “decor,” not “plants waiting to be planted.” That’s why designers love varying heights for porch displays.
5) You’ll end up with a “watering strategy.” After one week, most people naturally invent a system: keep mums in nursery pots so they can be lifted out to water; group pots together so you’re not walking a watering can around like it’s a fitness plan; add saucers (or hidden trays) so runoff doesn’t stain steps. You’ll also notice that big pots hold moisture longer and look fuller, while small pots dry quickly and demand attention like a needy houseplant on a hot date.
6) The best displays are modular. The smartest real-life setup is one you can adjust. Guests coming? Slide pumpkins forward, straighten pots, swap a tired mum with a backup. Cold night coming? Pull the pots closer to the house or cluster them together. Great outdoor mum decor is less like a sculpture and more like a little seasonal stage seteasy to tweak, easy to refresh, always ready for a photo.
Conclusion: Your Porch’s Fastest Fall Upgrade
Decorating with fall mums outdoors is one of the quickest ways to make your home feel warm, welcoming, and seasonally styled. Start with healthy, bud-filled plants, give them sun and consistent water, and then have fun with height, texture, and cozy fall companions like pumpkins, lanterns, baskets, and grasses.
Pick two or three colors, repeat them across your space, and build your display in layerslow, mid, and tall. With a little care (and a tiny bit of deadheading), your mums can carry your curb appeal through the best part of the season: sweater weather, golden light, and all the “aww, your porch is so cute” compliments.




