Table of Contents >> Show >> Hide
- The short answer: aim for yearly, adjust for real life
- Why dryer vent cleaning matters (beyond “because Mom said so”)
- Dryer vent vs. lint trap: what you’re cleaning (and what you’re not)
- Signs your dryer vent needs cleaning now (not “someday”)
- How to clean your dryer vent (DIY-friendly, if your setup is simple)
- When it’s smarter to hire a professional
- Common myths that keep vents dirty
- A simple “set it and forget it” reminder plan
- Bottom line: how often should you clean your dryer vent?
- Real-World Dryer Vent Cleaning Experiences (What People Commonly Notice)
- Experience #1: The “Why are towels still damp?” household
- Experience #2: Pets + lint = the world’s worst felt project
- Experience #3: The long vent run that turns lint into a “traffic jam”
- Experience #4: The “Check Vent” alert that finally got someone’s attention
- Experience #5: The “I cleaned the lint trap, what more do you want?” surprise
Your dryer vent is the hardworking background character of laundry day: it never asks for credit, it just quietly
hustles hot air and moisture out of your house. But if it gets clogged with lint (a.k.a. the world’s most flammable
confetti), that “quiet hustle” can turn into slow drying, higher energy bills, andworst casefire risk.
The U.S. Fire Administration has reported an estimated 2,900 dryer fires a year in residential buildings (based on
2008–2010 data), and “failure to clean” shows up as a leading contributing factor. In other words: cleaning your vent
isn’t just a “nice-to-have.” It’s a basic home safety habit that also makes laundry faster and less annoying.
The short answer: aim for yearly, adjust for real life
For most households, cleaning the dryer vent at least once a year is the best baseline. If your dryer
runs constantly (big family, pets, sports uniforms, towels that could qualify as blankets), plan on cleaning it
every 6 months. If you use your dryer lightly and your vent run is short and straight, you still
shouldn’t “set it and forget it”inspect regularly and clean as needed.
A practical cleaning schedule you can actually follow
- Every load: clean the lint screen (yes, every timeno one loves this chore, but everyone loves not having a dryer fire).
- Every 1–3 months: quick check of the exterior vent flap (it should open freely when the dryer runs).
- Every 3–6 months: clean the lint-trap housing area (under/around the lint screen) if you’re a heavy user, have pets, or notice lint sneaking past the screen.
- Every 6–12 months: clean the full vent duct (most homes fall hereannual is the common “sweet spot”).
| Household situation | Recommended vent-cleaning frequency | Why |
|---|---|---|
| Average use (a few loads per week), short straight vent | Every 12 months | Prevents gradual lint buildup; keeps airflow efficient |
| Large household, frequent loads, lots of towels/bedding | Every 6 months | High lint output + heavy fabrics clog vents faster |
| Pets (especially heavy shedders) | Every 6–9 months | Hair mats up with lint and sticks inside ducting |
| Long vent run, multiple elbows, roof termination | Every 6–12 months (inspect more often) | More turns = more places for lint to collect and restrict airflow |
| Light use (rare dryer runs) | Inspect quarterly; clean every 12–24 months as needed | Still risks nesting, debris, and slow accumulation |
Why dryer vent cleaning matters (beyond “because Mom said so”)
1) Fire prevention: lint + heat is a bad duo
Lint is highly flammable, and restricted airflow can cause heat buildup. Safety agencies warn that lint can build up
in the dryer or exhaust duct, block airflow, and contribute to overheating and fires. The NFPA’s safety guidance also
emphasizes keeping exhaust venting unobstructed and checking that the outdoor flap opens properly.
2) Faster drying and lower energy costs
When the vent is partially clogged, your dryer has to work harder and longer to move moist air out. That can turn a
normal 45-minute cycle into a 90-minute grudge match with a damp hoodie. Clean airflow helps clothes dry faster and
keeps the machine from running marathon cycles.
3) Longer dryer life (and fewer “why is this making that noise?” moments)
Longer run times and overheating stress components like heating elements, fuses, and thermostats. Keeping airflow
strong can reduce wear and tearaka fewer repair calls and fewer times you Google “dryer smells weird help.”
4) Moisture control (and less “laundry room sauna” vibes)
Poor venting can dump heat and humidity where you don’t want it. That can mean a musty smell, damp walls, or lint
dust clinging to everything like it pays rent.
5) Extra note for gas dryers
A properly installed, properly vented gas dryer should exhaust outdoors. Incorrect installation or venting issues can
create indoor air hazards. If you have a gas dryer and you suspect venting problems, treat it as a higher-stakes
situation and consider professional help.
Dryer vent vs. lint trap: what you’re cleaning (and what you’re not)
The lint screen (lint trap) catches a lotbut not allof the fibers your clothes shed. Fine lint and dust can slip
past the screen and collect in the lint-trap housing, the transition duct behind the dryer, and the vent line running
to the outdoors. That’s why “I clean the lint screen every time!” is great…but not the finish line.
Signs your dryer vent needs cleaning now (not “someday”)
- Drying takes longer than normal or you need two cycles for a normal load.
- Clothes feel unusually hot at the end of a cycle.
- The laundry room feels humid or smells musty.
- You notice a burning smell (stop the dryer and investigate).
- The outside vent flap barely opens or you feel weak airflow outside.
- More lint than usual behind the dryer or on the floor nearby.
- Your dryer shows a “check vent”/airflow alert (common on newer models).
How to clean your dryer vent (DIY-friendly, if your setup is simple)
You don’t need to be a wizardjust careful, patient, and willing to move a heavy appliance without reinventing your
spine. If your vent run is short and accessible, DIY cleaning is doable.
Step 1: Safety first
- Unplug the dryer (and shut off gas, if applicable).
- Let the dryer cool completely if it’s been running.
- Pull the dryer away from the wall gentlydon’t crush the duct.
Step 2: Clean the lint screen and lint-trap housing
- Remove lint from the screen.
- Vacuum inside the lint-trap opening (a crevice tool helps).
- If the screen seems “waxy” (often from dryer sheets), wash it with warm soapy water, rinse, and dry fully.
Step 3: Disconnect the transition duct behind the dryer
This is the short duct that connects the dryer to the wall/vent line. Loosen clamps, disconnect, and vacuum out lint.
Inspect for crushing, kinks, or tears. If it’s flimsy foil or plastic accordion-style ducting, consider replacing it
with a safer metal option.
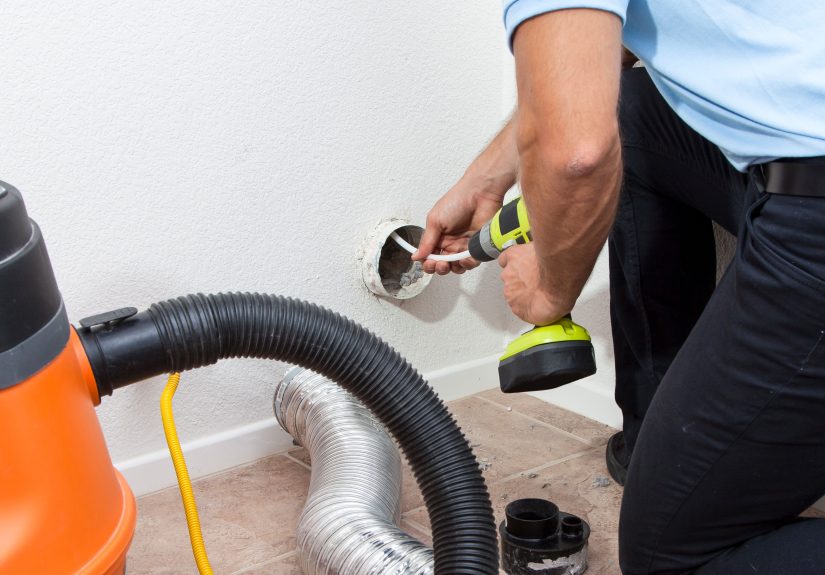
Step 4: Brush and vacuum the vent line
- Use a dryer vent brush kit sized for your duct.
- Work from the dryer side, the outside side, or bothwhichever gives better access.
- Vacuum as you go to capture loosened lint (a shop vac is ideal).
Step 5: Clean the outside vent hood
- Remove lint buildup and make sure the flap opens freely.
- Look for bird nesting material or debris.
- Make sure the termination isn’t blocked by a lint-clogging screen.
Step 6: Reconnect and test airflow
- Reconnect ducting securely with clamps/metal tape (not standard “duct tape,” which can fail over time).
- Push the dryer back without crushing the duct.
- Run the dryer and check outside: strong airflow + flap opening = good sign.
When it’s smarter to hire a professional
DIY is greatuntil your vent line runs 20 feet through a crawl space, turns into a mystery maze of elbows, and exits
on a roof you’d rather admire from the ground. Consider professional dryer vent cleaning if:
- The vent is long, has multiple bends, or terminates on a roof.
- You can’t access the full run of ducting.
- You suspect a serious blockage (or you’re getting repeated airflow alerts).
- You have a gas dryer and aren’t confident about safely disconnecting/reconnecting.
- You’ve had a vent-related issue before (birds, moisture, recurring lint buildup).
Bonus: pros often check duct condition, connections, and airflowuseful if your setup is older or was installed
“creatively.”
Common myths that keep vents dirty
Myth 1: “I clean the lint trap, so I’m good.”
Cleaning the lint trap is essential, but lint still accumulates beyond it. The vent line needs attention tooespecially
over time.
Myth 2: “I’ll clean it when the dryer stops drying.”
That’s like waiting to change your car’s oil until the engine writes you a resignation letter. Vent cleaning works best
as prevention: annual cleaning is simpler than emergency unclogging.
Myth 3: “Any ducting is fine.”
Smooth metal venting supports better airflow and traps less lint than cheap accordion-style materials. If your ducting
looks like a shiny slinky from a party store, upgrading is a smart safety move.
A simple “set it and forget it” reminder plan
- Pick a memorable month: Many people choose a seasonal reset (spring cleaning or early fall).
- Pair it with another habit: Smoke alarm checks, HVAC filter change, or deep-clean day.
- Use performance cues: If drying time creeps up, don’t ignore itinspect the vent.
- Keep a basic kit handy: Vent brush + vacuum attachments = fewer excuses.
Bottom line: how often should you clean your dryer vent?
If you want a clean, confident answer: clean your dryer vent at least once a year. Move to
every 6 months if you’re a heavy dryer user, have pets, or have a long/complicated vent run. And
don’t skip the basics: lint screen every load and regular airflow checks outside.
It’s one of those rare home maintenance tasks that pays you back immediately: faster drying, less wear on your dryer,
and a safer laundry room. Not bad for something that takes less time than scrolling “just one more” video.
Real-World Dryer Vent Cleaning Experiences (What People Commonly Notice)
Because dryer vent cleaning is a behind-the-scenes chore, most people don’t think about it until something feels off.
And the funny thing is, once the vent is cleaned, a lot of folks have the same reaction: “Wait… my dryer can do that?”
Here are a few common, real-life-style scenarios homeowners often reportand what you can learn from them.
Experience #1: The “Why are towels still damp?” household
A family runs multiple loads a dayschool clothes, workout gear, towels, bedding. At first, drying time creeps up so
slowly it’s easy to blame the laundry (or the laws of physics). Then it becomes normal to run two cycles for towels.
After a vent cleaning, the dryer suddenly finishes the same towel load in one cycle again. The lesson: when you’re
doing lots of laundry, semi-annual vent cleaning can prevent the slow slide into “laundry takes
forever” life.
Experience #2: Pets + lint = the world’s worst felt project
Pet owners often notice more lint “snowdrifts” behind the dryer, especially during shedding season. Hair tangles with
lint and can form thick mats inside the transition duct and elbowslike a tiny, stubborn rug that refuses to move.
People in this situation tend to do best with a 6–9 month cleaning rhythm and a quick exterior vent
check more often. The bonus win: less pet hair in the laundry room means fewer random tumbleweeds rolling under your
feet.
Experience #3: The long vent run that turns lint into a “traffic jam”
Homes where the dryer vent travels a long distance (or snakes around beams and corners) often feel “fine” for a while,
then suddenly struggle. What’s happening is simple: turns and long runs give lint more places to settle, and once the
airflow drops, even more lint sticks. Homeowners often report a noticeable difference after cleaningstronger airflow
at the outside vent flap and fewer “the dryer feels hot” moments. The takeaway: if your vent route is complicated,
inspect more often and don’t treat annual cleaning as optional.
Experience #4: The “Check Vent” alert that finally got someone’s attention
Newer dryers with airflow sensors can feel like a mildly judgmental coach: “Check Vent.” “Check Vent.” “CHECK VENT.”
People who ignore the alert often end up with longer dry times and hotter cycles. After cleaning (especially the
outside termination and the transition duct), the alert clears and performance improves. The lesson here is not “trust
technology with your whole heart,” but rather: if your dryer is warning you, it’s probably not doing it for fun.
Experience #5: The “I cleaned the lint trap, what more do you want?” surprise
Many homeowners are diligent about the lint screen and still get shocked by what comes out of the vent line. A common
story: someone pulls the dryer away for the first time in years, disconnects the duct, and finds a lint pile that
looks like it could be used as pillow stuffing. After cleaning, they notice the dryer runs cooler and finishes loads
faster. The takeaway: lint screen cleaning is necessary, but it’s not the whole system. Think of it
like brushing your teeth but never flossingnice effort, incomplete victory.
The consistent theme in these experiences is simple: dryer vents don’t usually fail loudly; they fail gradually. If
you adopt a yearly (or semi-yearly) cleaning habit, you’re far more likely to avoid the dramatic “why is everything
taking two cycles?” phaseand you’ll keep your laundry routine boring in the best possible way.




